Chicken Spring Rolls Recipe That is Packed with Flavour
Make crispy chicken spring rolls at home with this easy step-by-step recipe. Golden wrapper, juicy filling, perfect for parties. Get the full recipe now.
 Tripti Srivastava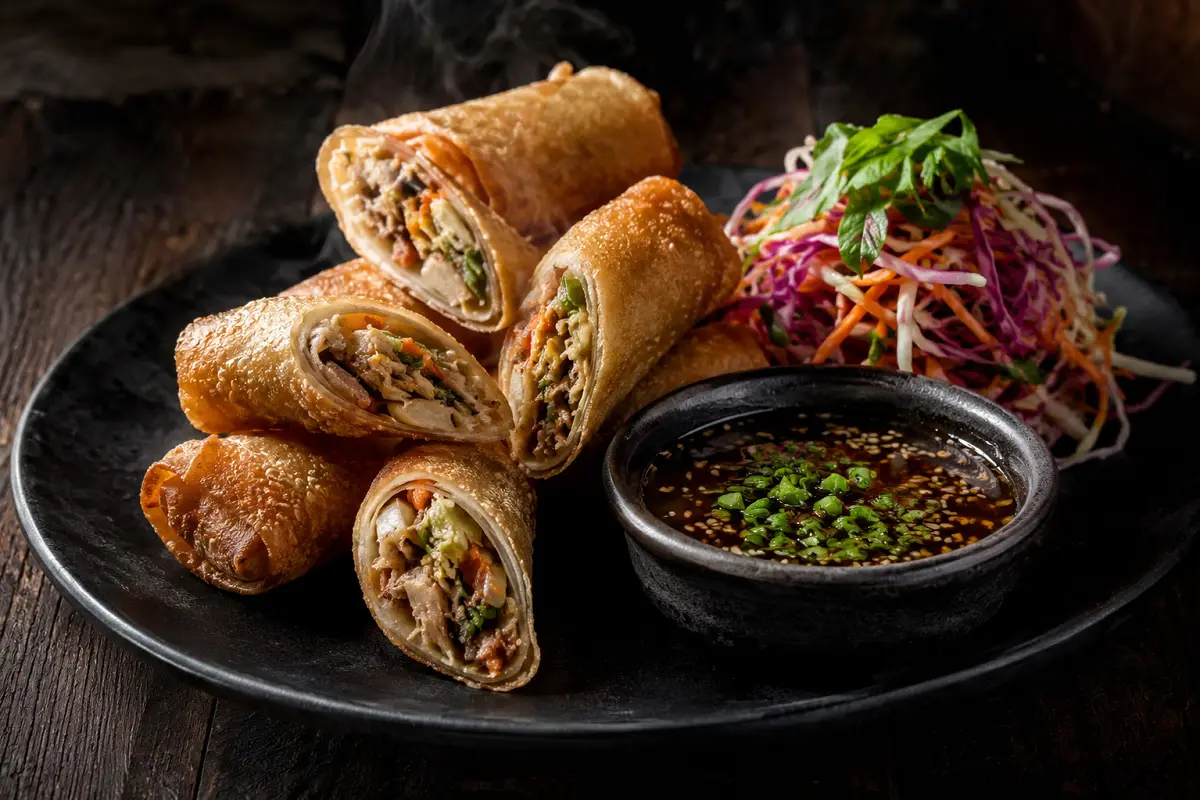
There is a very specific sound that tells you a spring roll is going to be good that sharp, definitive crack when you bite through the wrapper. Not a soft bend, not a slow give, but a clean, confident crack that sends tiny flakes of golden pastry in every direction. If your spring rolls have ever come out soft, greasy, or disappointingly pale, this recipe exists to fix all of that.
Chicken spring rolls are one of the most universally loved party snacks across India whether you call them spring rolls, Chinese rolls, or just "those crispy things" and the gap between a mediocre version and a genuinely great one comes down almost entirely to technique rather than ingredients. The filling needs to be completely dry before it goes into the wrapper. The oil needs to be at exactly the right temperature. And the rolling needs to be tight enough that the wrapper fuses to itself rather than puffing away from the filling during frying.
This recipe gives you all of that a seasoned Indo-Chinese style chicken and vegetable filling, the complete rolling SOP, a precise frying guide, and a full presentation guide for everything from a quick weeknight snack to a party platter that looks like it came from a restaurant. These spring rolls are also freezer-friendly, which means you can make a large batch, freeze them before frying, and have restaurant-quality spring rolls ready in under 15 minutes any night of the week.
What Makes These Chicken Spring Rolls Special
Crispy spring rolls are not an accident they are the result of a handful of specific technique decisions made at each stage of the recipe. Here is what this version does differently:
- Moisture management in the filling: The single biggest reason home spring rolls turn soggy is a wet filling. This recipe uses a specific cooking sequence high heat, short cooking time, draining, and a final spread-and-cool step to remove every drop of excess moisture from the filling before it touches the wrapper. A dry filling is the foundation of a crispy roll.
- The cornstarch seal: A thick cornstarch-water paste is used to seal the final fold of the wrapper. This creates a strong, waterproof bond that holds through deep frying without the wrapper opening at the seam which is what causes the filling to spill out and the oil temperature to drop.
- Oil temperature precision: Frying at exactly 170–175°C gives you a wrapper that crisps from the outside in without burning. Too hot and the wrapper burns before the seam seals; too cool and the wrapper absorbs oil before it crisps, giving you a greasy, soft result.
- Double-fry option for maximum crunch: A quick first fry to set the wrapper and seal the filling, followed by a second high-heat fry just before serving, produces the restaurant-level crunch that single-fry home cooking rarely achieves. This is the technique used in professional kitchens for service spring rolls.
- Freezer-ready construction: The recipe is structured so you can roll all the spring rolls, freeze them in a single layer, and fry directly from frozen which makes this one of the best batch-cook party recipes in the entire Indo-Chinese repertoire.
Ingredients Overview
The filling is built on boneless chicken mince or finely chopped chicken breast mince gives a more uniform texture and distributes through the vegetables evenly, while finely chopped breast gives more texture contrast with identifiable pieces of chicken in every bite. Both work; the choice is personal.
The vegetable base is the classic Indo-Chinese trinity: shredded cabbage, julienned carrots, and thinly sliced spring onions. Cabbage provides the bulk and absorbs the seasoning beautifully; carrots add colour, sweetness, and textural contrast; spring onions add freshness and a mild onion note at the finish. Bean sprouts are a traditional addition they add crunch and moisture, but because of their high water content they must be very well-drained before use or they will make the filling wet.
The seasoning is a straightforward Indo-Chinese profile: soy sauce for depth and saltiness, white pepper for heat without colour, oyster sauce for body and umami, and a drop of sesame oil at the end for the distinctive toasty fragrance that defines the Indo-Chinese kitchen. Oyster sauce is available at any supermarket in the Asian foods aisle and is one of the most useful condiments to keep in the pantry for stir-fry cooking.
For the wrappers, use ready-made spring roll pastry sheets (not rice paper wrappers, which are for fresh Vietnamese rolls). Spring roll pastry sheets are available frozen at Indian grocery stores and most supermarkets with an Asian foods section. Thaw them in the fridge overnight and keep them covered with a damp cloth while you work they dry out and crack very quickly when exposed to air.
How to Make It
Cook the chicken and vegetable filling over high heat, season precisely, spread it out to cool completely, and ensure it is completely dry before rolling. Roll tightly with the cornstarch seal, fry at 170–175°C until golden, drain, and serve immediately with your choice of dipping sauces. The entire process takes about one hour from start to first bite.
The filling can be made a day ahead and refrigerated in fact, a chilled filling is significantly easier to roll than a warm one because it holds its shape on the wrapper without steaming or softening the pastry before it hits the oil.
Also Read: Chicken Malai Boti Recipe
Tips for Best Results
- Cook the filling over the highest heat your stove allows. High heat evaporates moisture as it is released from the vegetables. Medium heat causes the vegetables to sweat and steam, resulting in a wet filling that will make the wrapper soggy.
- Spread the cooked filling on a wide tray and let it cool completely before rolling. Steam from a hot filling is the second major cause of soggy wrappers the steam softens the pastry from the inside before the spring roll ever reaches the oil.
- Keep unused wrappers covered with a damp cloth at all times. Spring roll pastry dries out in minutes and becomes brittle and impossible to fold without cracking. A damp cloth laid over the stack keeps them pliable throughout the rolling process.
- Roll tightly tighter than you think necessary. A loose roll has air pockets between the filling and the wrapper. When the roll hits hot oil, the air expands, the wrapper puffs away from the filling, and the seam splits. A tight roll holds its structure through the entire frying process.
- Do not fry more than four or five spring rolls at a time. Adding too many rolls at once drops the oil temperature dramatically, and the wrappers absorb oil before they can crisp the exact result you are trying to avoid. Fry in small batches and allow the oil to return to temperature between batches.
- Drain on a wire rack, not kitchen paper. Paper traps steam under the spring rolls and softens the bottom. A wire rack lets air circulate all around, keeping the entire surface crispy from the moment the rolls leave the oil.
Serving Suggestions
Serve chicken spring rolls immediately after frying with two dipping sauces for contrast: a sweet chilli sauce and a dark soy-ginger dipping sauce (equal parts soy sauce and rice vinegar, a teaspoon of sesame oil, a pinch of sugar, and freshly grated ginger). The sweet chilli sauce appeals to everyone; the soy-ginger sauce is for the sauce enthusiasts at the table who want something more complex.
For a full Indo-Chinese meal, serve alongside chicken fried rice and Manchurian gravy the spring rolls as a starter, the fried rice and Manchurian as the main. As a party platter, stand the spring rolls upright in a tall glass or arrange them in a fan on a flat board, cutting every other roll diagonally in half to reveal the colourful filling cross-section this detail makes a simple platter look immediately more inviting and helps guests see what is inside before they commit to picking one up.
For a lighter option, these spring rolls also bake and air-fry very well instructions for both methods are included in the directions below.
Storage and Reheating
Store cooked spring rolls in an airtight container in the fridge for up to 2 days. To reheat, place on a wire rack in the oven at 200°C for 8–10 minutes, or in the air fryer at 190°C for 5–6 minutes. Do not microwave cooked spring rolls the wrapper turns irreversibly soft and loses all of its crunch.
For uncooked, rolled spring rolls: these freeze exceptionally well. Lay them in a single layer on a lined tray, freeze until solid (approximately 2 hours), then transfer to zip-lock bags. They keep for up to 2 months in the freezer. Fry directly from frozen at 160°C for the first 3 minutes (to prevent the wrapper from cracking), then increase to 175°C for a further 4–5 minutes until golden and cooked through. No thawing required.
Variations and Substitutions
- Vegetarian spring rolls: Replace the chicken mince with an equal weight of finely chopped firm tofu or extra vegetables (mushrooms, baby corn, and shredded bamboo shoots work beautifully). Use vegetable oyster sauce or hoisin sauce in place of regular oyster sauce. All other steps and techniques remain identical.
- Baked spring rolls: Brush the assembled spring rolls generously on all sides with neutral oil. Bake at 200°C on a wire rack for 20–22 minutes, flipping halfway through, until golden and crispy. The wrapper will not be quite as shatteringly crisp as the fried version but is significantly lighter and very good for everyday cooking.
- Air fryer spring rolls: Preheat air fryer to 200°C. Spray assembled spring rolls generously with oil on all sides. Air fry for 8 minutes, flip, spray again, and air fry for a further 5–6 minutes until deeply golden. The air fryer produces excellent results notably crunchier than baking and significantly less oily than deep frying.
- Spicy Schezwan spring rolls: Add 1–2 tablespoons of Schezwan sauce to the filling along with the other seasonings for a bold, fiery variation that is enormously popular at parties. Reduce the soy sauce quantity by half to compensate for the saltiness of the Schezwan sauce.
- Cheese chicken spring rolls: Add 2 tablespoons of grated mozzarella or processed cheese to each spring roll before rolling. The cheese melts during frying and creates a creamy, stretchy interior that contrasts beautifully with the crisp wrapper. This variation is a guaranteed hit with children and a reliable crowd-pleaser at casual gatherings.
Preparation Method
Start by preparing all your filling ingredients before you cook shred the cabbage finely, julienne the carrots into thin matchsticks, chop the spring onions, mince or finely chop the chicken, and have all your sauces measured and ready. Once the wok or pan is hot, the filling cooks in under 8 minutes and you do not have time to prep mid-cook.
Cook the chicken first until just done, then add the vegetables in order of their cooking time carrots first (they need the most heat), then cabbage, then spring onions. Season, toss over high heat for one final minute, then spread the filling immediately on a wide tray. The wider the tray, the faster the filling cools and releases its remaining steam.
Standard Operating Procedure (SOP)
Step 1 Filling prep: Mince or finely chop chicken. Shred cabbage to 3mm thickness. Julienne carrots to matchstick size. Slice spring onions thinly. Drain bean sprouts thoroughly if using. Measure all sauces.
Step 2 Cook filling: Heat wok or wide pan over maximum heat. Add oil. Add chicken and cook until just done 3–4 minutes. Push to the side. Add carrots and stir-fry 2 minutes. Add cabbage and stir-fry 2 minutes. Add spring onions, bean sprouts, and all seasonings. Toss together over high heat for 1 minute. Add sesame oil off the heat.
Step 3 Cool filling completely: Spread filling on a wide tray. Do not roll until the filling is at room temperature warm filling softens the wrapper from the inside. This step is non-negotiable.
Step 4 Prepare cornstarch seal: Mix 2 tablespoons cornstarch with 3 tablespoons cold water to a smooth, thick paste. This is the rolling seal.
Step 5 Roll spring rolls: Place one wrapper on the work surface in a diamond orientation (one corner pointing toward you). Place 2–3 tablespoons of cold filling in the centre-lower area. Fold the bottom corner up and over the filling tightly. Fold the left and right corners inward toward the centre. Roll upward firmly to the final corner. Brush the final corner with cornstarch paste and press firmly to seal. The roll should feel tight and compact with no gaps.
Step 6 Heat oil to 170–175°C. Use a kitchen thermometer. If you do not have one, test with a small piece of wrapper it should sizzle and rise to the surface within 3 seconds without burning immediately.
Step 7 First fry (optional double-fry method): Fry rolls at 170°C for 3–4 minutes until pale golden and the seam is fully sealed. Remove and drain on a wire rack. Allow to cool and rest. This can be done up to 2 hours ahead of service.
Step 8 Second fry / single fry: Increase oil to 180–185°C. Fry rolls for 2–3 minutes (or 5–6 minutes for single fry) until deeply golden and the wrapper sounds hollow when tapped. Drain on a wire rack never on kitchen paper.
Step 9 Plate and serve immediately. Spring rolls lose their crunch within 10 minutes of frying serve without delay.
Garnish and Presentation
The visual appeal of a spring roll platter is built on three things: colour contrast, height, and the reveal of the cross-section. The golden wrapper is beautiful, but it is a single colour the contrast comes from what surrounds it and what is visible inside it.
Slice every other spring roll on the diagonal a clean 45-degree cut through the centre reveals the colourful filling cross-section (the green of the cabbage and spring onion, the orange of the carrot, the pale chicken) against the gold of the wrapper. This diagonal cut is the detail that distinguishes a home platter from a restaurant one. Stand the uncut rolls upright and lay the halved rolls flat with the cross-section facing upward for maximum visual impact.
Garnish the platter with thinly sliced spring onion greens scattered over the rolls, a few thin red chilli rings for colour, and a small pile of toasted sesame seeds. Place two dipping sauce ramekins one red (sweet chilli), one dark (soy-ginger) at the base of the platter. The colour composition of gold, green, red, and dark brown is one of the most appetising visual palettes in Asian cooking.
Plating and Serving Tips
For a party platter, use a large flat rectangular board or a wide ceramic serving plate. Arrange the spring rolls in two rows one row of whole rolls standing at a slight angle against each other, and one row of diagonally halved rolls laid flat cross-section-up in front of them. This two-tier arrangement creates height, shows the filling, and makes it easy for guests to pick up either a whole roll or a half.
For individual plating at a sit-down dinner, arrange three spring rolls in a fan on a warmed flat plate two whole and one halved. Place a small ramekin of dipping sauce at the curve of the fan. Add a neat stack of pickled cucumber (thinly sliced cucumber in rice vinegar, sugar, and a pinch of chilli flakes for 15 minutes) alongside for a refreshing palate cleanser between bites. Finish with a scatter of spring onion greens and sesame seeds directly on the spring rolls.
For a dramatic street-food style presentation, stand five or six whole spring rolls upright in a tall glass or a bamboo steamer basket lined with parchment, with the dipping sauces in small bowls on the side. This vertical presentation works particularly well for casual parties and photographs beautifully for social media content the height draws the eye immediately and the gold colour is shown off at its most vivid in upright lighting.
Made these chicken spring rolls? I genuinely want to hear the crack when you bite into the first one! Leave a star rating and drop a comment below your feedback helps other readers find this recipe. Share your platter photos on Instagram and tag us nothing beats seeing a tray of perfectly golden rolls come out of someone else's kitchen.
Ingredients
- 300g boneless chicken breast or thigh, finely minced or chopped into 5mm pieces
- 2 tablespoons neutral oil (for cooking filling)
- 1 teaspoon ginger, freshly grated
- 1 teaspoon garlic, freshly minced (approx. 3–4 cloves)
- 1 small green chilli, finely chopped (optional)
- 1 small capsicum / bell pepper (any colour), finely julienned (optional)
- 200g cabbage (approx. ¼ medium head), very finely shredded
- 3 spring onions, thinly sliced white and green parts separated
- 1 medium carrot (approx. 100g), peeled and julienned into thin matchsticks
- 100g bean sprouts, thoroughly drained and patted dry (optional)
- 1 tablespoon oyster sauce
- 2 tablespoons soy sauce (light or regular)
- ½ teaspoon sugar
- ½ teaspoon black pepper, freshly ground
- 1 tablespoon cornstarch, dissolved in 2 tablespoons cold water
- 1 teaspoon white pepper powder
- 1 teaspoon rice vinegar or white vinegar
Nutritional Information
- Calories: 334 kcal
- Protein: 18g
- Carbohydrates: 28g
- Fat: 16g
- Fiber: 205g
- Sodium: 620mg
- Sugar: 4g
Directions
1. PREP ALL FILLING INGREDIENTS
1. Finely mince the chicken breast or thigh, or chop into very small 5mm pieces. Set aside.
2. Shred the cabbage as finely as possible — aim for 3mm thickness. Place in a bowl and sprinkle with a pinch of salt. Let sit for 5 minutes, then squeeze out all excess moisture firmly with both hands. This pre-salting step draws out the cabbage's natural water before cooking.
3. Julienne the carrot into thin matchsticks. Slice the spring onions thinly, keeping the white and green parts separate. If using bean sprouts, drain thoroughly and pat completely dry. Julienne the bell pepper if using.
4. Measure all sauces and seasonings before heating the wok — the filling cooks quickly and you will not have time to measure mid-cook.
2. MAKE THE CORNSTARCH BINDER AND SEAL
5. In one small bowl, mix 1 tablespoon cornstarch with 2 tablespoons cold water until smooth — this is the filling binder. In a second small bowl, mix 2 tablespoons cornstarch with 3 tablespoons cold water until smooth — this is the rolling seal. Set both aside.
3. COOK THE CHICKEN FILLING
6. Heat a large wok or wide, heavy pan over maximum heat until it is very hot — you should see a faint haze rising from the surface. Add 2 tablespoons of neutral oil.
7. Add the minced chicken immediately. Spread into a single layer and cook undisturbed for 90 seconds until it starts to develop a pale golden colour on the underside. Break up with a spatula and stir-fry for another 2 minutes until the chicken is just cooked through — no pink remaining. Remove and set aside.
8. Add a touch more oil to the same wok if needed. Add the ginger, garlic, and green chilli (if using). Stir-fry for 30 seconds until fragrant — do not let them burn.
9. Add the julienned carrot. Stir-fry over maximum heat for 2 minutes.
10. Add the shredded, squeezed cabbage. Stir-fry for 90 seconds — the high heat should evaporate moisture instantly rather than letting the cabbage stew.
11. Add the spring onion whites. Return the cooked chicken to the wok.
12. Add soy sauce, oyster sauce, white pepper, black pepper, sugar, and rice vinegar. Toss everything together over high heat for 1 minute until the seasoning coats every element of the filling.
13. Pour in the cornstarch-water binder. Toss quickly for 30 seconds until the filling comes together with a slight glaze and no loose liquid remains in the pan.
14. Remove from heat. Add sesame oil and the spring onion greens. Toss once. Taste and adjust salt if needed — remember the soy and oyster sauce are already salty.
4. COOL THE FILLING COMPLETELY
15. Spread the cooked filling immediately onto a wide, flat tray or baking sheet in a thin, even layer. The wider the spread, the faster it cools and releases steam.
16. Allow to cool completely to room temperature before rolling — minimum 20–30 minutes. Do not rush this step. A warm filling will soften the wrapper from inside before frying.
5. ROLL THE SPRING ROLLS
17. Set your workspace: spring roll wrappers covered with a damp cloth, cooled filling, cornstarch seal paste, a pastry brush, and a lined tray to place the rolled spring rolls on.
18. Peel one wrapper from the stack and lay it on a clean, dry surface in a diamond orientation — one corner pointing directly toward you.
19. Place 2–3 tablespoons of filling in the lower-centre area of the wrapper, leaving at least 4cm clear on all sides. Do not overfill — an overfilled spring roll will burst during frying.
20. Fold the bottom corner up and over the filling, tucking it tightly under the filling to create a firm base. Pull the fold as snug as possible.
21. Fold the left corner inward toward the centre. Then fold the right corner inward toward the centre. Both side corners should overlap slightly over the filling.
22. Roll the package upward firmly toward the top corner, maintaining tight, even pressure throughout. Roll as tightly as physically possible.
23. Brush the final top corner generously with the cornstarch seal paste. Press and hold for 5 seconds until the seal bonds firmly. The completed roll should feel dense and compact with no air gaps and no loose seam.
24. Place seam-side down on the lined tray. Repeat for all remaining filling.
6. HEAT THE OIL
25. Pour neutral oil into a deep, heavy-based pan or wok to a depth of at least 6cm. Heat over medium-high heat to 170–175°C. Use a kitchen thermometer for accuracy. If no thermometer: drop a small piece of wrapper into the oil — it should sizzle immediately, rise to the surface within 3 seconds, and turn golden within 1 minute without burning.
7. FRY THE SPRING ROLLS SINGLE FRY METHOD
26. Gently lower 4–5 spring rolls into the hot oil, seam-side down first. Do not crowd the pan.
27. Fry for 5–6 minutes, turning regularly with tongs or a spider strainer, until deeply golden and the wrapper sounds hollow when you tap it with a fingernail. The colour should be a rich amber-gold — not pale yellow, not dark brown.
28. Remove with a spider strainer or tongs. Drain on a wire rack — not kitchen paper. Allow the oil to return to 175°C before frying the next batch.
8. FRY THE SPRING ROLLS DOUBLE FRY METHOD (FOR MAXIMUM CRUNCH)
26a. First fry: heat oil to 165–170°C. Fry rolls in batches for 3 minutes until pale golden and the seam is fully sealed. Remove and drain on a wire rack. The rolls can rest at this stage for up to 2 hours before the second fry.
27a. Second fry: increase oil to 185°C. Fry the par-cooked rolls for 2 minutes until deeply golden, very crispy, and hollow-sounding when tapped. Drain on a wire rack. Serve within 5 minutes.
9. SLICE AND PLATE
29. Allow to cool for 60 seconds — just enough for the filling to settle — then slice every other spring roll on the diagonal at a 45-degree angle.
30. Arrange on the serving board or plate, alternating whole rolls and halved rolls with cross-sections facing upward.
31. Scatter spring onion greens and toasted sesame seeds over the platter. Add red chilli rings for colour.
32. Place the two dipping sauce ramekins alongside. Serve immediately.
Rate this Recipe
User Reviews
No reviews yet. Be the first to share your thoughts!