Smoky Vegetable Seekh Kebab That Tastes Like a Restaurant Favourite
Vegetable seekh kebab recipe with spiced mixed veggies, paneer & roasted gram flour. Crispy outside, soft inside, ready in 50 mins. Get the full recipe now.
 Tripti Srivastava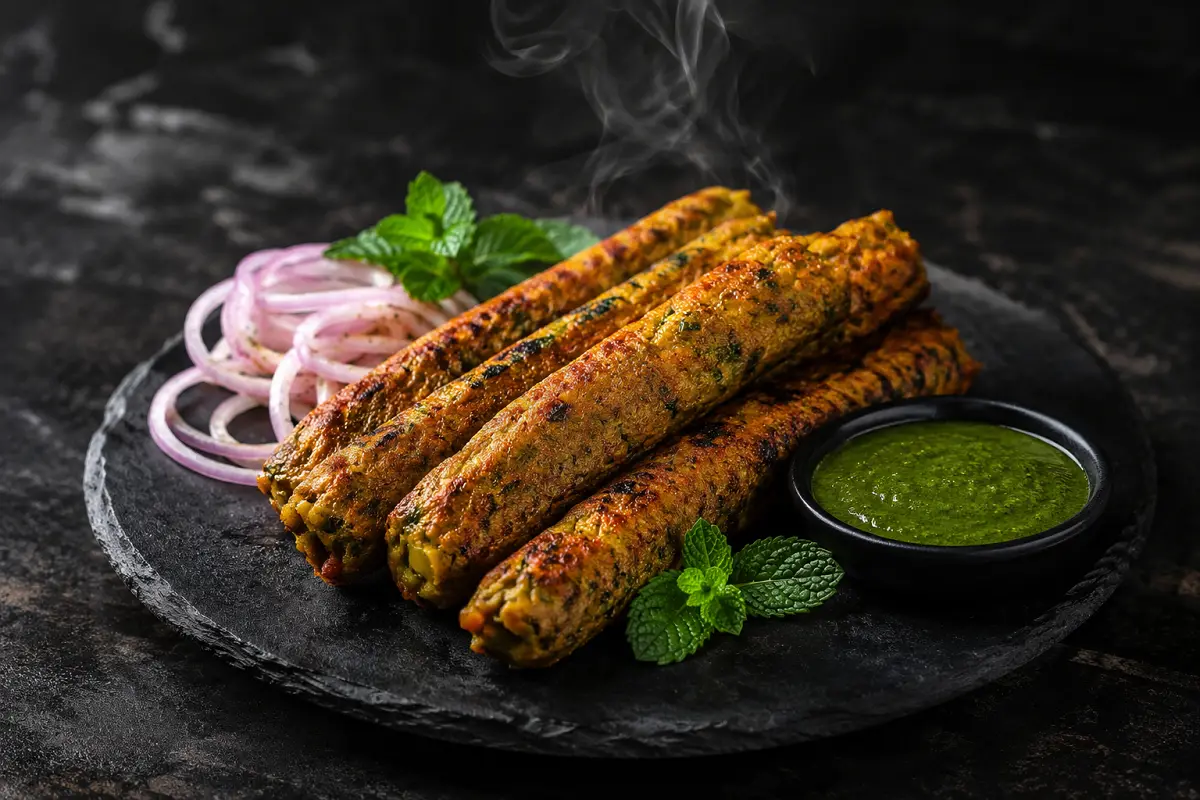
If you have ever ordered a vegetable seekh kebab at an Indian restaurant and thought I wish I could make these at home this recipe is for you. That slightly charred, deeply spiced cylinder of grilled vegetables, crisp on the outside and soft enough to melt on the inside, has always felt like it belonged only in a professional kitchen with a tandoor and twenty years of experience behind it. The truth is, you can make kebabs just as good on a regular tawa on your stovetop, in your oven, or in your air fryer. No clay oven needed. No special equipment. Just a handful of everyday vegetables, a few spices you already own, and the right technique.
I started making these for the same reason most people do I needed a vegetarian starter that felt genuinely celebratory rather than like a consolation prize for the non-meat eaters at the table. What I ended up with was a recipe that gets requested by everyone at the table, regardless of whether they eat meat or not. The smoky, charred exterior. The warm garam masala and chaat masala filling. The way they look on a plate with rings of raw onion, a wedge of lemon, and a bowl of green chutney alongside. These are party food that happens to be vegetarian not the other way around.
The one thing most people struggle with when making veg seekh kebabs at home is getting the mixture to stay on the skewer without breaking apart. This recipe solves that problem completely. Follow the binding technique and the cooling step, and your kebabs will hold their shape from skewer to plate.
What Makes This Vegetable Seekh Kebab Recipe Special
Veg seekh kebabs can easily taste bland, starchy, and heavy if the balance is off. This version avoids all of those pitfalls through a few deliberate choices that make a real difference.
- Roasted besan (gram flour) as the binder. Rather than relying entirely on potato and breadcrumbs, this recipe uses roasted besan to bind the mixture. Dry-roasting the gram flour in a pan before adding it to the mixture drives off the raw, starchy taste and gives the kebabs a subtle nuttiness that makes the whole thing taste more complex and satisfying.
- Mixed vegetables plus paneer. Grated paneer adds fat, protein, and a creamy richness to the filling that keeps the kebabs from tasting dry even after grilling. It also helps the mixture bind together more easily, which means fewer broken kebabs on the tawa.
- Chaat masala and lemon juice for brightness. Both are added at the end of mixing not during cooking. This preserves their sharpness and keeps the flavour from going flat and dull during the heat of grilling.
- Moisture management is built into the process. Every step squeezing vegetables, drying the potato, resting the mixture in the fridge is designed to reduce moisture so the kebabs hold on the skewer and develop a proper crust instead of steaming and falling apart.
- Works without a tandoor. A cast-iron tawa or a heavy non-stick pan on medium-high heat, brushed with a little oil, produces a beautifully charred exterior that is genuinely close to a tandoor result. An air fryer gets you there even more easily.
Ingredients Overview
The base of this recipe is boiled and grated potato not mashed. Grating rather than mashing gives you a lighter, less dense texture, and the drier surface of grated potato helps the mixture come together without becoming sticky. Keep the potato cool before using it, and if it feels at all wet after grating, press it lightly in a clean kitchen towel to remove extra moisture.
The vegetable mix includes finely chopped or grated carrot, green capsicum, green peas, and French beans but this is flexible. Cauliflower, corn, beetroot, broccoli, and spinach all work beautifully. Whatever vegetables you use, the key rule is the same: cook them briefly to soften, then drain thoroughly and press out as much moisture as possible before adding them to the mixture. Wet vegetables are the primary reason veg seekh kebabs fall apart on the skewer.
Grated paneer is the binding hero of this recipe. It adds fat and creaminess, helps hold the shape, and contributes a mild dairy richness that rounds out the spiced vegetable filling. If you need a vegan version, replace paneer with well-drained, crumbled firm tofu or thick cashew paste both work as fat and binder substitutes.
The roasted besan (gram flour) is non-negotiable. Dry roast it in a pan over medium-low heat for 3 to 4 minutes, stirring constantly, until it turns one shade deeper and smells faintly nutty. Let it cool before adding it to the mixture. Raw gram flour has a raw, slightly bitter edge that lingers even after grilling roasting removes that completely.
The spice blend red chilli powder, cumin-coriander powder, garam masala, chaat masala, and black pepper is layered so the kebabs taste warm, complex, and fresh all at once. Fresh ginger-garlic paste, green chillies, chopped coriander, and mint are added raw to the mixture for brightness and heat. A squeeze of fresh lemon juice at the end ties everything together.
How to Make It
The process runs in a deliberate sequence: roast the besan, cook and drain the vegetables, combine with grated potato, paneer, spices, and herbs, rest the mixture in the fridge to firm it up, shape the mixture onto skewers, and grill on a oiled tawa or in an air fryer until charred and golden on all sides. The whole process takes under an hour, and most of the active work is in the first 20 minutes.
The step that most home cooks skip and the one that makes the biggest difference is refrigerating the shaped kebabs for 20 to 30 minutes before cooking. A cold, firm mixture grips the skewer tightly and develops a proper crust during grilling. A warm mixture slides, droops, and falls apart before it ever reaches the plate. The full directions are below follow them in order and your kebabs will hold perfectly.
Tips for Best Results
- Squeeze every vegetable thoroughly. After cooking the vegetables, transfer them to a clean kitchen towel or a fine sieve and press out as much water as possible. Even a small amount of excess moisture can make the mixture too soft to stay on the skewer.
- Grate, do not mash, the potato. Grated potato has a drier surface texture and integrates into the mixture more evenly than mashed. It also gives the finished kebab a slightly lighter, less dense texture.
- Always roast the besan first. Raw gram flour leaves a starchy, slightly bitter taste that does not cook out fully during grilling. Three minutes in a dry pan over medium-low heat is all it takes to transform it.
- Rest the mixture in the fridge. After mixing all the ingredients, cover the bowl and refrigerate for at least 30 minutes. This firms the mixture significantly, makes it much easier to shape onto skewers, and helps the kebabs hold their cylindrical form during cooking.
- Use flat metal skewers if you can. Flat skewers give the mixture more surface area to grip than round ones, which means the kebab stays put as you rotate it. If you only have round wooden skewers, soak them in water for at least 30 minutes and use two skewers per kebab side-by-side for better grip.
- Do not overcrowd the pan. Give each kebab enough space to develop a crust on all sides. Crowding creates steam instead of char, and steamed veg seekh kebabs do not have that signature smoky crunch.
Serving Suggestions
The classic accompaniment is a generous bowl of green coriander-mint chutney with a side of thinly sliced raw onion rings tossed with a pinch of chaat masala and a squeeze of fresh lemon. The sharp, herby chutney against the warm spiced kebab is one of those flavour combinations that has been exactly right for decades and will stay that way. A small bowl of mint raita thick yoghurt stirred with chopped mint, a pinch of roasted cumin, and salt on the side adds a cool, creamy contrast that is hard to beat.
For a more filling meal, wrap two veg seekh kebabs inside a warm roomali roti or a soft naan with shredded cabbage, sliced tomato, raw onion, and a drizzle of green chutney for a street-style veg seekh kebab roll that rivals anything from a dhaba. You can also serve these alongside a proper cup of masala chai for the ultimate Indian tea-time spread.
Storage and Reheating
Fridge: Store cooked veg seekh kebabs in an airtight container for up to 2 days in the refrigerator. To reheat and restore the char, place them on a dry tawa or cast-iron pan over medium-high heat for 2 minutes per side, or pop them into an air fryer at 180°C for 5 to 6 minutes. Avoid the microwave it makes the exterior soft and the inside dense and heavy.
Freezer: The raw, shaped mixture whether on skewers or formed into cylinders without skewers can be frozen on a lined tray until solid and then transferred to a zip-lock bag for up to 3 weeks. Cook directly from frozen on a well-oiled tawa over medium heat, or in an air fryer at 180°C for 18 to 20 minutes, turning halfway. Do not defrost first it makes the mixture soft and difficult to handle.
Variations and Substitutions
- Hara Bhara Seekh Kebab: Replace the capsicum and carrot with blanched and squeezed spinach, fresh green peas, and a handful of fresh coriander leaves in the mixture. The result is a vibrantly green, nutrient-rich kebab that looks stunning on a plate. Add a pinch of amchur (dry mango powder) for a little tartness.
- Paneer Seekh Kebab: Increase the paneer proportion to 200g and reduce the mixed vegetables to a supporting role. The result is a richer, creamier kebab that is closer to a tandoori paneer starter. Add a teaspoon of kasuri methi (dried fenugreek leaves) to the mixture for a restaurant-style aroma.
- Vegan Version: Replace paneer with an equal amount of well-drained, crumbled firm tofu. Add a tablespoon of thick cashew paste for fat and binding. Use oil for greasing instead of ghee. The flavour is slightly lighter but the spice profile remains exactly the same.
- Dhungar Smoky Finish: After cooking the kebabs, place a small piece of live charcoal in a steel bowl in the centre of your serving platter. Drizzle half a teaspoon of ghee over the hot coal it will smoke immediately. Place the kebabs around the bowl, cover the platter tightly with foil for 2 minutes, then uncover and serve. This technique, called the dhungar method, infuses the kebabs with a genuine tandoor-style smokiness that transforms the eating experience entirely.
- Air Fryer Version: Lightly spray shaped kebabs with oil and air fry at 200°C (390°F) for 15 to 18 minutes, turning once halfway through. This is arguably the cleanest, most consistent way to cook these at home.
- Gluten-Free Option: Replace breadcrumbs with crushed rice crackers or certified gluten-free oats. Use rice flour instead of all-purpose flour if dusting is needed. The roasted besan is naturally gluten-free and requires no substitution.
Preparation Method
Start by dry-roasting the besan in a small pan over medium-low heat for 3 to 4 minutes, stirring constantly, until it darkens by one shade and smells nutty. Set aside to cool. Boil the potatoes until just tender not mushy then drain, peel, and grate them onto a clean plate to cool. Meanwhile, heat a teaspoon of oil in a pan and sauté the finely chopped or grated vegetables carrot, capsicum, beans, and peas for 4 to 5 minutes until softened but not overcooked. Transfer to a sieve or clean cloth and press out all moisture. Let everything cool fully.
Combine the grated potato, squeezed vegetables, grated paneer, roasted besan, ginger-garlic paste, green chillies, all spice powders, chopped coriander, mint, lemon juice, and salt in a large bowl. Mix thoroughly use your hands to get everything evenly combined. Taste the mixture and adjust seasoning. Cover the bowl and refrigerate for 30 minutes. Once rested, divide into equal portions, oil your palms, and shape each portion into a tight cylinder around a flat metal skewer. Refrigerate the shaped kebabs for a further 15 to 20 minutes before cooking.
Vegetable Seekh Kebab Standard Operating Procedure (SOP)
For consistent results every time you make this recipe, follow this sequence without shortcuts: roast besan → cook and squeeze vegetables → boil and grate potato → cool all three → combine with paneer, spices, herbs → taste and season → refrigerate mixture 30 minutes → shape onto skewers → refrigerate shaped kebabs 15–20 minutes → grill on oiled tawa or in air fryer → serve immediately. Every cooling and resting step in this sequence exists for a reason. Skipping the first fridge rest means a mixture that is too soft to shape. Skipping the second rest after shaping means kebabs that slide off the skewer before they develop a crust. Respect the process and it will reward you with kebabs that look and taste like they came out of a professional kitchen.
For large batch cooking and catering, prepare the mixture up to 24 hours ahead and keep it refrigerated. Shape and skewer the kebabs the next day the overnight rest in the fridge actually improves the flavour as the spices settle and deepen. When cooking for a crowd, use an oven at 220°C (430°F) on a lightly oiled baking rack so you can cook multiple trays simultaneously. Finish with 3 to 4 minutes under the grill setting for a charred, restaurant-style appearance.
Garnish and Presentation
A well-presented plate of veg seekh kebabs looks as good as it tastes with very little effort. Lay two or three thin rings of raw red onion on each plate and toss them with a pinch of chaat masala and a few drops of lemon juice they should glisten slightly. Place two kebabs on the plate at a slight angle leaning against the onion rings for height and visual dimension. Add a wedge of lemon, two slit green chillies, and a small sprig of fresh coriander for colour. A light dusting of red chilli powder and chaat masala directly over the kebabs adds colour contrast and signals the spice level to your guests.
For a party platter, arrange the kebabs in a neat row on a long wooden board or slate. Place a small bowl of green chutney at one end and a bowl of mint raita at the other. Scatter the dressed onion rings around the kebabs, tuck lemon wedges in the gaps, and finish with a generous handful of fresh coriander leaves over the top. The red-green-white contrast of chilli, coriander, and onion makes the platter look abundant and professionally styled without requiring any real skill.
Also Read: Mutton Cutlet Recipe
Plating and Serving Tips
Always serve veg seekh kebabs hot ideally within 3 to 4 minutes of coming off the tawa while the exterior still has that slight crackle to it. For individual plating, keep it clean and intentional: two kebabs, one dipping bowl, and a small dressed salad arranged with space between each element. A plate with room to breathe looks far more appealing than one that is crowded with too many components.
For the dhungar smoky effect at a dinner party, perform the charcoal smoking step at the table rather than in the kitchen guests find it theatrical and memorable, and the aroma it creates when you lift the foil is genuinely special. Even a modest home cook doing this for the first time looks like they know exactly what they are doing. Serve the kebabs still faintly smoking on the plate, with a squeeze of lemon juice over the top just before they reach the guest.
If you try this recipe, I would love to hear from you! Leave a star rating below and drop a comment sharing which cooking method you used, what vegetables you added, and how they turned out. Your feedback genuinely helps other readers cook with more confidence. Save this to Pinterest so you always have it ready for your next dinner party or Iftar spread!
Ingredients
- 2 medium potatoes, boiled, peeled, and grated (approx. 1 cup grated)
- ½ cup carrot, finely grated or very finely chopped
- 1 teaspoon chaat masala
- ½ teaspoon garam masala
- 1 teaspoon cumin-coriander powder (dhania-jeera powder)
- 1 teaspoon red chilli powder
- 2 green chillies, very finely chopped (adjust to taste)
- 1 tablespoon ginger-garlic paste
- 2 tablespoons fine breadcrumbs (plain, or gluten-free add more if mixture feels wet)
- ¼ cup French beans, very finely chopped
- 3 tablespoons besan (gram flour), dry-roasted until nutty
- ¼ cup green peas, boiled and lightly crushed
- ½ cup green capsicum (bell pepper), very finely chopped
- 100g (3.5 oz) paneer, grated (or firm tofu, well drained and crumbled, for vegan)
- 1 teaspoon oil (for sautéing vegetables)
- ½ teaspoon black pepper powder
- 1 tablespoon fresh lemon juice
- 2 tablespoons fresh coriander leaves, finely chopped
- 1 tablespoon fresh mint leaves, finely chopped
- 1 teaspoon salt (adjust to taste)
Nutritional Information
- Calories: 220 kcal
- Protein: 25g
- Carbohydrates: 27g
- Fat: 9g
- Fiber: 4g
- Sodium: 420mg
- Sugar: 3g
Directions
1. DRY-ROAST THE BESAN
Place the gram flour (besan) in a small dry pan over medium-low heat.
Stir constantly for 3 to 4 minutes until the besan turns one shade darker
and smells faintly nutty — like roasted chickpeas. It should not brown or
smell burnt. Remove from heat immediately and spread on a plate to cool.
This step is not optional — raw besan has a starchy, bitter edge that
does not cook out during grilling and will make your kebabs taste flat.
2. BOIL AND GRATE THE POTATOES
Place the potatoes in a pot, cover with cold salted water, and boil for
12 to 14 minutes until just tender — cooked through but not falling apart.
Drain, peel, and grate on a box grater onto a flat plate. Spread the grated
potato out and leave for 10 minutes to cool and release steam. If the grated
potato feels at all damp, press it lightly in a clean kitchen towel to
remove the extra moisture.
3. COOK AND DRAIN THE VEGETABLES
Heat 1 teaspoon of oil in a pan over medium heat. Add the grated carrot,
finely chopped capsicum, French beans, and crushed green peas. Cook for
4 to 5 minutes, stirring frequently, until the vegetables are soft but still
holding their shape — not mushy. Season lightly with a pinch of salt.
Transfer to a fine mesh sieve or a clean kitchen towel and press firmly to
extract as much moisture as possible. This step is critical — wet vegetables
are the number one reason veg seekh kebabs fall off the skewer.
Leave the vegetables to cool completely.
4. COMBINE THE MIXTURE
In a large mixing bowl, combine the cooled grated potato, squeezed and cooled
vegetables, grated paneer, cooled roasted besan, breadcrumbs, ginger-garlic
paste, green chillies, red chilli powder, cumin-coriander powder, garam masala,
black pepper, salt, and lemon juice. Mix everything together thoroughly using
clean hands — you want a mixture that feels firm, slightly sticky, and holds
its shape when pressed into a ball.
5. ADD HERBS AND TASTE
Add the finely chopped coriander leaves, mint leaves, and chaat masala to the
bowl. Mix through gently. Now taste the mixture — this is your only chance to
adjust the salt, chilli level, and tanginess before the kebabs are shaped.
Fix anything that feels off. If the mixture feels too wet to hold a shape,
add 1 extra tablespoon of breadcrumbs and mix again.
6. REST THE MIXTURE (DO NOT SKIP)
Cover the bowl with cling film and refrigerate for 30 minutes.
This resting step firms the mixture, allows the flavours to settle and deepen,
and makes shaping the kebabs onto skewers significantly easier. Do not skip it —
this is the difference between a mixture that grips the skewer and one that
slides right off.
7. SHAPE THE KEBABS
Remove the bowl from the fridge. If using bamboo skewers, take them out of
their water soak and pat dry. Lightly oil your palms. Take approximately
2 heaped tablespoons of the mixture (about the size of a golf ball) and begin
moulding it around a flat metal skewer. Press and squeeze the mixture firmly
around the skewer, shaping it into an even cylinder about 10 cm (4 inches) long
and 3 cm (1.5 inches) thick. Press gently along the length to ensure even density
— any thin spots will break during cooking. Leave a 2 cm gap at both ends of the
skewer exposed. Place each shaped kebab on a parchment-lined tray as you go.
8. CHILL THE SHAPED KEBABS
Place the tray of shaped kebabs in the refrigerator for 15 to 20 minutes.
Cold, firm kebabs develop a proper crust the moment they touch the hot tawa.
Warm ones sag, lose their shape, and stick. Use this time to heat your tawa
and set up your serving plates.
9. COOK ON TAWA (STOVETOP METHOD)
Heat a cast-iron tawa or a heavy non-stick pan over medium-high heat until
very hot. Brush generously with oil or ghee. Place 3 to 4 kebabs on the tawa
with enough space between them. Cook undisturbed for 2 minutes until the
underside develops a char. Rotate the skewer a quarter turn and cook for
another 2 minutes. Continue rotating every 2 minutes until the entire surface
is evenly charred and golden — about 10 to 12 minutes total per batch.
Baste the kebabs lightly with oil during cooking for a richer, glossier finish.
10. COOK IN AIR FRYER (ALTERNATIVE METHOD)
Lightly spray the shaped kebabs with oil all over. Place in the air fryer
basket in a single layer without touching. Air fry at 200°C (390°F) for
15 to 18 minutes, turning once at the halfway point. The surface should be
deep golden and slightly charred when done.
STEP 9C — COOK IN OVEN (ALTERNATIVE METHOD)
Place kebabs on a lightly oiled wire rack over a foil-lined baking tray.
Brush with oil. Bake at 220°C (430°F) for 18 to 20 minutes, turning once
halfway through. For a charred finish, switch to the grill/broiler setting
for the last 3 to 4 minutes.
11. DHUNGAR SMOKY FINISH (OPTIONAL)
Heat a small piece of charcoal over a direct flame until glowing red.
Place a small steel bowl on your serving platter and put the hot coal inside.
Immediately drizzle ½ teaspoon of ghee over the coal — it will smoke at once.
Quickly arrange the hot kebabs around the bowl and cover the entire platter
tightly with foil. Leave for exactly 2 minutes, then remove the foil and
discard the coal bowl. Serve the kebabs immediately, still faintly smoky.
12. GARNISH AND SERVE
Sprinkle a pinch of chaat masala over the kebabs directly.
Squeeze fresh lemon juice over the top. Arrange on a serving plate with
dressed raw onion rings, a lemon wedge, slit green chillies, and a sprig
of fresh coriander. Serve immediately with green chutney and mint raita
on the side while the kebabs are at their hottest and crunchiest.
Rate this Recipe
User Reviews
No reviews yet. Be the first to share your thoughts!