Crispy Indian Chicken Cutlets That Taste Like Home
Indian chicken cutlet recipe with spiced mince, golden breadcrumb crust & soft filling. Easy to make at home in 45 mins. Get the full recipe now.
 Tripti Srivastava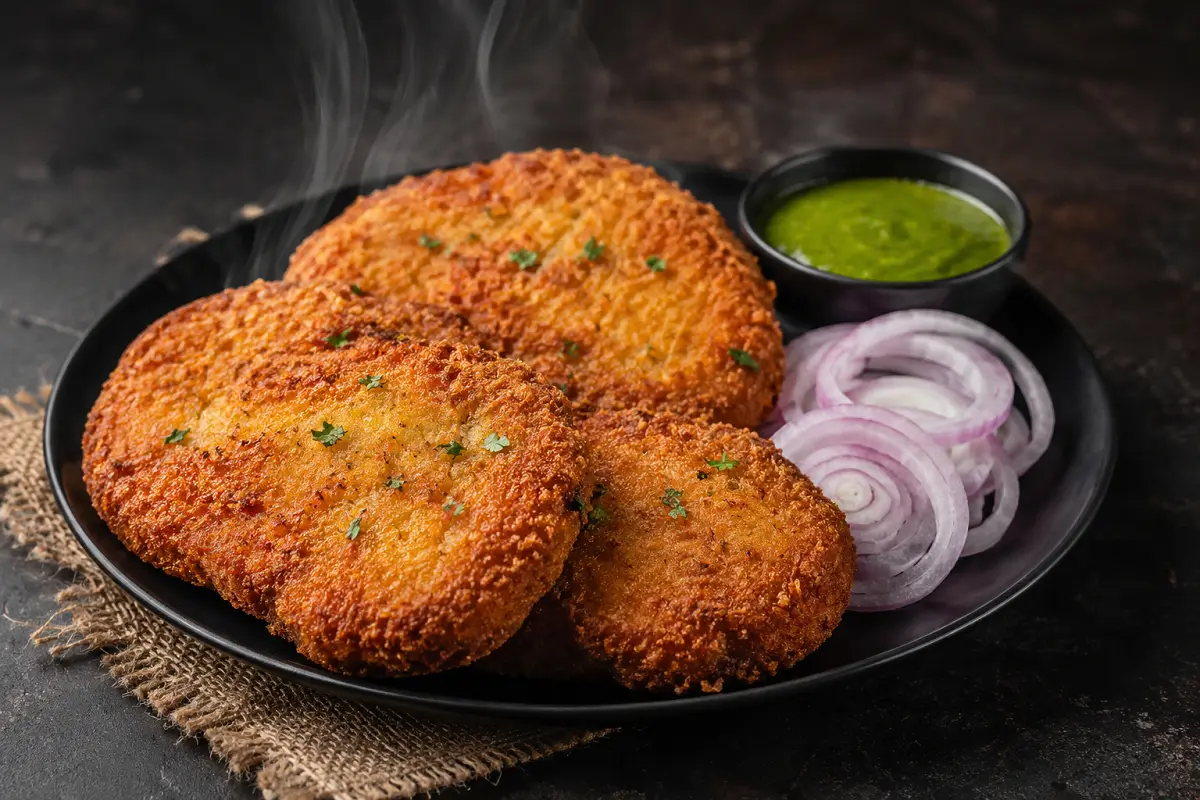
If you grew up in an Indian household, you already know the magic of a freshly fried chicken cutlet sitting on a plate next to a cup of masala chai. This Indian chicken cutlet recipe brings all of that comfort right into your kitchen crispy golden crust on the outside, soft and spiced filling on the inside, and that unmistakable aroma of garam masala and fresh coriander hitting you the moment it touches the pan. Whether you're making it for an evening snack, a house party, or just because it's raining outside and nothing else will do this one always delivers.
I first made these cutlets years ago trying to recreate the ones from a tiny bakery near my grandmother's house. They had this perfect thickness not too thick that they felt doughy, not so thin that they'd fall apart in the oil. After plenty of testing (and a few batches that absolutely did not hold together), I finally landed on a version that works every single time. And now I'm sharing it with you.
The best part? You don't need any fancy equipment or hard-to-find ingredients. Everything you need is probably already sitting in your kitchen right now.
What Makes This Chicken Cutlet Recipe Special
There are hundreds of cutlet recipes floating around, so what makes this one worth your time? A few things, actually.
- More chicken, less filler. A lot of bakery-style cutlets load up on mashed potatoes and barely use any chicken. This recipe flips that ratio you get a genuinely meaty, flavourful cutlet where the chicken is the star.
- Double-coated crunch. A quick egg-and-breadcrumb double coating gives you that crispy exterior that stays crunchy even as it cools slightly on the plate.
- Freezer-friendly. You can shape and coat the cutlets ahead of time, freeze them raw, and fry them straight from frozen whenever you need them. That means party-ready snacks on demand.
- Adaptable to how you cook. Pan fry, shallow fry, deep fry, air fry, or bake this recipe works beautifully with all of them.
- Family approved. These cutlets are just the right level of spice warm and fragrant without being too hot, which means kids love them as much as adults do.
Ingredients Overview
The foundation of a great Indian chicken cutlet is minced chicken (also called chicken keema). You can buy it ready-ground from the butcher or pulse boneless chicken breast or thighs in a food processor at home just don't over-blend it into a paste. A coarser texture gives you a better bite.
Boiled and mashed potato acts as the binding agent here. It holds the mixture together and adds a subtle creaminess to the filling. Keep the potato dry if it's watery, your cutlets will fall apart in the pan.
The spice mix is where the soul of this recipe lives. Garam masala, red chilli powder, cumin, coriander powder, and turmeric give these cutlets their warm, layered flavour. Fresh ginger-garlic paste, green chillies, and a good handful of chopped coriander leaves bring brightness and heat to balance everything out. For substitutions if you don't have fresh ginger and garlic, a teaspoon of ginger-garlic powder works in a pinch. You can swap green chillies for a pinch of cayenne if you'd like to control the heat level more easily.
For coating, you'll need beaten egg and breadcrumbs. Panko breadcrumbs give you a slightly lighter, crisper crust regular breadcrumbs work perfectly too.
How to Make It
The process is straightforward: you cook the spiced chicken mince, mix it with mashed potato and herbs, shape the mixture into patties, coat them in egg and breadcrumbs, and pan fry until golden brown. The whole thing comes together in under 45 minutes, and most of that time is hands-off.
The key step most people skip is letting the mixture cool completely before shaping. Trying to shape warm filling leads to sticky, crumbly cutlets that fall apart in the oil. Give it 10 to 15 minutes on the counter and the shaping becomes much easier.
Tips for Best Results
- Dry out your potato. After boiling and mashing, spread the potato on a plate for a few minutes to let steam escape. Any moisture left in it will soften the cutlet from the inside and cause it to break during frying.
- Cook the mince dry. When you cook the chicken keema, keep stirring on medium heat until all the liquid evaporates. The mixture should look dry and crumbly, not wet or saucy.
- Chill before frying. If you have time, refrigerate the shaped and coated cutlets for 20 to 30 minutes before frying. This helps the breadcrumbs stick better and the cutlet hold its shape.
- Don't overcrowd the pan. Fry in batches of 3 to 4 at a time. Too many cutlets lower the oil temperature, which leads to soggy rather than crispy results.
- Medium heat is your friend. High heat will burn the breadcrumbs before the inside is cooked through. Medium heat gives you even golden colour and a fully cooked centre.
Serving Suggestions
The classic pairing is a small bowl of green chutney (coriander and mint) and a side of sliced onion rings lightly tossed with lemon juice and chaat masala. The brightness of the chutney cuts through the richness of the fried cutlet perfectly.
For a more substantial meal, tuck two cutlets into a buttered soft bun with some sliced tomato, lettuce, and a dollop of mint chutney for a quick chicken patties Indian burger. You can also serve them alongside a proper cup of masala chai for the full Indian tea-time experience.
Also Read: Crispy Veg Cutlet
Storage and Reheating
Fridge: Store cooked cutlets in an airtight container in the refrigerator for up to 3 days. To reheat, place them in a dry pan on medium heat for 2 to 3 minutes per side, or pop them in an air fryer at 180°C for 5 to 6 minutes. Avoid microwaving it makes the crust soft and chewy.
Freezer: Freeze the shaped and coated (but uncooked) cutlets on a lined baking tray until firm about 1 hour. Then transfer to a zip-lock bag and freeze for up to 1 month. Fry them directly from frozen on medium heat, adding a couple of extra minutes to the cook time on each side.
Variations and Substitutions
- Kerala Style: Swap garam masala for a pinch of freshly ground black pepper and a little coconut oil in the pan. Serve with a tangy onion salad (called challas) on the side.
- Bengali Style: Shape them into thin diamond or square shapes instead of round patties, and use a touch of kasundi (Bengali mustard) as a dipping sauce.
- Baked Version: Brush shaped and coated cutlets with oil on both sides and bake at 200°C (390°F) for 20 to 25 minutes, flipping halfway through.
- Air Fryer Version: Air fry at 180°C (360°F) for 12 to 15 minutes, flipping once at the halfway mark. Lightly spray with oil for a crispier finish.
- Gluten-Free: Use gluten-free breadcrumbs (or crushed rice crackers) and replace the all-purpose flour with cornstarch or rice flour for the initial dusting.
Indian Chicken Cutlet Recipe Preparation Method
Start by boiling your potatoes until completely tender, then mash them smooth and set aside to cool. In a pan, heat a tablespoon of oil and sauté finely chopped onions until they turn a light golden colour. Add ginger-garlic paste and green chillies, cook for a minute, then add the minced chicken along with all the spice powders. Cook on medium heat, breaking up the mince as it cooks, until all the moisture has evaporated and the mixture looks dry. Stir in chopped coriander leaves, remove from heat, and let the mixture cool fully before combining with the mashed potato.
Indian Chicken Cutlet Standard Operating Procedure (SOP)
For consistent results every time you make this recipe, follow this order: boil potatoes → cook and dry out mince → cool both → combine → shape → coat → chill → fry. Never skip the cooling step. Never shape warm filling. Always fry on medium heat with enough oil to come halfway up the side of each cutlet. These small discipline points are what separate cutlets that hold together from ones that fall apart in the pan.
If you're making a large batch, lay the shaped and coated cutlets on a parchment-lined tray in a single layer. Don't stack them the breadcrumbs will stick and peel off. Refrigerate the tray while you fry in batches, so the waiting cutlets stay firm and cold.
Garnish and Presentation
A simple garnish makes a big visual difference. Finish each serving plate with a few thin rings of raw red onion, a small wedge of lemon, and a sprig of fresh coriander. A few slit green chillies on the side add colour and signal the heat level to your guests. Drizzle a few drops of lemon juice over the onion rings right before serving for a bright pop of freshness.
For a chutney-duo presentation, serve green coriander chutney in one small bowl and a simple tomato ketchup or tamarind chutney in another. The contrast of colours the deep green and the reddish brown makes even a simple snack plate look considered and inviting.
Plating and Serving Tips
Arrange the cutlets slightly overlapping in a fan shape on a flat plate or wooden board for a casual serving style. For a dinner party starter, stand one cutlet upright against a small ramekin of chutney and scatter the onion rings around it it looks restaurant-style with minimal effort.
Always serve chicken cutlets hot or warm, right out of the pan. If you're making them ahead for a party, keep them warm in an oven set to 100°C (200°F) on a wire rack placed over a baking tray this keeps the bottom from getting soggy while you fry the remaining batches.
If you try this recipe, I'd love to hear how it turned out! Leave a star rating and drop a comment below it really helps other readers too. And if you share it on Instagram or Pinterest, tag me so I can see your beautiful crispy cutlets!
Ingredients
- 500g (1.1 lb) minced chicken (chicken keema)
- 2 tablespoons fresh coriander (cilantro) leaves, finely chopped
- coarsely ground, not a paste
- 1 tablespoon ginger-garlic paste (or 1 tsp each ginger powder and garlic powder)
- 1 medium onion, finely chopped
- 2 green chillies, finely chopped (adjust to taste)
- 1 teaspoon coriander powder
- 1 teaspoon red chilli powder
- 2 medium potatoes, boiled, peeled, and mashed (approx. 1 cup mashed)
- ½ teaspoon garam masala
- ½ teaspoon cumin powder
- ¼ teaspoon turmeric powder
- 1 teaspoon salt (adjust to taste)
- 1 tablespoon oil (for cooking the mince)
Nutritional Information
- Calories: 310 kcal
- Protein: 26g
- Carbohydrates: 22g
- Fat: 13g
- Fiber: 2g
- Sodium: 480mg
- Sugar: 2g
Directions
1. BOIL THE POTATOES
Place the potatoes in a pot, cover with cold water, and bring to a boil.
Cook for 12–15 minutes until completely tender when pierced with a fork.
Drain, peel, and mash until smooth. Spread the mash on a plate and allow
it to cool and release steam for 10 minutes. You want it dry, not sticky.
2. COOK THE CHICKEN MINCE
Heat 1 tablespoon of oil in a pan over medium heat. Add the finely chopped
onion and sauté for 4–5 minutes until it turns light golden. Add the
ginger-garlic paste and green chillies and cook for 1 more minute, stirring
constantly, until the raw smell disappears.
3. ADD SPICES AND CHICKEN
Add the red chilli powder, coriander powder, cumin powder, turmeric, and
salt to the pan. Stir well for 30 seconds. Add the minced chicken and cook
on medium heat for 8–10 minutes, breaking up any lumps as you go. Keep
cooking until all the moisture has evaporated and the mixture looks dry and
crumbly. This step is important — wet mince = broken cutlets.
4. FINISH THE FILLING
Take the pan off the heat. Stir in the chopped coriander leaves and garam masala.
Taste and adjust salt. Transfer the mixture to a large bowl and let it cool
completely to room temperature — about 15 minutes.
5. COMBINE THE MIXTURE
Once the chicken mince and the mashed potato are both cooled, add the mashed
potato to the chicken mixture. Mix well with your hands or a spoon until
everything is evenly combined. The mixture should hold its shape when pressed
into a ball. If it feels too wet, add 1 tablespoon of breadcrumbs and mix again.
6. SHAPE THE CUTLETS
Lightly oil your palms. Take a lime-sized portion of the mixture (about 2
heaped tablespoons), roll it into a smooth ball, then flatten it gently into
a round or oval patty about 1.5 cm (½ inch) thick. Repeat with the remaining
mixture — you should get 10 to 12 cutlets. Place them on a tray as you go.
7. COAT THE CUTLETS
Set up your coating station: one plate with flour, one shallow bowl with beaten
egg (with a pinch of salt), and one plate with breadcrumbs. Dust each cutlet
lightly in flour first, then dip in beaten egg, and finally press firmly into
the breadcrumbs on both sides and around the edges. Place the coated cutlets
back on the tray. For extra crunch, dip in egg and breadcrumbs a second time.
8. CHILL (OPTIONAL BUT RECOMMENDED)
Place the coated cutlets in the refrigerator for 20–30 minutes. This firms them
up and helps the coating bond so it doesn't fall off during frying. Skip this
step if you're short on time, but don't skip it if you can help it.
9. FRY THE CUTLETS
Heat 3–4 tablespoons of oil in a wide, heavy-bottomed pan over medium heat.
Once the oil is hot (test by dropping in a breadcrumb — it should sizzle
immediately), add 3–4 cutlets to the pan. Do not crowd the pan.
Fry for 3–4 minutes on the first side without moving, until deep golden brown.
Flip carefully and fry the other side for another 3–4 minutes until golden.
10. DRAIN AND SERVE
Remove the cutlets from the pan and drain on a plate lined with kitchen paper
towels for 1–2 minutes to absorb excess oil. Repeat with remaining batches,
adding fresh oil to the pan as needed. Serve hot with green chutney, sliced
onion rings, and lemon wedges on the side.
Rate this Recipe
User Reviews
No reviews yet. Be the first to share your thoughts!