Make Crispy Veg Cutlet the Indian Way: Golden, Spiced, and Irresistible
Indian veg cutlet recipe made with spiced potatoes and mixed vegetables: crispy, golden, and ready in 40 minutes. Get the full recipe now.
 Tripti Srivastava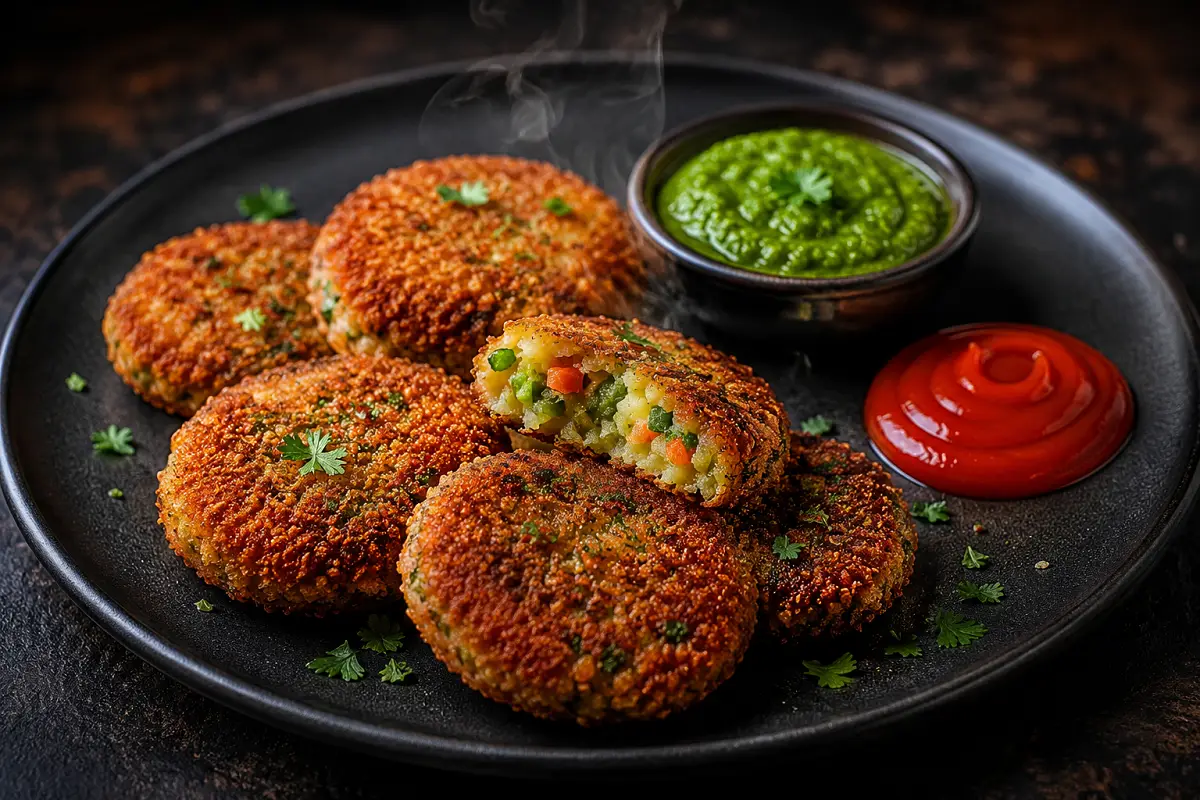
My mother used to make these on rainy evenings, and honestly, nothing has changed since then. There is something about the smell of spiced potato and vegetable mixture hitting a hot pan that makes the whole house feel warmer. This veg cutlet Indian recipe is one of those dishes I keep coming back to not because it is fancy, but because it is deeply, reliably good.
If you have never made veg cutlets at home before, you are in for a treat. And if you have been making them for years, I hope a few tips here help you get that extra-crispy crust you have been chasing. Either way, this one is straightforward, forgiving, and ready in about 40 minutes.
Pour yourself a cup of chai. Let's do this.
WHAT MAKES THIS VEG CUTLET RECIPE WORTH MAKING AGAIN AND AGAIN
I have tried a lot of vegetable cutlet recipe over the years, and what I keep coming back to is this particular balance the mix of vegetables is generous enough to feel wholesome, the spicing is bold but not overpowering, and the crust stays crispy long enough for you to actually enjoy your plate without rushing.
A few things make this version stand out:
No eggs needed. The cornflour slurry does everything an egg wash would do, which means this recipe is completely vegan right out of the gate.
It uses what you already have. Potatoes, carrots, peas, beans, a handful of spices nothing obscure, nothing that requires a special trip to the store.
Kids genuinely eat it. I know that sounds like a stretch, but something about the golden crust and the mild, familiar flavours makes these a hit even with fussy eaters.
You can make a big batch, freeze the unfried cutlets, and pull them out on a weeknight when you need something fast. They go from freezer to plate in under 15 minutes.
It is also one of those recipes that rewards you for paying attention to a few small details which I will walk you through below.
KEY INGREDIENTS AND WHY THEY MATTER
Potatoes are non-negotiable here. They are the binder that holds everything together, and they give the inside of the cutlet that soft, warm, almost creamy texture. Use a starchy variety regular Indian desi potatoes work perfectly, as do Russets. Waxy potatoes like new potatoes tend to be too wet and will make your mixture difficult to shape.
The mixed vegetables I use carrot, green peas, French beans, and sweet corn bring colour, a little sweetness, and enough bite to make each cutlet interesting rather than just a potato patty. The key is to steam them instead of boiling. Boiled vegetables carry a lot of water, and that water is exactly what causes cutlets to fall apart in the pan. Steam for 8 to 10 minutes, then spread them out and let them cool and dry properly before mashing.
For the spicing, garam masala and amchur (dry mango powder) do the heavy lifting. Garam masala adds warmth and depth, while amchur gives that tangy, slightly sour edge that you get in good Indian street food. Fresh ginger and green chilli bring brightness and heat. If you are cooking for young children, simply leave out or halve the chilli the cutlets are still full of flavour without it.
Breadcrumbs are the classic outer coating, and for good reason they fry up fast, stay crisp, and give you that satisfying crunch when you bite through. Panko breadcrumbs produce a lighter, airier crust. Crushed cornflakes give a deeper golden colour. Fine semolina (rava) gives a slightly nutty, coarser texture. All three work well use whatever you have to hand.
Also Read: Indian Corn Cheese Balls Recipe
HOW TO MAKE IT
The process has four clear stages: cook and cool the vegetables, make and season the mixture, shape and coat the cutlets, then fry. None of these steps is complicated, but doing them in order and not rushing the cooling stage is what separates a cutlet that holds together from one that falls apart the moment it hits the oil.
Full directions are in the step-by-step section below. But do read through them once before you start. It takes five minutes and makes the whole cooking process much smoother.
TIPS FOR BEST RESULTS
These are the things I have learned the hard way so you do not have to:
- Get rid of all the moisture. This is the single most important thing. After steaming your vegetables, spread them on a clean towel or a wide plate and give them time to cool and dry. Even five extra minutes of air drying makes a real difference.
- Chill before you fry. Once you have shaped and coated the cutlets, put them in the fridge for 15 to 20 minutes before frying. The cold firms up the mixture and the coating, so they hold their shape when they hit the hot oil instead of puffing out and cracking.
- Keep the heat at medium. High heat chars the outside before the inside has warmed through. Medium heat gives you that even, deep golden colour all the way to the edges.
- Oil your palms. Just a tiny bit of oil on your hands when you are shaping the patties stops the mixture from sticking and helps you get a smooth, even surface on each one.
- Do not overcrowd the pan. Two or three cutlets at a time no more. Overcrowding drops the oil temperature and you end up with greasy, pale cutlets instead of crispy golden ones.
SERVING SUGGESTIONS
The classic pairing is mint-coriander chutney and tamarind chutney, and there is a reason it has never gone out of style. The sharpness of the mint chutney cuts through the richness of the fried crust beautifully. A small bowl of tomato ketchup on the side keeps the children happy.
If you want to turn these into a proper snack, take two cutlets, tuck them between two slices of buttered bread with some thinly sliced onion and a generous smear of green chutney, and you have one of the best sandwiches you will ever eat. [INTERNAL LINK: Cutlet Sandwich Recipe]
For a party, skip the regular dinner plate. Arrange the cutlets on a wooden board or a slate, set out small bowls of dipping sauces, scatter a few lemon wedges and sliced red onion around the board, and it looks like something from a restaurant. The food is the same the presentation does the rest of the work.
STORAGE AND REHEATING
Fried cutlets will keep in the fridge for up to two days in a sealed container. To bring the crispiness back, reheat them in an air fryer at 180°C (350°F) for about five minutes, or in a dry non-stick pan over medium heat for a couple of minutes per side. The microwave will warm them through, but they come out soft and a little sad avoid it if you care about the texture.
For freezing, the trick is to freeze before frying. Shape and coat the cutlets, lay them flat on a baking tray lined with parchment, and freeze until solid about an hour. Then transfer to a zip-lock bag and store for up to a month. When you are ready to cook, fry them straight from frozen on medium heat, giving them an extra two to three minutes per side. They come out just as good as fresh.
VARIATIONS AND SUBSTITUTIONS
There are a lot of ways to take this recipe in a different direction, and I encourage you to experiment once you have made it once:
- Add paneer or tofu: Grate about 50g of firm paneer or well-pressed tofu into the mixture before shaping. It adds protein, a slightly richer flavour, and makes the texture even softer inside.
- Try a beetroot cutlet: Grate one small raw beetroot into the vegetable mixture. The cutlets turn a gorgeous deep pink-red colour and have a natural sweetness that makes them particularly popular at parties and with kids.
- Use poha as a binder: If you want to skip breadcrumbs entirely, use powdered poha (flattened rice, blitzed to a coarse powder) in the mixture and as the outer coating. It gives a lighter bind and a texture that is slightly different but equally good.
- Make it gluten-free: Replace the plain flour slurry with a cornflour-water slurry (cornflour is already gluten-free) and use certified gluten-free breadcrumbs, rice flour, or powdered poha for the coating. The recipe works just as well.
- Air fryer version: Brush the coated cutlets lightly with oil on all sides. Air fry at 190°C (375°F) for 12 to 15 minutes, flipping once halfway through. The crust is not quite as deep as shallow-fried, but it is genuinely crispy and uses a fraction of the oil.
STANDARD OPERATING PROCEDURE (SOP) FOR CONSISTENT RESULTS EVERY TIME
If you are making these for a party, a catering situation, or just want to get the same result every single time, follow this sequence:
1. Mise en place first. Before you turn on the heat, have every ingredient measured, chopped, and sitting in front of you. Spices in one small bowl, breadcrumbs in a shallow plate, cornflour and water measured out for the slurry. This prevents the panicked scramble that leads to overcooking.
2. Steam, never boil. Boiling leaches water into the vegetables and makes the mixture wet. Steam only, and drain thoroughly.
3. Cool completely before mixing. Hot vegetables melt the starch in the potato and make the mixture sticky and soft. Give them at least 10 minutes at room temperature before you start mixing in the spices and breadcrumbs.
4. Taste before shaping. Season the mixture, then take a small piece, roll it into a ball, and taste it. This is your one chance to adjust salt or spice before everything is formed and coated. Do not skip this.
5. Weigh for uniformity. Use a kitchen scale to portion the mixture at 50 to 60g per cutlet. Equal portions mean equal cooking times no undercooked centres or overdone edges.
6. Double coat for a sturdier crust. Slurry, breadcrumbs, slurry again, breadcrumbs again. Two layers of coating creates a shell that will not crack open during frying.
7. Rest in the fridge before frying. At least 15 minutes. Non-negotiable if you want them to hold their shape.
8. Keep the oil temperature steady. Aim for 170 to 180°C (340 to 360°F). A cooking thermometer is worth using here. Too cool and the cutlets absorb oil; too hot and the outside burns before the inside is warm.
GARNISH AND PRESENTATION
The way you present these makes a real difference, even for a casual evening snack at home.
Drain the fried cutlets on kitchen paper for a minute or two this removes the surface oil and keeps the crust from going soggy. Arrange them on the serving plate slightly overlapping, rather than stacked or piled, so every cutlet shows its golden crust.
Right before serving, dust lightly with chaat masala. This is the step most people skip, and it is the one that makes everyone ask what you did differently. The chaat masala adds a tangy, savoury, slightly smoky note that ties everything together.
Scatter a few fresh coriander leaves, two or three thin slices of green chilli, and wedges of lemon around the cutlets. For a more elevated presentation dinner party, birthday table, or a social media photo you are proud of use a cast-iron skillet or a dark slate board instead of a white plate. The contrast makes the golden colour of the cutlets look stunning.
PLATING AND SERVING TIPS
- Serve immediately. Cutlets lose their crispiness within 10 to 15 minutes at room temperature. If you are cooking for a group, fry in batches and bring them to the table as they come out of the pan.
- Use small ceramic dipping bowls for the chutneys. Squeezing sauce directly onto the plate looks messy and makes the crust soggy. Individual bowls keep things neat and let each person control how much they dip.
- For a children's party, use a cutlet mould to press the patties into stars, hearts, or animal shapes. The recipe and the flavour are exactly the same, but the shapes make them genuinely exciting for small children.
- For a dinner party starter, stack three cutlets vertically on a small plate, secure them with a short toothpick skewer, and tuck a small sprig of micro-herbs or a fresh mint leaf into the top. It takes 30 seconds per plate and looks like something you ordered at a restaurant.
If you give this recipe a go, I would genuinely love to know how it turned out for you. Drop a star rating and leave a comment below it really does help other readers decide whether to try it. And if you make these for a party, share a photo on Pinterest and tag us. Seeing your plates always makes my day.
Ingredients
- 3 medium potatoes (approx. 400g / 14 oz), boiled
- ½ cup (75g) carrot
- ½ cup (75g) French beans
- ½ cup (75g) green peas (fresh or frozen)
- ¼ cup (40g) sweet corn kernels
- 1 teaspoon fresh ginger, grated
- 1 medium onion, finely chopped
- 1–2 green chillies, deseeded and finely chopped
- 3 tablespoons fresh coriander (cilantro) leaves, finely chopped
- 1 teaspoon garam masala
- ½ teaspoon cumin powder
- ½ teaspoon coriander powder
- ½ teaspoon amchur (dry mango powder)
- ¼ teaspoon turmeric powder
- Thinly sliced red onion
Nutritional Information
- Calories: 210 kcal
- Protein: 5g
- Carbohydrates: 32g
- Fat: 7g
- Fiber: 4g
- Sodium: 390mg
- Sugar: 3g
Directions
1. PREPARE THE VEGETABLES
1. Steam the carrots, French beans, green peas, and sweet corn in a steamer basket or strainer set over boiling water for 8–10 minutes over medium heat, until fork-tender but not mushy. Alternatively, pressure cook with 3 tablespoons water for 2 whistles on medium heat, then drain all liquid.
2. Spread the steamed vegetables on a clean kitchen towel or wide plate and let them cool completely. Make sure there is no excess moisture — this is the key step that prevents the cutlets from breaking apart.
3. Peel the boiled potatoes and mash them in a large mixing bowl until smooth, with no lumps remaining.
2. MAKE THE CUTLET MIXTURE
4. Heat 1 teaspoon oil in a small pan over medium heat. Add the chopped onion and sauté for 3–4 minutes until translucent. Add the grated ginger and chopped green chilli and sauté for 1 more minute until fragrant. Turn off the heat.
5. Add the sautéed onion mixture and the cooled steamed vegetables to the mashed potatoes. Mix well.
6. Add the garam masala, cumin powder, coriander powder, turmeric, amchur (or lemon juice), salt, black pepper, and fresh coriander. Mix until the spices are evenly distributed.
7. Add the breadcrumbs (for binding) one tablespoon at a time and mix to form a firm, non-sticky dough. If the mixture feels too soft, add 1–2 tablespoons more breadcrumbs. Taste and adjust salt if needed.
3. SHAPE THE CUTLETS
8. Divide the mixture into 10–12 equal portions (approx. 50–60g each). Grease your palms lightly with oil to prevent sticking.
9. Roll each portion into a ball, then flatten it between your palms to form a round or oval patty about 1 cm (½ inch) thick. You can also use a cutlet mould for shaped cutlets.
4. COAT THE CUTLETS
10. In a small bowl, whisk together the cornflour and water to make a smooth, lump-free slurry.
11. Place the breadcrumbs for coating in a shallow plate.
12. Dip each shaped patty into the cornflour slurry, letting the excess drip off. Roll it in the breadcrumbs, pressing gently so they adhere on all sides. For a thicker, sturdier crust, dip in slurry and roll in breadcrumbs a second time.
13. Place the coated cutlets on a plate and refrigerate for 15–20 minutes. This firms them up for better frying.
5. FRY THE CUTLETS
14. For shallow frying: Heat 2–3 tablespoons oil in a non-stick pan over medium heat. Once hot, place 3–4 cutlets in the pan without overcrowding. Fry for 2–3 minutes per side until golden brown and crisp. Flip only once per side. Drain on kitchen paper.
15. For deep frying: Heat oil to 175°C (350°F) in a deep pan. Slide in 3–4 cutlets gently. Fry over medium heat for 3–4 minutes, turning once, until golden and crisp on all sides. Do not stir immediately after adding — let them set for 60 seconds first. Drain on kitchen paper.
6. SERVE
16. Transfer to a serving plate, sprinkle with chaat masala, and garnish with coriander sprigs and lemon wedges. Serve immediately with mint chutney and tamarind chutney.
Rate this Recipe
User Reviews
No reviews yet. Be the first to share your thoughts!