Paneer Tangdi Style Recipe That Looks Like a Showstopper and Tastes Even Better
Make stunning paneer tangdi style at home with this easy marinade and SOP guide. Smoky, golden, vegetarian showstopper. Get the full recipe now.
 Tripti Srivastava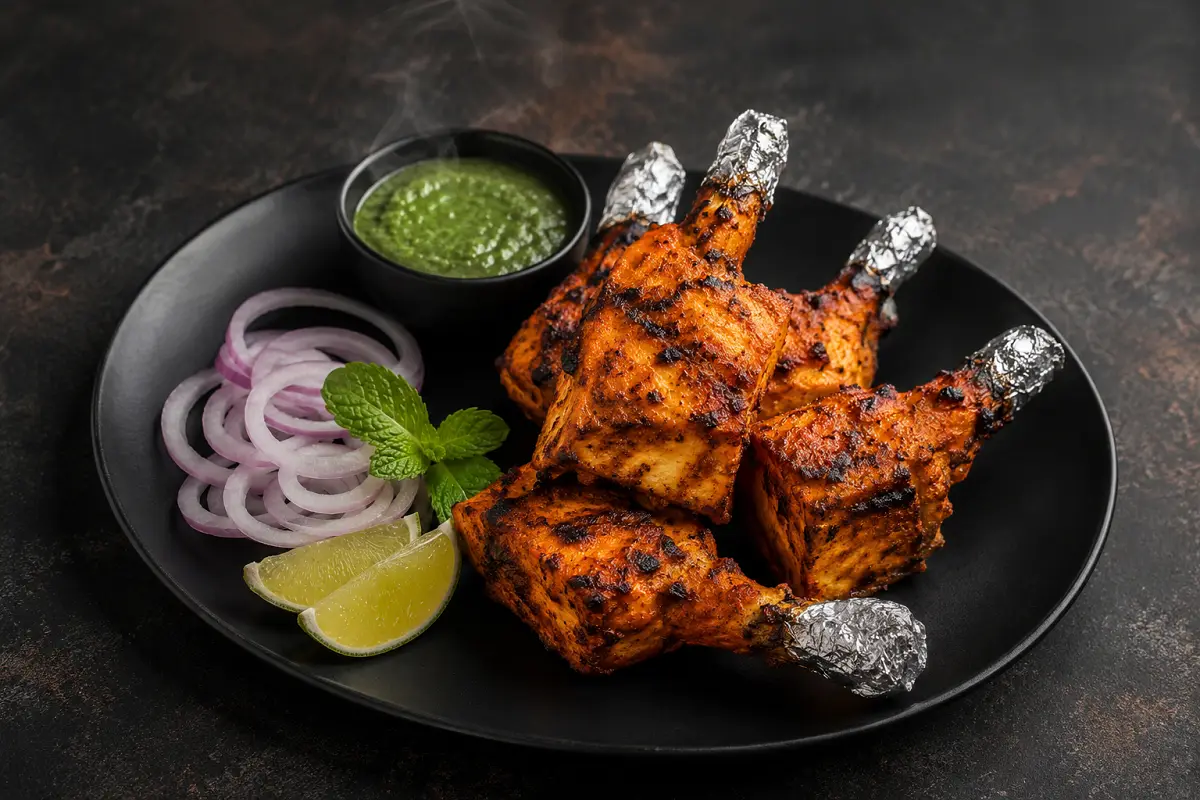
The first time I served paneer tangdi style at a dinner party, three guests asked which restaurant had catered the food. The foil frills on the skewer tips, the deep orange-red marinade coating, the way the paneer sat at an angle against a mound of laccha onion on the slate board it looked exactly like the chicken tangdi kabab you get at a proper North Indian restaurant. Except it was paneer. And I had made it in my oven.
That is the magic of this recipe. It is not simply grilled paneer with a spice rub. It is a carefully constructed vegetarian showpiece: thick slabs of paneer threaded onto skewers with coloured bell peppers and onion, coated in a rich tandoori marinade, grilled until the edges blister and caramelise, and presented with the same foil-frill finish and laccha onion plating that you see in fine dining and wedding banquet menus across North India.
If you are looking for a vegetarian centrepiece that gets the same reaction as a meat dish this is it. Bold, smoky, visually stunning, and genuinely delicious in its own right.
What Makes This Paneer Tangdi Style Special
Most grilled paneer recipes are simply paneer tikka by another name cubes on a stick with a yoghurt marinade. This recipe is built differently, and these are the details that make the difference:
- The tangdi shape technique: Instead of small cubes, the paneer is cut into thick rectangular slabs approximately 6cm long, 3cm wide, and 2cm thick and threaded lengthwise onto a flat metal skewer. This mimics the elongated profile of a chicken tangdi leg and is what gives the dish its restaurant-style visual identity. Alternating pieces of bell pepper and onion between each paneer slab adds colour, flavour, and structural support on the skewer.
- Double marinade for maximum flavour: Paneer has a neutral flavour that benefits enormously from a two-stage marinade. A quick first coat of lemon juice, salt, and chilli opens the surface. The main tandoori marinade thick hung curd, mustard oil, and a full spice blend then has a properly prepared surface to grip and penetrate.
- Pre-sear for a caramelised crust: A brief 90-second sear in a hot pan before the final oven or grill step creates a golden crust on the paneer surface that holds the marinade in place during cooking and gives a beautiful caramelised texture that raw-grilled paneer never achieves.
- Hariyali variation option: The same tangdi-style format works with the green hariyali marinade from the previous recipe and the visual contrast of vivid green paneer on a dark slate board is even more dramatic than the red tandoori version. Instructions for both are included.
- Completely vegetarian and easily vegan: Swap the hung curd for thick coconut yoghurt and the butter baste for vegan butter every other element of this recipe is already plant-based.
Ingredients Overview
The quality of the paneer matters more here than in any other paneer recipe. For tangdi-style presentation, you need paneer that is firm enough to hold its shape on the skewer through the heat of cooking without crumbling or falling apart. Fresh homemade paneer or a good quality store-bought block paneer (not the pre-crumbled variety) works best. If your paneer feels soft and wet, press it between two plates weighted with a heavy pot for 30 minutes before cutting this removes excess whey and firms the texture significantly.
The tandoori marinade is built on hung curd as the binding base. The key spice here is Kashmiri red chilli powder, it gives the signature deep orange-red colour with only moderate heat, meaning you get the visual impact of a restaurant tandoor dish without making the paneer too spicy for guests who prefer a milder flavour. A tablespoon of roasted besan is non-negotiable in the marinade it is the professional binder that prevents the coating from sliding off the paneer during grilling.
Mustard oil heated to smoking point and cooled is the traditional fat for this marinade. It adds an unmistakable pungent depth that no other oil replicates. If mustard oil is genuinely unavailable, use a mild extra virgin olive oil as a substitute but do try to source the mustard oil if you can. Mustard oil is a foundational ingredient in North Indian and Bengali cooking and is available at any Indian grocery store.
Also Read: Tangdi Kebab Hariyali
How to Make It
Cut the paneer into tangdi-style slabs, apply the first marinade, then coat generously in the main tandoori marinade and rest for at least 2 hours. Thread onto flat metal skewers alternating with bell pepper and onion pieces. Sear briefly in a hot pan, then finish in the oven grill, air fryer, or on a grill pan until deeply coloured with blistered edges. Rest for 2–3 minutes, add the foil frills to the skewer tips, dust with chaat masala, and plate with laccha onion and chutney.
Active cooking time is about 20 minutes. The marinade and the presentation do the rest.
Tips for Best Results
- Use flat metal skewers, not round ones and not wooden ones. Flat skewers grip the paneer and prevent it from spinning when you rotate round skewers let the paneer rotate independently and the underside never gets proper colour. Wooden skewers char and can break under the weight of thick paneer slabs.
- Do not over-marinate paneer. Unlike meat, paneer does not benefit from very long marinating times the acid in the yoghurt can make the outer surface of the paneer grainy and crumbly if left too long. Two hours is ideal; four hours is the maximum.
- The pre-sear step is not optional if you want the coating to hold. Raw paneer surfaces are smooth and slightly wet the marinade slides off during cooking. A 90-second sear creates a textured, grippy surface that locks the marinade in place.
- Cook at high heat and do not move the skewers too early. Let a proper crust form before rotating if the paneer is sticking when you try to turn it, it is not ready to be turned. When properly seared, it releases cleanly.
- Serve immediately. Unlike meat kebabs which benefit from resting, grilled paneer is best eaten within 5 minutes of coming off the heat it firms up and loses its silky interior texture as it cools.
Serving Suggestions
Serve paneer tangdi style as a centrepiece appetiser on a dark slate board or a black cast- iron grill tray, arranged with the skewers at slightly different angles to create visual height and movement. Place a bowl of mint-coriander chutney and a bowl of sweet tamarind chutney at opposite ends of the board the dual-chutney setup gives guests a choice and adds two more colour points (bright green and deep brown) to the visual spread.
For a full vegetarian feast, pair with dal makhani, butter naan, and jeera rice. The rich, creamy dal provides the perfect counterpoint to the smoky, spiced paneer. A cooling cucumber raita alongside balances the heat of the tandoori marinade.
For individual plating at a sit-down dinner, remove the paneer and vegetables from the skewer and fan them on a warmed flat plate over a base of laccha onion, with the foil frill skewer tip resting decoratively against the edge of the plate. This format makes the dish easier to eat while retaining the restaurant-style visual presentation.
Storage and Reheating
Store cooked paneer tangdi in an airtight container in the fridge for up to 2 days. Paneer does not keep as long as meat once cooked the texture deteriorates faster, becoming rubbery and dry. For this reason, this recipe is best made fresh on the day it is served.
If you do need to reheat, use a hot grill pan with a very small amount of butter over medium heat 2 minutes per side maximum. The goal is to warm the paneer through and revive the outer crust without drying out the interior. A microwave makes reheated paneer tough and chewy.
The marinated, uncooked paneer can be refrigerated for up to 24 hours before cooking. This is the best make-ahead strategy marinate the day before, store covered in the fridge, and cook fresh on the day. Do not freeze marinated paneer; the freezing and thawing process changes the texture of paneer significantly and it becomes crumbly.
Variations and Substitutions
- Hariyali paneer tangdi: Replace the tandoori red marinade with the full hariyali paste (blended coriander, mint, blanched spinach, green chilli, roasted cashew) from the tangdi kabab hariyali recipe. The vivid green paneer on a dark board is one of the most visually striking vegetarian presentations in Indian cooking.
- Malai paneer tangdi: Swap the yoghurt with fresh cream, replace the red chilli powder with white pepper, and add a tablespoon of cashew paste to the marinade for a pale, creamy, mildly spiced version. This is the most popular wedding-banquet variation elegant, gentle, and suitable for all ages.
- Achari paneer tangdi: Add 1 teaspoon of mixed achaar (pickle) paste and half a teaspoon of fennel seeds to the main marinade for a tangy, pickled flavour dimension that cuts through the richness of the paneer.
- Vegan tangdi style: Replace paneer with firm, well-pressed tofu cut into the same tangdi-style slab shape. Use coconut yoghurt in the marinade and vegan butter for basting. The tofu absorbs the marinade beautifully and develops excellent colour on the grill.
- Stuffed paneer tangdi: Make a lengthwise slit in each paneer slab and fill with a mixture of finely chopped onion, green chilli, coriander, and a pinch of chaat masala before skewering and marinating. This stuffed version is a more elaborate party showpiece and adds a flavour surprise at the centre of each piece.
Preparation Method
Start by pressing the paneer if it feels soft place the block between two plates with a weight on top for 30 minutes, then pat dry. Cut into tangdi-style slabs: approximately 6cm long, 3cm wide, and 2cm thick. Each slab should be large enough to thread lengthwise onto a flat skewer and hold its shape through cooking.
Apply the first marinade of lemon juice, salt, and ginger-garlic paste. While the first marinade works, prepare your main marinade heat the mustard oil to smoking point, cool completely, then whisk into the hung curd with all spices. Coat the paneer slabs thoroughly, pressing the marinade into all surfaces. Thread onto skewers alternating with bell pepper and onion, then rest in the fridge.
Standard Operating Procedure (SOP)
Step 1 Paneer prep: Press paneer block if needed. Cut into slabs measuring 6 cm x 3 cm x 2 cm. Pat all surfaces completely dry. You need approximately 4–5 slabs per skewer depending on skewer length.
Step 2 Vegetable prep: Cut capsicum (red, yellow, green) and onion into 3cm squares large enough to sit between paneer slabs on the skewer without falling through.
Step 3 First marinade: Combine lemon juice, salt, and ginger-garlic paste. Coat all paneer slabs. Rest 15 minutes.
Step 4 Main marinade: Heat mustard oil to smoking point. Cool completely. Whisk into hung curd with all spices, besan, and kasuri methi. Taste and adjust. Coat paneer thoroughly. Refrigerate 2 hours (maximum 4 hours).
Step 5 Pre-sear: Heat a pan over high heat with a small amount of oil. Sear each marinated paneer slab for 90 seconds per side to form a golden crust. Cool for 3 minutes before skewering.
Step 6 Skewer: Thread paneer slabs lengthwise onto flat metal skewers, alternating with bell pepper and onion squares. Leave a small gap between each piece.
Step 7 Grill: Cook at high heat, rotating every 5 minutes. Baste with butter or ghee halfway through. Target: deep orange-gold with blistered, lightly charred edges. Total cook time: 15–18 minutes in the oven grill or 12–14 minutes in the air fryer.
Step 8 Dhungar finish (optional): Transfer cooked skewers to a deep tray. Place live coal on foil in the centre, drizzle ghee, cover 30 seconds. Remove coal. Serve within 2 minutes.
Step 9 Frill and plate: Rest 2–3 minutes. Wrap skewer tips in foil frills. Dust with chaat masala. Squeeze charred lemon. Plate and serve immediately.
Garnish and Presentation
The presentation of paneer tangdi style is built on three visual elements working together: the deep orange-red of the tandoori-coated paneer, the vivid multi-coloured bell peppers and onion alternating along the skewer, and the crisp white foil frill at the tip. Together, these three elements create a platter that looks professionally composed without requiring any specialist equipment.
Dust with chaat masala right before plating the timing matters here because chaat masala draws moisture from the paneer surface and can dull the vibrant coating if applied too early. A brush of melted ghee or butter over the finished skewers immediately before plating adds a glossy restaurant-style sheen. Scatter fresh coriander and a pinch of julienned ginger across the platter for colour and freshness.
To make the foil frill: cut a strip of aluminium foil 8cm wide and 20cm long. Fold lengthwise in half. Cut a fringe along the folded edge at 5mm intervals, cutting two-thirds of the way through the width. Roll tightly around the skewer tip and press to secure. The frill unfurls into a ruffled decoration that is the defining visual signature of tangdi-style presentation.
Plating and Serving Tips
For a party platter, lay two or three skewers across a large dark slate board or a black ceramic platter at slightly offset angles not parallel, not crossing, but arranged with a natural, dynamic energy that suggests movement. Place a small bowl of vibrant green mint chutney and a ramekin of deep brown tamarind chutney at opposite ends of the board. Scatter laccha onion generously along the base of the skewers and tuck charred lemon halves between them.
For individual plating, slide the paneer and vegetable pieces off the skewer onto a warmed flat white plate. Fan them in an arc, alternating paneer and vegetable pieces, over a base of laccha onion. Rest the empty foil-frilled skewer decoratively across the plate this detail communicates the tangdi identity even after the food has been removed from it. Add a small ramekin of chutney, a few sprigs of coriander, and a dusting of Kashmiri red chilli powder around the edge of the plate.
For a truly theatrical table moment, bring the paneer tangdi to the table still on the skewers and resting on a sizzler plate or a cast iron tray that has been heated in the oven. Add a few drops of water to the hot tray just before bringing it out the dramatic sizzle and steam at the table elevates even a home-cooked dish into a restaurant experience. Serve immediately paneer waits for no one.
If you make this paneer tangdi style recipe, I would love to see your platter! Drop a star rating and leave a comment below your feedback genuinely helps other readers find this recipe. Tag us on Instagram with your foil-frilled skewers I repost every single one.
Ingredients
- 500g firm paneer block, cut into 6cm x 3cm x 2cm slabs
- 1 medium red bell pepper, cut into 3cm squares
- 1 medium green bell pepper, cut into 3cm squares
- 1 large onion, cut into 3cm squares, layers separated
- ½ teaspoon red chilli powder
- 1 medium yellow bell pepper, cut into 3cm squares
- 1½ tablespoons fresh lemon juice
- 1½ teaspoons ginger-garlic paste
- 1 teaspoon salt
- 1½ teaspoons ginger-garlic paste
- ¾ cup (180g) hung curd / thick Greek yoghurt
- 2 tablespoons mustard oil
- 2 teaspoons Kashmiri red chilli powder
- ½ teaspoon regular red chilli powder (adjust to heat preference)
- 1 teaspoon cumin powder
Nutritional Information
- Calories: 298 kcal
- Protein: 18g
- Carbohydrates: 11g
- Fat: 20g
- Fiber: 2g
- Sodium: 490mg
- Sugar: 5g
Directions
1. PREP THE PANEER
1. If the paneer feels soft, press it first: place the block between two plates, weight the top plate with a heavy pot, and press for 30 minutes. Drain any released liquid and pat the block completely dry.
2. Cut the paneer into slabs approximately 6cm long, 3cm wide, and 2cm thick. Each slab should be large enough to thread lengthwise onto a flat metal skewer without breaking. You should get 16–20 slabs from a 500g block.
2. PREP THE VEGETABLES
3. Cut all three bell peppers and the onion into 3cm squares. The pieces should be roughly the same thickness as the paneer slabs so everything cooks evenly on the skewer. Separate the onion layers into individual squares.
3. FIRST MARINADE
4. In a small bowl, combine lemon juice, salt, ginger-garlic paste, and red chilli powder.
5. Lay the paneer slabs on a tray. Brush or rub the first marinade over all surfaces of every slab. Coat the bell pepper and onion pieces lightly as well.
6. Set aside at room temperature for 15 minutes.
4. PREPARE THE MAIN TANDOORI MARINADE
7. Heat the mustard oil in a small pan over high heat until it reaches smoking point — a faint haze will appear. Remove from heat immediately and allow to cool completely before using.
8. In a large bowl, whisk the hung curd until completely smooth.
9. Add the cooled mustard oil and whisk to combine.
10. Add Kashmiri red chilli powder, regular red chilli powder, ginger-garlic paste, cumin, coriander, garam masala, turmeric, white pepper, chaat masala, salt, roasted besan, kasuri methi, ajwain, lemon juice, and fresh cream if using. Mix thoroughly until the marinade is uniform, thick, and deeply coloured.
11. Add food colour if using and stir through. Taste and adjust salt and chilli.
5. COAT THE PANEER
12. Add the first-marinated paneer slabs to the main marinade bowl. Using clean hands, coat every surface of every slab generously — press the marinade firmly into all sides. Coat the bell pepper and onion pieces as well.
13. Cover with cling film and refrigerate for 2 hours. Do not exceed 4 hours for paneer.
6. PRE-SEAR THE PANEER (IMPORTANT STEP)
14. Remove the paneer slabs from the marinade. Heat a wide non-stick or cast iron pan over high heat. Add 1 tablespoon of neutral oil.
15. Once the oil is shimmering, lay the marinated paneer slabs in the pan in a single layer — work in batches.
16. Sear undisturbed for 90 seconds until a golden crust forms on the underside. Flip and sear for 60 seconds on the other side. You are not cooking the paneer through at this stage — just creating a crust that holds the marinade.
17. Remove and allow to cool for 3 minutes before skewering.
7. SKEWER THE PANEER AND VEGETABLES
18. Thread the pre-seared paneer slabs lengthwise onto flat metal skewers, alternating with bell pepper and onion squares: paneer — pepper — onion — paneer — pepper — onion — paneer. Leave a small 5mm gap between each piece.
19. Press any remaining marinade onto the assembled skewers, coating any exposed surfaces.
8. OVEN / GRILL METHOD
20. Preheat oven to maximum grill/broiler setting (230–240°C). Place a wire rack over a foil-lined baking tray. Lay the skewers across the rack so the paneer is elevated above the tray.
21. Grill on the upper shelf for 8–9 minutes. Remove, rotate each skewer carefully, and baste with melted butter or ghee.
22. Return to the grill for a further 7–8 minutes until the coating is deeply coloured and blistered at the edges, and the bell pepper and onion are lightly charred. Watch closely in the final 2 minutes — paneer can go from perfect to over-coloured quickly.
9. DHUNGAR COAL SMOKE FINISH (OPTIONAL BUT RECOMMENDED)
23. Transfer cooked skewers to a deep tray or large bowl. Place a small square of foil in the centre and put a live coal on it. Drizzle 3–4 drops of ghee over the coal — it will smoke immediately.
24. Cover tightly with foil or a lid for 30–35 seconds. Remove coal and foil. Serve within 2 minutes for full smokiness.
10. REST AND FINISH
25. Rest the skewers for 2–3 minutes before plating.
26. While the paneer rests, make the foil frills: cut strips of aluminium foil 8cm wide x 20cm long. Fold each strip lengthwise in half. Cut a fringe along the folded edge at 5mm intervals, cutting two-thirds of the way through the width. Roll tightly around each skewer tip and press to secure.
27. Place lemon halves cut-side down on the hot pan or grill for 60 seconds until lightly caramelised.
28. Dust the cooked paneer lightly with chaat masala. Squeeze charred lemon juice over all skewers.
29. Brush a thin coat of melted ghee over the entire surface of each skewer for gloss.
30. Arrange on the serving board with laccha onion, charred lemon, julienned ginger, fresh coriander, and chutney bowls. Serve immediately.
Rate this Recipe
User Reviews
No reviews yet. Be the first to share your thoughts!