Crispy Chilli Chicken That Brings the Indo-Chinese Restaurant Home
Chilli chicken recipe with crispy batter-fried chicken, bold green chilli sauce & wok-tossed capsicum. Dry and gravy versions ready in 40 mins.
 Tripti Srivastava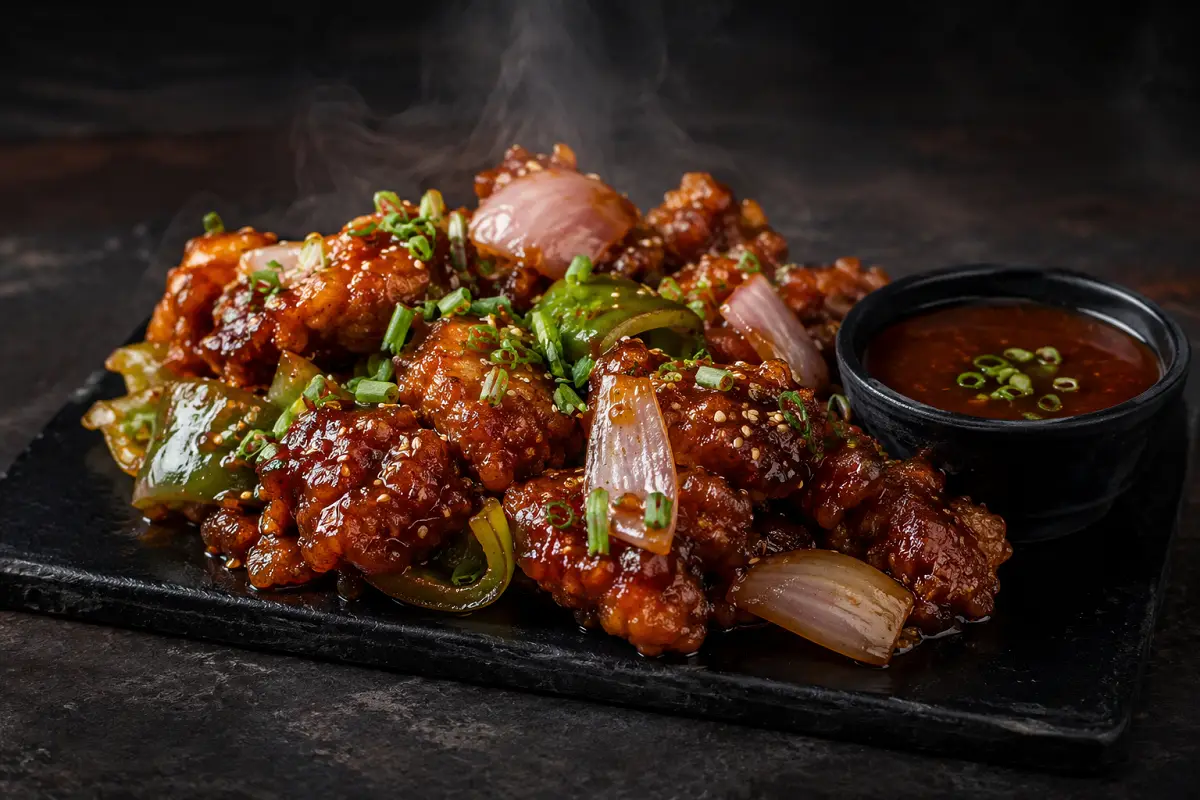
Ask anyone who grew up eating Indo-Chinese food in India what their most-ordered restaurant dish is, and the answer, more often than not, is chilli chicken. Not for any complicated reason simply because it delivers something that is genuinely hard to resist. Crispy, golden batter-fried chicken pieces tossed in a wok on high heat with sliced onion, capsicum, green chillies, garlic, and a sauce that is simultaneously hot, tangy, slightly sweet, and loaded with the umami depth of soy and vinegar. The fragrance when it hits a hot pan is one of the best smells in any kitchen. The texture the crunch of the batter against the softened capsicum and the sticky, bold sauce is one of those eating experiences that makes people order it every single time without even looking at the rest of the menu.
Chilli chicken is often confused with chicken Manchurian, and while the two dishes share DNA they are both Indo-Chinese, both use batter-fried chicken, and both are tossed in a soy-based sauce they taste meaningfully different. Chilli chicken features crispy fried chicken cubes, bell peppers, aromatics, and a medley of Chinese sauces that strikes a balance between being mildly sweet, tangy, and just a touch spicy. The key distinction is that chilli chicken is defined by the green chilli and capsicum in the sauce base these are not just garnishes here. They are the structural flavour elements that give the dish its characteristic freshness and heat. Manchurian sauce is richer, darker, and more tomato-forward. Chilli chicken sauce is brighter, greener, and more assertively aromatic from the fresh chilli and the high-heat stir-fry of the vegetables.
This recipe gives you the complete chilli chicken the batter-marinade coating, the full sauce build, both dry and gravy formats, the schezwan variation for the fire lovers at the table, the air fryer adaptation, and a full SOP and presentation guide. Once you make it at home you will understand why it has been the top of every Indo-Chinese menu for decades.
What Makes This Chilli Chicken Recipe Special
The difference between a great chilli chicken and a mediocre one comes down to a few specific decisions and this recipe makes every one of them correctly.
- The batter-marinade is one mixture, not two steps. Many recipes separate the marination from the batter marinate the chicken, then coat in a separate batter. This recipe combines both into a single thick paste: ginger-garlic paste, soy sauce, red chilli sauce, an egg, cornflour, and plain flour all mixed with the chicken simultaneously. The chicken marinates inside the batter, which means the flavour is built into the coating itself rather than sitting only on the surface of the meat. Every crag and fold of the batter tastes of the marinade, not just plain flour.
- Kashmiri red chilli powder for colour without fire. The deep, vivid red-orange colour of restaurant chilli chicken comes from Kashmiri red chilli powder added to the batter rather than from food colouring. Kashmiri chilli gives intense visual colour with moderate heat using regular red chilli powder in the same quantity would make the dish far too hot. The green chillies in the sauce carry the heat. The Kashmiri chilli in the batter carries the colour.
- Green chillies and green chilli sauce as the sauce hero. Where chicken Manchurian relies on tomato ketchup and red chilli sauce as its primary flavour drivers, chilli chicken is defined by fresh green chillies and green chilli sauce in the sauce base. These two together produce a brighter, more citrusy, more aromatic heat than red chilli preparations. The slit green chillies go into the hot oil before the onion and capsicum they bloom in the oil and release their essential character before anything else joins the pan.
- Capsicum and onion cooked to the right texture. In chilli chicken, the capsicum and onion are not cooked soft. They are added to the hot wok and tossed for exactly 60 to 90 seconds long enough to take the raw edge off while keeping a distinct crunch. That crunch against the crispy chicken and the sticky sauce is the textural signature of a properly made chilli chicken. Overcooked capsicum is limp and sweet. Correctly cooked capsicum is crunchy, slightly charred at the edges, and aromatic.
- The vinegar timing matters. Vinegar is added to the sauce as a pre-mix component but a final dash is also added off the heat at the very end after the chicken has been tossed. This second, off-heat addition of vinegar preserves the sharpness and bright acidity of the vinegar in the finished dish rather than letting it cook away into the background. It is the small step that keeps the chilli chicken tasting fresh and tangy rather than flat and one-dimensional.
Ingredients Overview
Start with boneless chicken thighs or breast, cut into 3 to 4 cm cubes. Thighs are the more forgiving choice they stay juicier through the frying process and have more natural fat, which means the batter clings better and the interior remains moist even if the cooking runs slightly long. Breast pieces produce a leaner, slightly denser bite. Pat the chicken dry before adding it to the batter- marinade mixture surface moisture makes the batter slip and prevents it from bonding properly to the meat.
The batter-marinade is built with cornflour and plain flour in equal parts for the same reason as chicken Manchurian cornflour alone is too fragile and plain flour alone absorbs too much oil. Together they produce a craggy, crispy coating that holds up to the sauce. The egg binds the batter and creates the irregular surface texture. Do not add water to this batter the moisture from the egg and the sauces is sufficient to bring it together into a thick, pasty consistency that coats the chicken rather than running off it. If it feels too dry, add one tablespoon of water at a time. If it feels too wet and thin, add a tablespoon of cornflour. The correct consistency is thick enough to coat a spoon without running off immediately.
The chilli chicken sauce has a specific character that distinguishes it from Manchurian sauce. Green chilli sauce is one of the two primary sauce elements not an optional addition. Combined with red chilli sauce and a smaller amount of soy sauce and ketchup, it produces the bright, aromatic, slightly sharp heat profile that defines this dish. White vinegar provides the tanginess. A small amount of sugar balances the heat and the vinegar without making the sauce sweet. Sesame oil is the finishing element never used for cooking, always added off the heat to preserve its toasted, nutty aroma.
The vegetables onion cut into petals, green and red capsicum in squares, fresh green chillies slit lengthwise, and spring onion whites are not just filler here. The capsicum provides crunch and sweetness. The onion provides body and a faint caramelised note from the high-heat toss. The slit green chillies provide fresh, bright heat that the chilli sauces alone cannot replicate. The spring onion whites add aromatics to the base and the spring onion greens are the finishing garnish. For substitutions: replace green capsicum with yellow for a milder, sweeter result. Add a tablespoon of honey in place of sugar for a floral sweetness. Use tamari for a gluten-free sauce version.
How to Make It
The process runs on two parallel tracks. Track one: mix the batter-marinade, coat the chicken, and deep fry until golden and crispy. Track two: pre-mix the sauce ingredients in a bowl, heat the wok until smoking, bloom the chillies and aromatics, stir-fry the capsicum and onion briefly, add the sauce, thicken with cornflour slurry, and toss in the fried chicken. The whole process takes 40 minutes of active time. The result is a plate of chilli chicken that is crispy where it should be crispy, crunchy where the capsicum is, sticky where the sauce coats the chicken, and bold throughout. The full step-by-step directions are below.
The critical moment is the final 60-second toss after the chicken goes into the sauce. The sauce must be at full boiling point and the wok must be on maximum heat for that toss this creates the slight caramelisation on the chicken edges that makes the difference between a Manchurian-style soft coating and the drier, stickier, more intensely flavoured surface that defines chilli chicken.
Also Read: Chicken Manchurian Recipe
Tips for Best Results
- Make the batter thick resist adding water. The batter should be thick enough that when you lift a chicken piece, the batter coats it and hangs slightly rather than running off in a thin stream. If it looks like a thin pancake batter, it is too loose and will slide off the chicken during frying. Add cornflour a tablespoon at a time until it reaches a thick, pasty consistency.
- Do not crowd the frying oil. This is the most common cause of soft, greasy chilli chicken at home. Crowding drops the oil temperature and causes the chicken to steam in the oil rather than fry. The surface becomes pale and soft rather than golden and crispy. Fry in batches of 4 to 5 pieces at 170°C and maintain the temperature between batches.
- Bloom the slit green chillies first in the hot oil. The first ingredient into the hot wok for the sauce before the garlic, ginger, or onion should be the slit green chillies. 20 to 30 seconds in hot oil blooms the chilli's essential oils and distributes the fresh chilli aroma through the entire sauce base. Chillies added later with the other vegetables give a sharp, raw heat instead of the rounded, aromatic heat of bloomed chillies.
- Keep the capsicum crunchy. Add the capsicum and onion to the wok and toss for no more than 60 to 90 seconds. You want a slight char at the edges and the raw bite taken off but the capsicum should still snap when you bite it. Overcooked capsicum turns sweet and limp and the dish loses the textural contrast that makes chilli chicken so satisfying.
- Pre-mix the sauce before the wok goes on. The wok cooking stage moves very fast the aromatics bloom in under 30 seconds, the vegetables toss in under 90 seconds. Having the sauce pre-mixed in a bowl means you can add it in a single confident pour without measuring individual sauces while garlic burns in the background.
- Add a final dash of vinegar off the heat. After tossing the chicken in the sauce, remove from heat and add one additional teaspoon of white vinegar directly over the dish. Stir once and plate immediately. This off-heat vinegar addition preserves the fresh, bright acidity that makes chilli chicken taste lively rather than flat.
Serving Suggestions
Chilli chicken dry is the natural starter format a plate of sticky, boldly spiced chicken pieces with a few slices of raw green chilli and a wedge of lime on the side. It is best served within 3 to 4 minutes of plating while the batter still has some crunch remaining. For a starter spread, pair with veg spring rolls and a bowl of hot-and-sour soup for the full Indo-Chinese restaurant experience at home.
Chilli chicken gravy is the main course format the sauce is slightly thinner and more abundant, designed to flow over and soak into whatever is served alongside. It pairs perfectly with egg fried rice or hakka noodles, where the sauce soaks into the base and turns every forkful deeply satisfying. For a complete Indo-Chinese dinner, serve the gravy version alongside a bowl of paneer Manchurian or fried rice with chilli sauce on the table.
Storage and Reheating
Fridge: Store cooked chilli chicken in an airtight container for up to 2 days in the refrigerator. The batter coating will soften overnight as the sauce moisture migrates into it. To partially restore the crunch, remove the chicken pieces from the sauce, reheat them in an air fryer at 190°C for 4 to 5 minutes to re-crisp, then toss briefly in the reheated sauce and serve. For the gravy version, reheat the sauce separately on the stovetop, adding a splash of water if it has thickened overnight.
Freezer: The batter-fried chicken (before being sauced) freezes well for up to 3 weeks on a parchment-lined tray. Freeze until solid, then transfer to a zip-lock bag. When ready to use, air fry at 190°C for 6 to 8 minutes from frozen until re-crisped, then toss in freshly made chilli chicken sauce. The sauce itself does not freeze well always make it fresh. This make-ahead approach is particularly useful for parties where you want to pre-fry the chicken in bulk and sauce it fresh to order.
Variations and Substitutions
- Schezwan Chilli Chicken: Add 1 to 2 tablespoons of schezwan sauce to the sauce mixture alongside the other sauces. The fiery, garlic-forward character of schezwan transforms chilli chicken into a bolder, more pungent version with a noticeably different heat profile. Reduce the green chilli sauce by half to prevent over-salting the sauce. This is one of the most popular restaurant variations particularly popular in North India as a bar-style snack.
- Chilli Chicken without Deep Frying: Toss the batter-marinated chicken in a shallow 1 cm depth of oil on medium-high heat in a wide pan for 4 to 5 minutes per side until golden and cooked through. Alternatively, air fry the battered chicken at 200°C for 14 to 16 minutes, turning once, lightly spraying with oil before cooking. The result lacks the deep craggy crust of the fried version but still develops a good surface for the sauce to cling to.
- Boneless Chilli Chicken with Extra Vegetables: Add thinly sliced mushrooms and baby corn to the stir-fry base alongside the capsicum and onion. The mushrooms absorb the chilli sauce and add an earthy depth. Baby corn adds sweetness and a different crunch. Both additions increase the vegetable-to- chicken ratio and work particularly well in the gravy version served over fried rice.
- Chilli Chicken Sizzler: Serve the completed dry chilli chicken on a cast-iron sizzler plate preheated in the oven at 220°C for 20 minutes. Line with cabbage leaves, spoon the chilli chicken over the top, and bring to the table immediately. The sizzle, the steam column, and the audible crackle of the sauce hitting the hot iron surface makes this the most theatrical version of the dish and one of the most memorable ways to present it at a dinner party.
- Honey Chilli Chicken: Replace the sugar in the sauce with 1 tablespoon of honey and reduce the green chilli sauce by half. Add an extra tablespoon of soy sauce. The honey creates a glazed, sticky coating on the chicken that is slightly sweeter and more aromatic than the standard version. Particularly popular served as a starter with toasted sesame seeds scattered over the top and a wedge of lime alongside.
Preparation Method
Begin by preparing the batter-marinade: combine the chicken cubes with cornflour, plain flour, egg, ginger-garlic paste, soy sauce, green chilli sauce, Kashmiri red chilli powder, black pepper, and salt in a large bowl. Mix vigorously with your hands until every piece of chicken is completely coated in a thick, pasty batter. Do not add water unless the batter is genuinely too dry to coat the moisture from the egg and sauces should be sufficient. Cover and rest for 30 minutes.
While the chicken rests, pre-mix the sauce ingredients in a small bowl: green chilli sauce, red chilli sauce, soy sauce, ketchup, vinegar, sugar, and a splash of water or stock. Stir to combine. In a separate small bowl, prepare the cornflour slurry. Prepare all the vegetables cut the capsicum into squares, slice the onion into petals, slit the green chillies lengthwise, mince the garlic and ginger finely, and slice the spring onion whites and greens separately. Heat the deep-frying oil to 170°C and fry the battered chicken in batches of 4 to 5 pieces for 4 to 5 minutes until golden and cooked through. Drain on a wire rack. When all chicken is fried, heat the wok on maximum heat, build the sauce as described in the directions, add the fried chicken, toss for 60 seconds, and serve immediately.
Standard Operating Procedure (SOP)
For consistent, restaurant-quality chilli chicken every single time, follow this sequence: pat chicken dry → combine batter-marinade ingredients and coat chicken → rest 30 minutes → pre-mix sauce in bowl → prepare cornflour slurry → prep all vegetables → fry chicken at 170°C 4–5 minutes per batch → drain on wire rack → heat wok on maximum heat until smoking → bloom slit green chillies in oil 20–30 seconds → add garlic and ginger 20 seconds → add spring onion whites 20 seconds → add onion and capsicum, toss 60–90 seconds (keep crunchy) → pour pre-mixed sauce all at once → bring to boil → stir slurry and add → stir to glossy → add fried chicken → toss 60 seconds maximum on high heat → remove from heat → add sesame oil and final dash of vinegar → toss once → scatter spring onion greens → plate immediately → serve within 3 minutes. The five steps that most define the result are thick batter (coating durability), not crowding the oil (crispiness), blooming green chillies first (flavour character), keeping capsicum crunchy (texture), and the off-heat vinegar dash (brightness). These five together are the difference between a chilli chicken that tastes and feels like a restaurant plate and one that tastes flat and home-made in the wrong way.
For party and catering batches, fry the battered chicken up to 2 hours ahead and keep on a wire rack at room temperature uncovered and never stacked. The sauce can be pre-built and kept warm. Combine the two fresh-to-order in batches for 60 seconds per batch. For sizzler service at a party, preheat the cast-iron plates in the oven during the final frying round, bring to the table before plating, and toss the final batch of chicken directly onto the hot surface at the table for the most impressive Indo-Chinese arrival of the evening.
Garnish and Presentation
The visual identity of chilli chicken is defined by three colours the golden-red of the sauced chicken, the green of the capsicum and spring onion, and the bright orange-red of the slit green chillies visible throughout the dish. A wide, flat dark ceramic plate or bowl allows all three colours to show clearly and makes the garnish pop. Arrange the chicken and vegetables in a generous pile rather than a neat stack abundance looks more appetising than careful arrangement for a boldly flavoured dish like this one.
For garnish: scatter thinly sliced spring onion greens generously over the top use more than you think you need. Add a few rings of fresh red chilli for colour contrast and a light drizzle of chilli oil or sesame oil over the surface. A wedge of lime on the side. For a restaurant- finish, scatter toasted sesame seeds over the spring onion greens the white seeds against the dark sauce and green garnish is the classic Indo-Chinese visual that immediately signals the dish is properly done. For the sizzler version, bring to the table before garnishing and add the spring onions and sesame seeds at the table while the sizzle is still audible.
Plating and Serving Tips
Serve chilli chicken dry within 3 to 4 minutes of plating the batter coating continues to soften in contact with the sauce and the optimal eating window is narrow. For individual plating at a dinner, serve in a small, wide ceramic bowl or on a flat plate with the sauce collecting naturally around the base of the chicken pile rather than draining off the edge of the plate. For a party, a large flat platter with the chicken piled in the centre and the sauce visible as a sheen over every piece looks generous and abundant.
Never cover hot chilli chicken before serving the steam softens the coating within minutes and the capsicum loses its crunch. For buffet service, keep the chilli chicken in a shallow hotel pan over a food warmer and serve within 15 minutes of plating. Add a fresh scatter of spring onion greens and sesame seeds over the top just before guests start serving themselves it restores the visual freshness of the dish immediately.
If you make this chilli chicken recipe, I genuinely want to hear every detail did you bloom the green chillies first, did you make the dry or gravy version, did you try the schezwan or honey chilli variation, did the sizzler presentation come together? Leave a star rating below and drop a comment. Your notes help other readers get that crispy, bold, restaurant-quality result at home and I read every single one. Save this to Pinterest now so it is always there for your next party spread, Indo- Chinese dinner night, Diwali celebration, or the next time the craving hits and you want something genuinely bold and satisfying on the table in 40 minutes!
Ingredients
- 500g (1.1 lb) boneless chicken thighs or breast
- ¼ cup (4 tablespoons) cornflour (cornstarch)
- ¼ cup (4 tablespoons) plain flour (maida / all-purpose flour)
- 1 large egg
- 1 tablespoon ginger-garlic paste
- ½ teaspoon black pepper powder
- 1 tablespoon dark soy sauce
- ¼ teaspoon salt
- Water
- 1 tablespoon green chilli sauce
- 1 teaspoon Kashmiri red chilli powder
- Neutral oil
- 2 tablespoons green chilli sauce
- 1½ tablespoons dark soy sauce
- 1½ tablespoons red chilli sauce
Nutritional Information
- Calories: 295 kcal
- Protein: 25g
- Carbohydrates: 22g
- Fat: 11g
- Fiber: 2g
- Sodium: 780mg
- Sugar: 5g
Directions
1. MAKE THE BATTER-MARINADE AND COAT THE CHICKEN
Place the chicken cubes in a large bowl. Add the cornflour, plain flour, egg,
ginger-garlic paste, dark soy sauce, green chilli sauce, Kashmiri red chilli
powder, black pepper, and salt. Using your hands, mix everything together
vigorously until every piece of chicken is completely coated in a thick, pasty
batter. The batter should be thick enough to coat a chicken piece and hang
slightly without running off immediately. If it feels too dry, add 1 tablespoon
of water. If it feels too thin, add 1 tablespoon of cornflour.
Cover and rest for 30 minutes at room temperature.
While the chicken rests, pre-mix the sauce in a small bowl, prepare the cornflour
slurry in a separate bowl, and cut all the vegetables.
2. DEEP FRY THE BATTERED CHICKEN
Heat neutral oil in a deep pan to 170°C (340°F). Test with a small piece of
batter — it should sizzle steadily and float to the surface. Fry in batches of
4 to 5 pieces — do not crowd the pan. Each batch should go in with enough space
for the pieces not to touch. Fry for 4 to 5 minutes, turning once at the halfway
point, until the coating is a deep golden-red and the chicken is cooked through.
The coating should look dry, craggy, and irregular rather than smooth and pale.
Remove with a slotted spoon and drain on a wire rack. Repeat with remaining chicken,
maintaining the oil temperature at 170°C between batches. Allow all pieces to drain
on the rack for 2 minutes.
3. HEAT THE WOK AND BLOOM THE GREEN CHILLIES
Heat a wok or wide pan on the highest heat available for 2 full minutes until
visibly smoking. Add 2 tablespoons of neutral oil. Add the slit green chillies
immediately — they should sizzle aggressively on contact. Toss them in the hot
oil for 20 to 30 seconds until fragrant and slightly blistered at the cut edges.
This blooming step is critical — it releases the essential oils of the fresh
chilli into the cooking oil and distributes that aromatic heat throughout the
entire sauce base. Do not skip it.
4. BUILD THE AROMATICS BASE
Add the minced garlic and grated ginger to the wok. Stir constantly for 20 seconds —
the garlic should turn just barely golden at the edges. Add the spring onion whites.
Stir for 20 seconds until fragrant. The wok should be producing intense, aromatic
steam at this stage — that is exactly right.
5. ADD CAPSICUM AND ONION
Add the onion petals and capsicum squares all at once. Toss on maximum heat for
60 to 90 seconds — constant motion, constant tossing. The capsicum should develop
slight char marks at the edges and take on a faint roasted aroma, but it must
retain a clear crunch when pressed. Do not cook beyond 90 seconds at this stage.
The onion should soften slightly but still have some bite.
6. ADD SAUCE AND THICKEN
Give the pre-mixed sauce bowl a quick stir and pour the entire contents into the
wok at once. It will sizzle aggressively — stir immediately to prevent any catching
at the base. Bring to a full boil on high heat — this takes about 60 seconds.
Taste the sauce at boiling point and adjust salt, sugar, or chilli sauce to
your preference.
Stir the cornflour slurry vigorously to re-combine the settled starch, then pour
into the boiling sauce in a thin steady stream while stirring constantly. The sauce
will thicken to a glossy, flowing consistency within 30 to 40 seconds. For the
dry version, it should coat a spoon thickly and flow slowly. For the gravy version,
it should flow more readily and pool slightly.
7. ADD THE FRIED CHICKEN AND TOSS
Add all the fried chicken pieces to the glossy sauce and capsicum base. Toss
vigorously on maximum heat for exactly 60 seconds. Every piece should be
completely coated in the sauce. The sauce edges on the chicken should look slightly
caramelised and sticky — not wet and saucy. Remove from heat.
8. FINISH AND PLATE
Drizzle the sesame oil over the dish and add the reserved 1 teaspoon of vinegar.
Toss once firmly to distribute both. Scatter the spring onion greens over the top.
Transfer immediately to a serving plate or bowl.
9. GARNISH AND SERVE
Scatter thinly sliced spring onion greens generously over the dish. Add red chilli
rings and a sprinkle of toasted sesame seeds. Drizzle a few drops of chilli oil
over the surface. Add a wedge of lime on the side.
Serve immediately — within 3 minutes of plating for the dry version,
while the batter still has crunch at the edges.
Rate this Recipe
User Reviews
No reviews yet. Be the first to share your thoughts!