Homemade Sushi Rolls That Look Stunning and Taste Even Better
Sushi rolls recipe with seasoned rice, maki and uramaki rolling technique & multiple fillings. Restaurant-quality at home in 1 hour. Get the full recipe now.
 Tripti Srivastava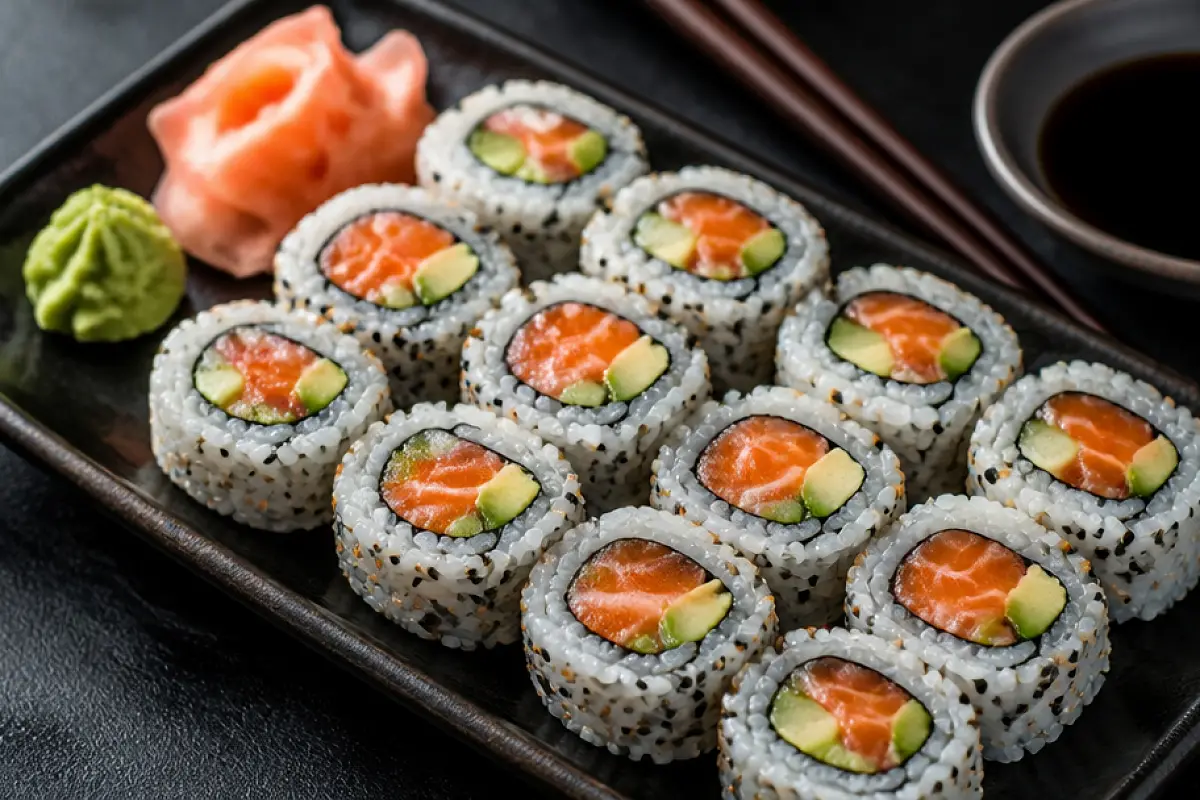
There is a moment when you make sushi rolls for the first time at home that you do not expect the moment you peel the cling-wrapped bamboo mat back from a finished roll and see a perfect cylinder of rice-covered nori staring back at you, looking exactly like the ones at your favourite Japanese restaurant. It is genuinely surprising. And then you cut it a slow, confident pull with a wet knife through the roll and the pieces fall away clean and even, the filling visible in neat cross-sections of colour and texture, and the whole thing looks like a small piece of edible art sitting on your kitchen counter. Making sushi at home is one of those cooking projects that feels far more difficult than it actually is. The technique is learnable in a single afternoon. The tools are simple. And the reward the ability to make a beautiful, fresh, completely customised sushi platter at home whenever you want is something that pays back every time you use it.
This recipe covers the complete foundation: the correctly seasoned sushi rice that everything else is built on, two rolling techniques (maki for the classic nori-outside roll, and uramaki for the inside-out rice-outside roll), four distinct filling combinations, the wet-knife slicing method that keeps your pieces clean and even, and a full presentation and plating guide. Whether you are making sushi for a date night dinner, a weekend project with the family, a dinner party centrepiece, or simply because fresh sushi is one of life's great pleasures and you want it at home this recipe has everything you need.
One thing worth saying upfront: the rice is everything. A sushi roll with imperfect filling but perfect rice will still taste good. A sushi roll with perfect filling on badly seasoned or incorrectly textured rice will disappoint every time. Give the rice the attention it deserves and the rest of the process becomes much easier.
What Makes This Sushi Rolls Recipe Special
There are thousands of sushi recipes available. What makes this one useful for home cooks specifically is that it explains the why behind each step, not just the what so when something feels different from the instructions, you understand how to adjust rather than abandoning the process entirely.
- The sushi-zu seasoning is made from scratch. Most home recipes suggest adding bottled sushi vinegar to the rice and calling it done. This recipe makes the sushi-zu the rice vinegar, sugar, and salt mixture from scratch with a brief heat-and-steep process that dissolves the seasonings completely and produces a cleaner, more precisely balanced flavour than bottled alternatives. It takes five minutes and the difference in the flavour of the finished rice is immediate and unmistakable.
- The cooling technique matters as much as the seasoning. Sushi rice is seasoned while still hot the vinegar mixture absorbs best into warm rice but must be cooled quickly to prevent the grains from overcooking in their own retained heat. Folding rather than stirring, fanning while folding, and using a wide, flat surface to spread the rice all play a role in producing rice that is shiny, separate, sticky-but-not-mushy, and at the right temperature for rolling. Each of these techniques is explained clearly in the directions.
- Two rolling techniques covered maki and uramaki. Maki (nori on the outside) is the classic starting point. Uramaki (rice on the outside, nori inside) is the California roll format and is the most popular sushi roll style outside Japan. Both techniques are explained step by step with specific instructions for where to place the filling, how much pressure to apply, and how to achieve the tight, even roll that produces clean, round pieces when sliced.
- Four filling combinations from simple to impressive. This recipe includes a classic cucumber roll for beginners, a California roll (crab and avocado uramaki), a spicy tuna roll, and a vegetarian avocado-capsicum roll. Each builds on the same rice and technique foundation and covers a range from completely raw-fish-free to sashimi-grade fish preparations.
- The wet-knife slicing method for clean, even pieces. A dry knife dragged through a sushi roll tears the nori, compresses the rice, and produces ragged, uneven pieces that look nothing like the restaurant versions. A sharp knife dipped in cold water and wiped clean between every cut produces the clean, precise cross-section that makes sushi look like it was made by someone who knows what they are doing because it was.
Ingredients Overview
Sushi rice (short-grain Japanese rice) is the single most important ingredient in this recipe and there is no substitute. Short-grain Japanese rice has the right starch content to become sticky and cohesive when cooked it holds its shape in a roll and produces the correct chewy, slightly firm texture when seasoned. Regular long-grain rice, basmati, or jasmine rice will not work they do not have the right starch profile and the rolls will fall apart. Look for bags labelled "sushi rice," "Japanese short-grain rice," or "Calrose rice" at any Asian grocery store.
The sushi-zu (seasoning mixture) is made from three ingredients: Japanese rice vinegar, white sugar, and fine salt. The ratio is important too much vinegar and the rice tastes aggressively sour, too little and it tastes flat. The standard ratio used in this recipe produces a clean, mildly tangy, subtly sweet rice that complements fillings without dominating them. Avoid substituting rice vinegar with white vinegar or apple cider vinegar both are sharper and will produce an unpleasantly sour rice.
Nori (dried seaweed sheets) should be full-size sheets of good quality they should smell faintly of the sea, be dark green rather than brown, and feel slightly crisp when you handle them. Poor-quality or old nori is already soft and chewy when it comes out of the packet and will not roll or cut cleanly. Store opened nori in an airtight bag with a food-safe silica gel sachet to prevent it from softening between uses.
For fillings, the core principle is moisture management wet fillings (tomato, juicy cucumber, undrained fish) make the rice soggy and weaken the nori from the inside during rolling. Always pat fillings dry before assembling. Cut everything into thin, uniform strips or pieces that fit inside the roll without creating a thick, lumpy centre that causes uneven rolling. For rolls using raw fish, always use sashimi-grade (sushi-grade) fish purchased specifically as safe for raw consumption from a fishmonger or specialist Japanese grocery store. Never use regular supermarket fish fillets raw. For raw-fish-free options, smoked salmon, surimi crab sticks, cooked prawns, or fully plant-based fillings all work beautifully without any food safety concerns.
Also Read: Dim Sum Recipe
How to Make It
The process has three stages: prepare and season the sushi rice (20 minutes cooking, 15 minutes cooling), prepare all fillings (10 minutes), and roll and slice (20 minutes for four rolls). The rice preparation is the most time-sensitive stage it needs to be seasoned while warm and then used within 1 to 2 hours at room temperature. Do not refrigerate sushi rice cold firms the starch and the rice becomes hard and difficult to spread. If you are not rolling immediately, keep the seasoned rice covered with a damp kitchen towel to prevent drying.
The rolling stage feels awkward for the first one or two rolls, then becomes intuitive quickly. The bamboo mat is the essential tool it provides the even pressure and controlled movement that fingers alone cannot replicate. Wrap the mat in cling film before rolling uramaki (rice-outside rolls) to prevent the rice from sticking to the bamboo. For maki (nori-outside rolls), no wrapping is needed. The full step-by-step directions and rolling technique are below.
Tips for Best Results
- Rinse the rice until the water runs completely clear. Rinsing removes excess surface starch that would otherwise make the cooked rice gluey and heavy. Place the rice in a bowl, cover with cold water, swirl gently, and drain. Repeat three to four times until the water is transparent. Do not rush this it takes two to three minutes of genuine rinsing and makes a visible difference to the texture of the finished rice.
- Season the rice while it is still warm. The rice vinegar mixture absorbs into warm rice and distributes evenly through every grain. Added to cold rice, the seasoning stays on the surface rather than absorbing, and you end up with some grains very sour and some completely bland. Season within five minutes of the rice finishing cooking.
- Fold, do not stir. Use a rice paddle or flat wooden spatula to fold the seasoning into the rice using a gentle cutting-and-folding motion like folding a cake batter. Stirring in a circular motion breaks the grains, releases excess starch, and turns the rice into a gluey paste. The fold preserves the individual grain structure while distributing the seasoning evenly.
- Keep your hands wet when spreading rice. Sushi rice is extremely sticky. Wet hands prevent it sticking to your fingers when you spread it on the nori. Keep a small bowl of water with a splash of rice vinegar at your rolling station and dip your fingers before each contact with the rice.
- Do not overfill the roll. This is the single most common beginner mistake. A thin line of filling about the diameter of a pencil is the correct amount for maki. For uramaki, slightly more filling fits because the nori is inside and can hold more without risk of the roll opening. Overfilling makes the roll impossible to close, causes the filling to push out at the ends during slicing, and produces pieces that are impossible to eat in one bite.
- Use a sharp, wet knife and wipe between every cut. A sharp knife, a bowl of cold water, and a clean kitchen towel are the three tools that make the difference between beautiful sushi pieces and crushed ones. Dip the knife in the water, wipe clean, and cut with a single smooth pulling motion not a sawing action. Do this before every single cut, every single roll. No exceptions.
Serving Suggestions
Sushi rolls are traditionally served with three accompaniments that each serve a specific purpose. Soy sauce (ideally low-sodium Japanese soy sauce or tamari for a gluten-free option) is for dipping the rolls are dipped fish-side down into the soy sauce, not dragged through it. Pickled ginger (gari) is eaten between different rolls to cleanse the palate not on top of a roll as a filling. Wasabi is mixed in small amounts into the soy sauce or applied directly in tiny dabs a little goes a very long way. A plate of sushi rolls with all three accompaniments presented neatly on the side is the complete, traditional Japanese presentation.
For a fuller dinner spread, serve alongside a bowl of homemade miso soup and a simple green salad dressed with sesame oil and rice vinegar. For a party platter, three or four different roll varieties on a large wooden board with the soy sauce, ginger, and wasabi in small ceramic bowls creates a beautiful sharing centrepiece that looks genuinely impressive without requiring more than a few hours of preparation. Always serve sushi at room temperature never chilled directly from the refrigerator, as cold rice becomes hard and the flavour flattens.
Storage and Reheating
Same day is best. Sushi rolls are at their absolute peak within 1 to 2 hours of rolling. The nori begins to soften and become chewy as it absorbs moisture from the rice, and the rice itself starts to harden after refrigeration. If you need to store assembled rolls briefly, wrap each roll tightly in cling film before slicing and refrigerate for no more than 4 hours. Slice immediately before serving.
Longer storage: If you want to prepare ahead for a party, make the sushi rice and prepare all fillings up to 4 hours in advance but do not roll until 1 hour before serving. Keep the rice covered with a damp kitchen towel at room temperature (never refrigerate unseasoned or seasoned sushi rice it hardens and the texture becomes unpleasant). Rolls with raw fish should not be made more than 2 hours before serving for food safety reasons.
Variations and Substitutions
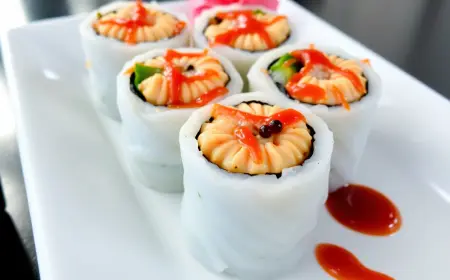
- California Roll (Classic Uramaki): Rice on the outside, nori on the inside. Filling: surimi (imitation crab) sticks or real cooked crab, avocado slices, and cucumber sticks. The California roll is the most popular sushi roll outside Japan and is the ideal starting roll for beginners because it uses no raw fish, the filling combination is universally appealing, and the uramaki format (rice outside) is very forgiving of imperfect rolling technique.
- Spicy Tuna Roll: Maki format. Filling: finely chopped sashimi-grade tuna mixed with a small amount of Japanese mayonnaise and a teaspoon of sriracha or togarashi until smooth and sticky. Add a thin stick of cucumber for crunch. The creamy, spicy tuna filling is one of the most popular roll fillings in the world and works in both maki and uramaki formats.
- Philadelphia Roll: Uramaki format. Filling: smoked salmon strips, cream cheese (spread in a thin layer before placing the salmon), and cucumber sticks. The cream cheese and smoked salmon combination is rich, slightly smoky, and completely raw-fish-free ideal for guests who want something substantial and familiar. Finish with a sesame seed coating on the rice for the classic Philadelphia roll appearance.
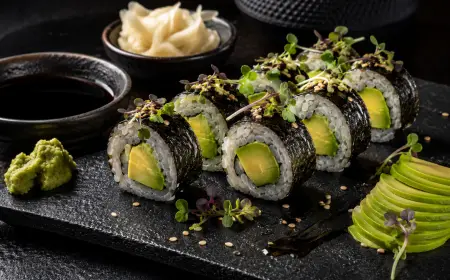
- Fully Vegetarian/Vegan Roll: Maki format. Filling: thin sticks of cucumber, avocado, pickled carrot (cut into matchsticks and marinated in rice vinegar and sugar), and thin strips of roasted red capsicum or pickled radish (takuan). No soy sauce in the seasoning replace with tamari for a completely vegan roll. These vegetarian rolls are colourful, fresh, and genuinely satisfying.
- Dragon Roll (Advanced): Uramaki base filled with tempura prawn and cucumber, then topped with thin slices of avocado fanned out over the outside of the roll in a scale pattern before slicing. A drizzle of unagi (eel) sauce or spicy mayo over the top completes the presentation. This is the most visually impressive home sushi roll and is well within reach once you are comfortable with the basic uramaki technique.
Preparation Method
Begin with the rice: rinse until the water runs clear, soak in fresh cold water for 15 minutes, then cook with an equal volume of water in a covered pot. Bring to a boil, reduce to the lowest possible heat, cover, and cook for 12 to 13 minutes. Remove from heat and rest covered for 10 minutes do not lift the lid. Meanwhile, make the sushi-zu: combine rice vinegar, sugar, and salt in a small saucepan over low heat, stirring until the sugar dissolves completely. Remove from heat and cool to room temperature. Transfer the cooked rice to a wide, shallow non-metallic bowl a wooden salad bowl or a large flat baking dish works well. Pour the sushi-zu over the rice using a rice paddle held horizontally to distribute the vinegar evenly. Fold the seasoning into the rice using gentle cutting and folding motions while fanning the rice to cool it quickly. The rice should be shiny, sticky, and slightly warm not hot and not cold before rolling begins.
Prepare all fillings while the rice cools: slice avocado, cucumber, and other vegetables into thin, uniform sticks. Pat all fillings dry with kitchen paper. Mix any sauce-based fillings like spicy tuna. Set up the rolling station: bamboo mat on the work surface, cling film to wrap the mat for uramaki, a small bowl of water with a splash of rice vinegar for wet hands, all fillings in small bowls, nori sheets within reach, and a sharp knife beside a bowl of cold water with a clean towel for slicing.
Standard Operating Procedure (SOP)
For consistent, beautiful sushi rolls every single time, follow this sequence: rinse rice 3–4 times until clear → soak 15 minutes → cook with equal water covered → rest 10 minutes covered → make sushi-zu and cool → transfer rice to wide shallow bowl → pour sushi-zu over paddle → fold and fan simultaneously until shiny and slightly warm → cover with damp towel, roll within 90 minutes → prepare all fillings and dry thoroughly → wrap bamboo mat in cling film for uramaki (not for maki) → wet hands before every contact with rice → lay nori rough-side up for maki (shiny-side up for uramaki) → spread rice evenly leaving 1.5 cm bare at the far edge of nori → lay filling in thin line one-third from the near edge → roll firmly with even pressure → seal with the bare nori edge → shape by pressing gently on all sides through the mat → remove mat → dip knife in cold water → wipe clean → cut roll in half first, then each half into thirds for 6 pieces → arrange cut-side up on plate → serve within 30 minutes. The four steps that most directly affect the quality are the rice rinse (texture), the fold-and-fan seasoning (even distribution), the wet hands (clean spreading), and the wet-knife cut (clean slices). Master these four and every roll will look and taste like it came from a trained hand.
For party batches, make the rice up to 90 minutes ahead and keep covered with a damp towel at room temperature. Pre-slice all vegetables and prepare all fillings in advance. Roll in batches of 2 to 3 rolls at a time, slicing immediately after rolling for best presentation. Keep completed pieces covered loosely with cling film if there is a gap before serving. For a sushi party where guests roll their own, set up individual rolling stations with all components in small bowls and the bamboo mats laid out it is one of the most interactive and enjoyable dinner party formats imaginable, requires no special skill from guests, and produces a table full of genuine laughter and imperfect but delicious sushi.
Garnish and Presentation
The presentation of sushi rolls at home can be as simple or as considered as you like and both approaches work. For a clean, minimal Japanese-style presentation, arrange the sliced pieces in a neat row cut-side up on a long, dark rectangular plate or a slab of dark slate. Each row should show the cross-section of the filling clearly the green of avocado, the orange of salmon or spicy tuna, the pale of cream cheese, the white and black of rice and sesame seeds. The visual appeal of sushi comes from the filling colours showing in the cross-section and from neat, even pieces of consistent height. A gentle hand with the knife makes the single biggest difference to how the finished sushi looks.
For garnish: a small mound of pickled ginger (gari) in pale pink at one end of the plate, a small dab of wasabi (bright green) at the other, and a small side bowl of soy sauce for dipping complete the classic Japanese presentation. Additional garnish options include a scatter of toasted black and white sesame seeds over the top of uramaki rolls (California roll and Philadelphia roll), a zigzag of Japanese mayonnaise or spicy mayo over the top of the roll before slicing for a richer finish, and finely sliced spring onion greens or micro herbs for colour. For the Dragon Roll, lay thin slices of avocado over the rolled but unsliced roll, cover with cling film, and press gently with the bamboo mat to adhere the avocado to the surface before slicing this is the technique that creates the dramatic scale appearance.
Plating and Serving Tips
Serve sushi rolls at room temperature never directly from the refrigerator. Cold sushi rice becomes firm and loses its characteristic chewy, slightly yielding texture. If you have made the rolls ahead and refrigerated them briefly, allow them to come to room temperature for at least 15 minutes before serving and slicing. For individual plating at a dinner, five to six pieces per person is a standard serving for a starter, eight to ten pieces for a main. Arrange the pieces cut-side up in a neat row or a slight diagonal fan for visual variety.
For a party sharing board, arrange three or four different roll varieties in parallel rows on a large wooden board or rectangular platter. Keep each variety clearly separate so guests can identify them easily. Place the pickled ginger, wasabi, and soy sauce in three small ceramic bowls at one corner of the board the classic Japanese sushi counter arrangement. For an elegant visual, alternate rows of different roll types so the contrasting colours of the cross-sections create a natural pattern across the board. This takes ten minutes to arrange and looks genuinely beautiful.
If you make these sushi rolls, I genuinely want to hear how the first roll went was the rice the right texture, did the bamboo mat make the rolling easier than you expected, which filling combination did you try first, did you attempt the Dragon Roll? Leave a star rating below and drop a comment sharing your experience. Every note helps other first-time sushi makers approach the process with confidence rather than anxiety. Save this to Pinterest so it is always there for your next date night, dinner party, or the next rainy afternoon that calls for a cooking project worth doing!
Ingredients
- 2 cups (360g) short-grain Japanese sushi rice
- tablespoons Japanese rice vinegar
- ½ Japanese or Persian cucumber, seeds removed, cut into thin sticks
- 1 teaspoon fine salt
- 2 tablespoons white sugar
- 4 full sheets of nori (dried seaweed), approximately 20 cm × 18 cm
- 150g sashimi-grade tuna, very finely chopped
- 1 bamboo sushi rolling mat (makisu)
- Small bowl of cold water + 1 tsp rice vinegar (for wet hands)
- Cling film (to wrap the mat for uramaki/inside-out rolls)
- 6 surimi (imitation crab) sticks, halved lengthwise
- 2 tablespoons toasted sesame seeds
- 2 tablespoons Japanese mayonnaise (mixed with the crab if desired)
- ½ cucumber, seeds removed, cut into thin sticks
- ½ ripe avocado, thinly sliced
Nutritional Information
- Calories: 310 kcal
- Protein: 8g
- Carbohydrates: 52g
- Fat: 8g
- Fiber: 3g
- Sodium: 420mg
- Sugar: 6g
Directions
1. RINSE THE RICE
Place the sushi rice in a large bowl. Cover with cold water, swirl gently with
your hand for 30 seconds, and drain. Repeat three to four times until the water
you drain off is completely clear rather than cloudy white. Each rinse removes
surface starch that would otherwise make the cooked rice gluey. Drain the rinsed
rice in a fine mesh sieve for 5 minutes after the final rinse. Transfer to a
medium saucepan.
2. SOAK AND COOK THE RICE
Add 2 cups of cold water to the saucepan with the rinsed rice. Leave to soak
for 15 minutes without heat — this allows the grains to absorb water evenly
before cooking begins and produces a more consistent texture throughout.
After soaking, bring to a full boil over medium-high heat. The moment it boils,
reduce the heat to the absolute lowest setting your stove can produce. Place the
lid on the saucepan and cook for 12 to 13 minutes — do not lift the lid during
this time. Remove from heat with the lid still on and rest for 10 minutes.
The resting period finishes the cooking gently using the retained steam and
is as important as the cooking itself.
3. MAKE THE SUSHI-ZU
While the rice cooks and rests, combine the rice vinegar, sugar, and salt in
a small saucepan over low heat. Stir gently until the sugar and salt have fully
dissolved — about 2 minutes. Do not boil. Remove from heat and allow to cool
to room temperature completely before adding to the rice. A warm sushi-zu on
warm rice is acceptable — hot sushi-zu on warm rice causes the rice to continue
cooking in the acid and the grains become mushy.
4. SEASON THE RICE (THE MOST IMPORTANT STEP)
Transfer the cooked rice to a wide, shallow non-metallic bowl — a large wooden
salad bowl, a wide baking dish, or a hangiri (traditional Japanese rice tub) if
you have one. Metal bowls react with the rice vinegar and can impart a metallic
taste. Hold a rice paddle or wide flat spatula horizontally over the rice and pour
the cooled sushi-zu across the paddle so it distributes across the rice in a thin
curtain rather than pooling in one spot. Using the rice paddle, fold the seasoning
into the rice with a gentle cutting-and-folding motion — insert the paddle
vertically, turn it horizontally, and lift the rice from the bottom, folding it
toward you. Never stir in circles — this breaks the grains. While folding, fan the
rice with a piece of cardboard, a folded magazine, or an electric fan on low to
cool it rapidly. This simultaneous folding and fanning is the technique that produces
shiny, separate, sticky sushi rice. Continue for 3 to 4 minutes until the rice is
shiny and has cooled to slightly warm — not hot, not cold. Cover with a lightly damp
kitchen towel and use within 90 minutes.
5. PREPARE ALL FILLINGS
Slice all vegetables into thin, uniform sticks approximately 1 cm wide and the
full length of the nori sheet (about 18 cm). Pat every filling ingredient dry
with kitchen paper — any surface moisture will soften the nori from the inside.
For the spicy tuna: finely chop the sashimi-grade tuna, combine with mayonnaise
and sriracha, and mix until sticky and combined. Taste and adjust heat to preference.
For California roll: halve the surimi sticks lengthwise or shred real crab meat.
Slice the avocado thinly.
6. MAKI ROLL (NORI OUTSIDE Classic technique)
Place the bamboo mat on your work surface (no cling film needed for maki).
Place one full nori sheet on the mat, rough-side up, with the lines of the nori
running parallel to the bamboo slats of the mat. The near edge of the nori should
align with the near edge of the mat.
Wet your hands in the vinegar-water bowl. Take approximately ¾ cup of seasoned
sushi rice and place it in the centre of the nori. Using wet fingertips, spread
the rice across the nori in an even layer, pressing lightly so the grains adhere
to the nori. Cover the nori completely with rice leaving a 1.5 cm strip bare at
the far edge — this bare strip will be the seal.
Lay your chosen filling in a thin horizontal line one-third of the way up from
the near edge of the rice — approximately 3 to 4 cm from the near edge.
Do not pile the filling — keep it as thin and even as possible.
Lift the near edge of the bamboo mat with both thumbs while holding the filling
in place with your fingertips. Roll the near edge of the mat up and over the
filling in one firm, controlled motion. Press the mat firmly around the roll,
applying even pressure from all sides simultaneously, to compact the rice and
define the round shape. Continue rolling the mat forward until the bare nori
strip seals against the rice. Press firmly along the length of the roll for
5 seconds to set the seal. Remove the mat and set the sealed roll aside.
7. URAMAKI ROLL (RICE OUTSIDE California Roll, Philadelphia Roll)
Wrap the bamboo mat completely in cling film — cover every surface including
the sides. This prevents the rice from sticking to the bamboo.
Place a half sheet of nori (or a full sheet trimmed in half) shiny-side up on
the cling-wrapped mat. Using wet hands, spread a thin, even layer of sushi rice
across the entire surface of the nori — edge to edge with no bare strip. The layer
should be thinner than for maki — about 4 to 5mm deep.
Scatter toasted sesame seeds evenly over the rice if making a California roll.
Carefully flip the entire nori-and-rice sheet over so the rice side is face down
on the mat and the nori is now on top facing you.
Place your chosen fillings horizontally across the centre of the nori.
Roll forward using the same firm, controlled motion as maki, pulling the near
edge of the mat up and over the filling. Press firmly through the mat from all
sides to compact the rice and create a tight, round roll. Remove the cling film.
8. SLICE THE ROLLS
Dip a sharp knife in the bowl of cold water. Wipe it completely clean with the
kitchen towel. Cut the roll in half with a single smooth pull — do not saw.
Do not press down — let the weight of the knife do the work. Dip and wipe the
knife again. Cut each half into thirds for 6 even pieces per roll. Alternatively,
cut each half into 4 pieces for 8 smaller pieces. Dip and wipe the knife before
every single cut — this is non-negotiable for clean pieces.
9. ARRANGE AND SERVE
Arrange the sliced pieces cut-side up on a serving plate or board. A small
mound of pickled ginger at one end, a dab of wasabi at the other, and a small
bowl of soy sauce for dipping completes the traditional presentation.
Scatter toasted sesame seeds and a light drizzle of spicy mayo over uramaki
rolls if desired. Serve at room temperature within 30 minutes of slicing.
Rate this Recipe
User Reviews
No reviews yet. Be the first to share your thoughts!