Sweet and Sour Chicken Bites: Crispy, and Better Than Any Takeaway
Sweet and sour chicken bites with double-coated crispy chicken, glossy tangy sauce & pineapple. Cantonese recipe ready in 40 mins. Get the full recipe now.
 Tripti Srivastava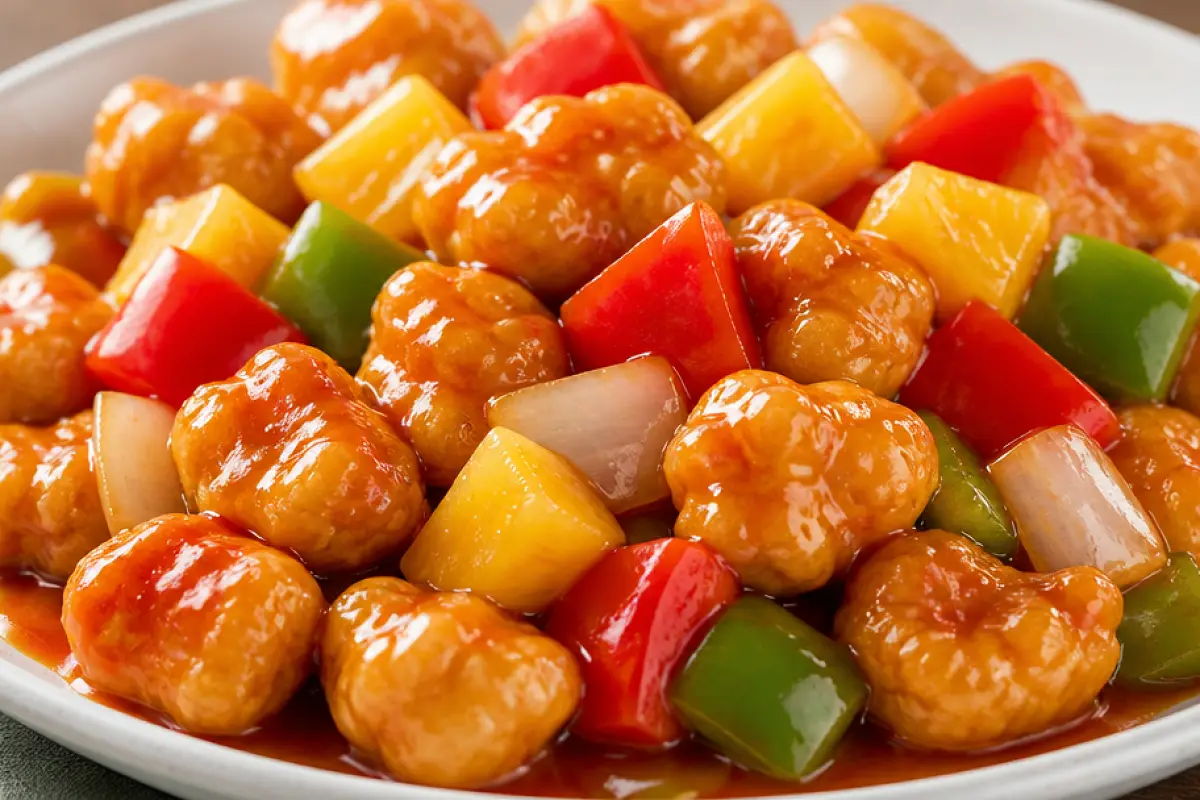
Sweet and sour chicken bites from scratch at home for the first time, you will wonder why you ever ordered this from a takeaway. That glossy, tangy-sweet sauce coating biting-crispy pieces of golden chicken, with the occasional pop of sweet pineapple and the crunch of lightly cooked capsicum it is one of the most crowd-pleasing dishes in the world, and it comes together in 40 minutes from ingredients you either already own or can pick up on the way home. The bites format smaller, uniform pieces rather than large chunks makes this version ideal as a party starter, a plate of finger food that people pick up between conversations, or a bowl of something genuinely satisfying that sits in the centre of a Chinese-style spread and disappears faster than anything else on the table.
Sweet and sour chicken originates from Guangdong province in China and is rooted in the Cantonese cooking tradition, where balancing contrasting flavours sweet against sour, crunchy against silky is a central culinary principle. The traditional Cantonese version originally used hawthorn berries for the sauce's characteristic red colour and tartness, rather than the ketchup used in modern adaptations. What most people know as sweet and sour chicken today is the Chinese-American and Chinese-international version adapted over decades of cooking in restaurant kitchens around the world and it is genuinely excellent in its own right. The sauce in this recipe is made without food colouring or corn syrup, using rice vinegar, pineapple juice, ketchup, and a small amount of sugar to produce a balanced result that is glossy, lightly sticky, and tastes clean and bright rather than heavy and artificial.
This recipe gives you the complete picture: the double-coating technique that makes the bites stay crispy in the sauce, the sauce ratio that produces the right balance of sweet and sour without going too far in either direction, the half-release frying technique that prevents pieces from sticking together, the air fryer adaptation, the pineapple and no-pineapple options, and a full SOP and presentation guide. Make it once and this becomes one of the most requested things in your kitchen.
What Makes This Sweet and Sour Chicken Bites Recipe Special
There are two versions of this dish ones that look and taste like restaurant sweet and sour chicken, and ones that look like they were made at home. The difference comes down to a handful of specific choices, and this recipe makes every one of them correctly.
- The double-coating technique for maximum crispiness. Most simple sweet and sour chicken recipes coat the chicken once in cornflour and fry it. This recipe uses a three-step double-coat: first in cornflour, then in beaten egg, then briefly back into cornflour. This technique makes the chicken extra crispy, and the cornstarch on the chicken thickens up the sauce during cooking, turning it into a shiny, flavorful glaze. The result is a crust that is significantly crunchier and more textured than a single-coat, and the cornflour residue on the surface of each piece helps the sauce cling and thicken around each bite rather than sliding off.
- Rice vinegar, not white vinegar. The type of vinegar in the sauce matters more than most people realise. Rice vinegar is mellow, slightly sweet, and clean-tasting it produces the characteristic gentle tanginess of restaurant sweet and sour sauce. White distilled vinegar is sharper and more aggressive and will make the sauce taste harsh if used in the same quantity. Always use rice vinegar for this recipe and if possible, buy the unseasoned kind so you control the sweetness yourself.
- Pineapple juice in the sauce not just pineapple chunks. Adding a few tablespoons of pineapple juice directly into the sauce base rather than just using pineapple chunks as a garnish ingredient gives the sauce a naturally fruity, tropical sweetness that reduces the amount of added sugar needed and produces a more complex, layered flavour than ketchup and sugar alone. This is the technique used in Cantonese restaurant kitchens.
- The half-release frying technique. When frying the chicken, lowering each battered piece one at a time slowly into the oil halfway so the batter has a couple of seconds to cook then releasing it, prevents the chicken pieces from sticking to the pan or to each other. This simple technique is used in Chinese restaurant kitchens and is one of those small adjustments that makes a visible difference to the finished presentation.
- The sauce is made and the chicken is tossed in sequence, immediately. Starting to cook the sweet and sour sauce immediately after finishing the frying ensures maximum crispiness when the two come together. Every minute the fried chicken sits at room temperature, the coating loses crunch. The sauce should be ready to receive the chicken within 2 minutes of it coming out of the oil.
Ingredients Overview
Boneless chicken thighs are the strongly recommended choice for sweet and sour chicken bites. They have more natural fat than breast meat, stay juicier during the two-coat frying process, and produce a more satisfying, flavourful bite. Chicken breast can be used but needs careful monitoring as it usually cooks faster and dries out more quickly than thighs. Cut the chicken into uniform 2.5 to 3 cm cubes small enough to eat in one or two bites for the bites format, and consistent enough that they all reach the correct internal temperature at the same time during frying. Pat dry with kitchen paper before marinating surface moisture dilutes the marinade and prevents the first cornflour coat from adhering evenly.
The marinade is brief and simple ginger, garlic, white pepper, a small amount of soy sauce, and sesame oil. The sesame oil adds a faint nuttiness that layers into the background flavour of the finished dish. White pepper rather than black is the correct choice here it is earthier, faintly hotter, and does not create visible dark flecks in the pale cornflour coating. The marinade only needs 15 minutes long enough to season the chicken but short enough not to begin denaturing the protein.
The sweet and sour sauce has five core ingredients: tomato ketchup for body and colour, rice vinegar for the sour note, pineapple juice for fruity sweetness, sugar for balance, and soy sauce for depth and umami. The ratio between ketchup, vinegar, and sugar is where the flavour character of the sauce lives this recipe produces a sauce that is noticeably tangy with a clean sweetness behind it. If you prefer a sweeter sauce, reduce the vinegar by half a tablespoon. If you prefer a sharper sauce, increase the vinegar slightly. A cornflour slurry thickens the sauce to a glossy, clingy consistency that coats every piece of chicken completely. Capsicum and onion go into the sauce for colour and crunch cook them for exactly 60 to 90 seconds on high heat to keep them crisp rather than soft and sweet.
For substitutions: replace pineapple juice and chunks with mango juice and fresh mango for a tropical variation. Use tamari instead of soy sauce for a gluten-free version. Replace chicken with firm tofu (pressed dry, cubed, and double-coated in the same way) for a vegetarian alternative. Honey can replace the sugar in the sauce for a slightly more floral sweetness.
Also Read: Veg Tempura Recipe
How to Make It
The recipe runs in two tracks that meet at the end. Track one is the chicken: marinate briefly, double-coat with cornflour and egg, and deep fry until golden and crispy. Track two is the sauce: pre-mix all the sauce ingredients in a bowl, stir-fry the vegetables briefly in a wok, add the sauce, thicken with cornflour slurry, and toss in the fried chicken immediately. The whole process takes 40 minutes from start to finish and the result is a plate of sweet and sour chicken bites that look and taste genuinely better than any takeaway version.
The most satisfying moment in the whole recipe is the final toss when the fried chicken pieces go into the glossy, bubbling sauce and the entire wok fills with the fragrance of pineapple, vinegar, and soy caramelising together. Thirty seconds of tossing on high heat and the sauce coats every piece completely. Plate it immediately and eat it while the crust still has that faint crackle under the sauce.
Tips for Best Results
- Cut the chicken into truly uniform pieces. This is especially important for the bites format. Pieces that are different sizes cook at different rates small pieces overcook and dry out while larger ones are still raw inside. 2.5 to 3 cm cubes, cut with a confident clean knife, are the right size for a bite that is cooked all the way through and still juicy at the centre.
- Use the half-release technique when adding to the oil. Hold each battered piece at the surface of the hot oil for 2 seconds before releasing fully. This allows the batter to begin setting before the piece sinks to the base of the pan preventing it from sticking to the bottom or bonding to adjacent pieces. Once released, do not touch the piece for at least 60 seconds.
- Never put more than 8 pieces in the oil at once. Crowding drops the oil temperature, causes pieces to steam rather than fry, and produces pale, greasy bites rather than golden crispy ones. Four to six pieces per batch is the right number for a standard home pan.
- Pre-mix the sauce before the wok goes on. The sauce and chicken need to come together immediately. Having the sauce already measured and combined in a bowl means you can pour it in a single confident motion the moment the vegetables have had their 90-second stir-fry.
- Drain on a wire rack, not paper towels. Paper towels create steam under the bites that softens the crust within seconds. A wire rack allows air to circulate on all sides and keeps the exterior dry and crispy while the sauce is being prepared.
- Add the chicken to the sauce and toss for 30 seconds maximum. Every second beyond 30 seconds in the hot sauce softens the coating further. The goal is a crust that still has some crunch under the gloss when it reaches the plate. Toss for 30 seconds, plate immediately, and serve within 3 minutes.
Serving Suggestions
Sweet and sour chicken bites served as a starter work beautifully on their own on a plate, with a small extra bowl of the sauce for additional dipping and a few picks or toothpicks for serving to guests who want to eat without using chopsticks. For a party platter, pile the bites generously on a dark board or wide plate and drizzle a tablespoon of additional sauce over the top for that glossy, restaurant-appearance finish.
As a main course, serve over steamed jasmine rice or alongside egg fried rice and a simple cucumber salad dressed with rice vinegar and sesame oil. The sauce soaks into the rice as you eat and turns every forkful into something deeply satisfying. For a full Chinese-style dinner, serve alongside a bowl of wonton soup and a plate of veg spring rolls.
Storage and Reheating
Fridge: Store cooked sweet and sour chicken bites in an airtight container for up to 2 days in the refrigerator. The coating will soften overnight as the sauce moisture migrates into it. To restore some crunch, remove the chicken from the sauce, reheat the pieces in an air fryer at 190°C for 4 to 5 minutes, then add to the reheated sauce and toss briefly before serving. For the sauce: reheat separately in a saucepan over medium heat, adding a splash of water if it has thickened too much overnight.
Freezer: The double-coated fried chicken bites (before saucing) freeze well for up to 3 weeks on a parchment-lined tray. Freeze until solid, then transfer to a zip-lock bag. When ready to use, air fry at 190°C for 6 to 8 minutes from frozen until recrisped, then toss in freshly made sweet and sour sauce. The sauce itself does not freeze well always make it fresh.
Variations and Substitutions
- No-Pineapple Version: Simply omit the pineapple juice and pineapple chunks. Replace the pineapple juice in the sauce with an equal amount of chicken stock or water. Add an extra teaspoon of sugar to compensate for the lost natural sweetness from the pineapple. The sauce will be slightly less fruity but just as glossy and well-balanced.
- Mango Sweet and Sour Chicken Bites: Replace the pineapple juice and chunks with fresh mango juice and cubed ripe mango added at the very end of saucing. Mango adds a floral, tropical sweetness that produces a slightly different but equally beautiful sauce. Particularly good served with coconut rice.
- Honey Garlic Sweet and Sour Bites: Replace the sugar in the sauce with a tablespoon of honey and double the minced garlic in the sauce base. The honey creates a richer, more floral glaze and the extra garlic deepens the sauce's savoury dimension. Finish with a light scatter of toasted sesame seeds and thinly sliced spring onion greens.
- Air Fryer Sweet and Sour Chicken Bites: After the double-coat, spray the bites generously with neutral oil and air fry at 200°C for 14 to 16 minutes, turning once at the halfway point. The coating will not be as dramatically craggy as the deep-fried version but still develops good colour and crunch. Toss in the freshly made sauce for the last 30 seconds of the air fryer cook time for the glaze to set.
- Vegetarian Tofu Sweet and Sour Bites: Press firm tofu for 20 minutes to remove excess water, cut into 2.5 cm cubes, double-coat using the same technique as the chicken, and fry at 175°C for 3 to 4 minutes until golden. The tofu absorbs the sweet and sour sauce beautifully. Use tamari for a fully vegan preparation.
Preparation Method
Begin with the marinade: combine the chicken cubes with grated ginger, minced garlic, white pepper, soy sauce, and sesame oil. Mix well and leave for 15 minutes. While the chicken marinates, pre-mix the sauce in a bowl: ketchup, rice vinegar, pineapple juice, sugar, soy sauce, and a splash of water. Stir until the sugar dissolves. Prepare the cornflour slurry in a small bowl. Cut the capsicum and onion into 2 to 3 cm squares. Open the pineapple can if using chunks and drain the juice into the sauce bowl.
Set up the double-coating station: one plate of cornflour, one bowl of beaten egg. Beat the egg well it should be fully homogenous with no visible white streaks. Working one piece at a time, toss the marinated chicken in cornflour, shake off excess, dip in beaten egg, then press back into the cornflour for a second coat. Heat oil to 175°C. Fry in batches using the half-release technique, 4 to 5 minutes per batch, until deeply golden. Drain on a wire rack. Start the sauce immediately in a wok on high heat while the last batch fries.
Standard Operating Procedure (SOP)
For consistent, restaurant-quality sweet and sour chicken bites every single time, follow this sequence: cut chicken into uniform 2.5–3 cm cubes → pat dry → marinate 15 minutes → pre-mix sauce in bowl → prepare cornflour slurry → cut vegetables → set up double-coating station (cornflour / egg / cornflour) → double-coat all pieces → heat oil to 175°C → half-release each piece into oil → fry 4–5 minutes per batch in batches of 4–6 → drain on wire rack → start sauce immediately in wok on high heat → stir-fry capsicum and onion 60–90 seconds → pour pre-mixed sauce → bring to boil → stir slurry and add → stir to glossy → add pineapple chunks if using → add fried chicken → toss 30 seconds maximum → plate immediately → serve within 3 minutes. The five decisions that most directly affect the result are uniform chicken size (even cooking), double coat (crunch durability), half-release frying (no sticking), wire rack draining (crust preservation), and the 30-second sauce toss (crunch under the gloss). Together, these five make the difference between sweet and sour chicken bites that taste like they came from a proper kitchen and ones that taste like an approximation of a takeaway.
For party and catering batches, the double-coated fried chicken can be prepared up to 2 hours ahead and kept on a wire rack at room temperature uncovered, never stacked. The sauce can be pre-mixed up to 24 hours ahead and refrigerated. Combine fresh-to-order in batches at the party. For a party table presentation, a small chafing dish or warming tray keeps the sauced bites at serving temperature and allows guests to help themselves while the sauce stays glossy and warm.
Garnish and Presentation
Sweet and sour chicken bites have one of the most naturally appealing visual profiles of any Chinese dish the deep amber-red of the glossy sauce, the golden edges of the coating visible beneath it, the bright green-red-yellow of the capsicum, and the pale gold of the pineapple chunks all create a colourful, abundant-looking plate without any additional garnish. Serve on a wide, flat dark ceramic plate or bowl the colour of the sauce pops brilliantly against a dark background. Arrange the bites in a generous, slightly heaped pile rather than a flat single layer height signals abundance and makes the plate look more restaurant-worthy.
For garnish: a generous scatter of thinly sliced spring onion greens over the top, a light sprinkle of toasted sesame seeds (white or a mix of white and black), and a few rings of fresh red chilli for colour and a subtle heat signal. A wedge of fresh lime or lemon on the side. For a party presentation with extra gloss, drizzle a tablespoon of the warm sauce directly over the arranged bites just before bringing to the table the sauce catches the light and makes the entire plate look freshly made and irresistible.
Plating and Serving Tips
Serve sweet and sour chicken bites within 3 to 4 minutes of plating the coating continues to soften in contact with the sauce and the optimal window for crunch under the gloss is narrow. For individual plating at a dinner table, serve in a wide, shallow ceramic bowl so the sauce collects naturally around the base of the pile rather than running off the edge of a flat plate. For a party tray, use a dark oval platter and serve with small tasting picks or bamboo skewers through each bite so guests can serve themselves cleanly without touching each other's food.
Never cover hot sweet and sour chicken bites before serving the trapped steam softens the coating and the vibrant colour of the sauce dulls within minutes. For buffet service, keep in a shallow hotel pan over a warmer and scatter fresh spring onion greens and sesame seeds over the top just before guests start serving themselves to restore the visual freshness.
If you make this sweet and sour chicken bites recipe, I genuinely want to hear every detail did the double-coating make the difference, did you use pineapple or go without, did you try the air fryer version or the mango variation, how quickly did the plate disappear at the table? Leave a star rating below and drop a comment. Your notes help other readers get that glossy, crispy, better-than-takeaway result at home and I read every single one. Save this to Pinterest now so it is always there for your next party spread, Chinese dinner night, Diwali celebration, or the next time the sweet and sour craving hits and 40 minutes is all you need!
Ingredients
- 500g (1.1 lb) boneless skinless chicken thighs
- 1 teaspoon fresh ginger, finely grated
- 2 garlic cloves, finely minced
- ½ teaspoon white pepper powder
- 1 tablespoon soy sauce
- ½ cup cornflour (cornstarch)
- 2 large eggs, beaten until fully homogenous
- 1 tablespoon soy sauce
- 4 tablespoons tomato ketchup
- ½ cup water or light chicken stock
- 3 tablespoons rice vinegar (unseasoned)
- Neutral oil with high smoke point: vegetable, sunflower, or groundnut oil
- 2 tablespoons sugar (white or light brown)
- 1 teaspoon toasted sesame oil
- 3 tablespoons pineapple juice
Nutritional Information
- Calories: 295 kcal
- Protein: 24g
- Carbohydrates: 26g
- Fat: 10g
- Fiber: 2g
- Sodium: 620mg
- Sugar: 14g
Directions
1. MARINATE THE CHICKEN
Place the chicken cubes in a bowl. Add the grated ginger, minced garlic, white
pepper, soy sauce, sesame oil, and salt. Toss well so every piece is evenly
coated. Cover and leave to marinate for 15 minutes at room temperature.
While the chicken marinates, pre-mix the sweet and sour sauce, prepare the
cornflour slurry, cut the vegetables, and set up the coating station.
2. SET UP THE DOUBLE-COATING STATION
Place ½ cup of cornflour in a wide, shallow plate.
In a separate bowl, beat the two eggs vigorously until completely homogenous —
no visible streaks of white remaining.
3. DOUBLE-COAT THE CHICKEN
Working with a few pieces at a time, lift the marinated chicken from the bowl
(shaking off excess marinade) and toss in the cornflour until evenly coated —
press lightly to ensure the flour adheres on all surfaces.
Transfer the cornflour-coated pieces to the beaten egg bowl. Turn each piece
to coat all sides in egg.
Remove from the egg wash (letting any excess drip off for 2 seconds) and return
to the cornflour plate. Press each piece firmly into the cornflour for a second
coat on all surfaces — this second layer should be thicker and slightly more
uneven than the first.
Place each double-coated piece on a clean tray. Do not let the coated pieces sit
too long before frying — 5 to 10 minutes maximum or the coating becomes damp.
STEP 4 — HEAT THE OIL
Pour neutral oil into a deep, wide pan to a depth of 5 to 6 cm. Heat to 175°C
(347°F). Test with a small piece of batter or a drop of egg — it should sizzle
steadily and float to the surface within 3 seconds without browning immediately.
Place a wire rack over a clean tray beside the stove.
4. FRY THE CHICKEN BITES (IN BATCHES OF 4–6)
Pick up one double-coated chicken piece and lower it halfway into the hot oil.
Hold it at the surface for 2 seconds — the batter will begin to set immediately.
Then release fully into the oil. Repeat with 3 to 5 more pieces, releasing each
in a different spot in the oil away from the others. Do not crowd the pan.
Fry for 4 to 5 minutes, turning the pieces once at the halfway point, until the
coating is a deep golden amber and the chicken is cooked through.
Remove with a slotted spoon or mesh skimmer and transfer to the wire rack.
Repeat with remaining batches, maintaining the oil temperature at 175°C between
each batch. Allow all batches to rest on the rack while you build the sauce —
start the sauce immediately after the last batch goes into the oil.
5. BUILD THE SWEET AND SOUR SAUCE
Heat a wok or wide pan on the highest heat available for 2 minutes until smoking.
Add 2 tablespoons of neutral oil. Add the minced garlic and stir for 15 to 20
seconds until just golden at the edges — do not burn. Add the onion squares and
capsicum pieces all at once. Toss on high heat for 60 to 90 seconds — the
vegetables should take on slight char marks at the edges while remaining clearly
crunchy. Do not cook beyond 90 seconds.
6. ADD THE SAUCE AND THICKEN
Give the pre-mixed sauce bowl a quick stir (the sugar may have settled) and pour
the entire contents into the hot wok at once. Stir immediately. Bring to a full
boil on high heat — this takes about 60 seconds. Taste the sauce at boiling point.
Adjust with more vinegar for a sharper result, more sugar for a sweeter one.
Stir the cornflour slurry vigorously to re-combine any settled starch, then pour
into the boiling sauce in a thin steady stream while stirring constantly. The sauce
will thicken to a glossy, clingy consistency within 30 seconds. It should coat a
spoon and flow steadily — not pour like water, not be stiff. Add the pineapple
chunks if using and stir through for 20 seconds.
7. TOSS THE CHICKEN AND SERVE
Add all the fried chicken bites to the glossy sauce in the wok. Using tongs or a
spatula, toss vigorously for exactly 30 seconds on high heat so every piece is
completely coated in the sauce. Remove from heat. Drizzle the sesame oil over
the top and toss once more.
8. PLATE AND SERVE IMMEDIATELY
Transfer the sweet and sour chicken bites to a wide serving plate or bowl.
Scatter spring onion greens, sesame seeds, and red chilli rings over the top.
Add a wedge of lime and a small bowl of extra sauce on the side if desired.
Serve immediately — within 3 minutes of plating — while the coating still has
a faint crunch under the gloss and the sauce is at peak temperature and sheen.
Rate this Recipe
User Reviews
No reviews yet. Be the first to share your thoughts!