Crispy Tempura Vegetables with a Feather-Light Batter
Tempura vegetables with ice-cold batter, minimal mixing technique & tentsuyu dipping sauce. Light, airy, crispy results at home in 40 mins.
 Tripti Srivastava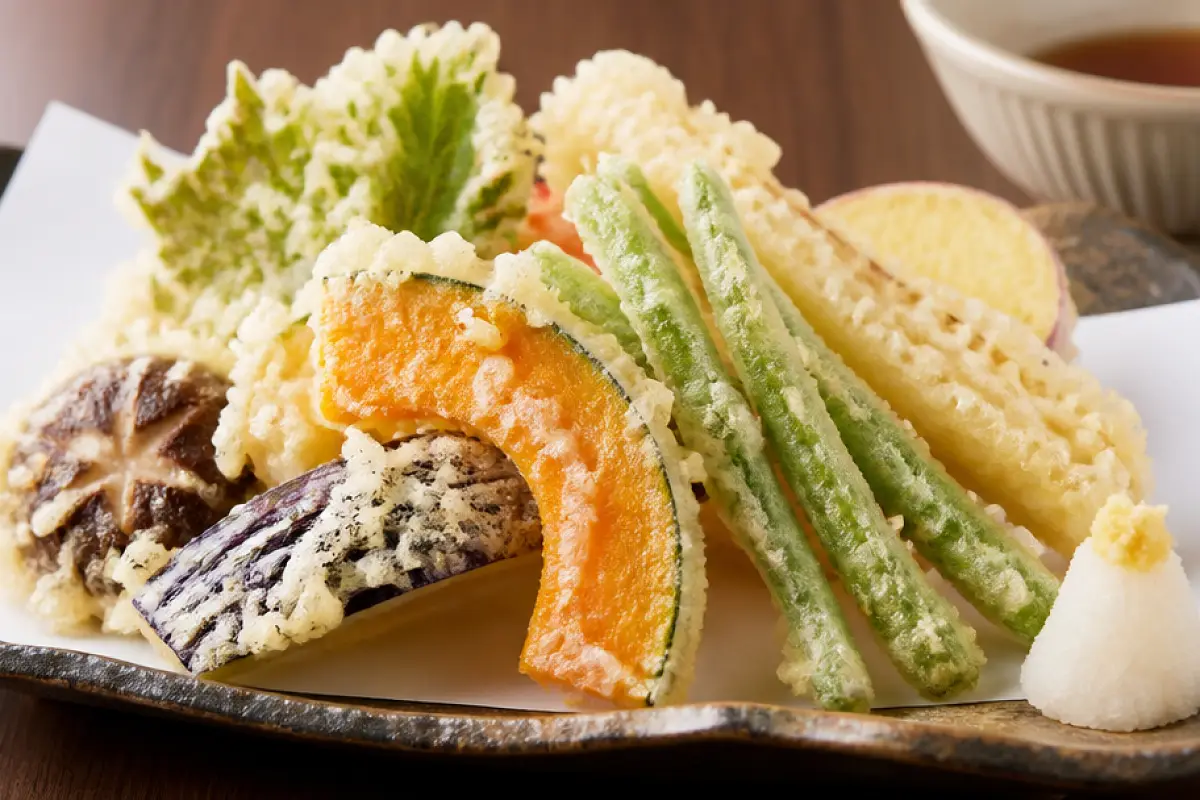
There is a particular kind of crispiness that only properly made tempura vegetables can produce a thin, lacy, almost translucent coating that shatters at the first bite rather than crunching through a thick, bready shell. It is lighter than any other fried batter. It is more delicate. And it is, once you understand the three or four rules that govern it, genuinely one of the easier frying preparations to master at home. The challenge is not the technique itself it is unlearning the instincts you have built from making every other kind of battered food. Tempura vegetables is about restraint in a way that most frying is not. Less mixing. Colder water. Less batter on the vegetable. Less time in the oil. Every instruction in this recipe points in the same direction: do less, and trust the process.
Tempura actually has its roots in Portugal in the 16th century, Portuguese traders introduced a dish called Peixinhos da Horta, bringing deep-frying techniques to Japan for the first time. The dish first became popular during Japan's Edo era between 1603 and 1867, initially as food eaten while standing at outdoor street stalls. Over the centuries that followed, Japanese chefs refined what they had inherited into something entirely their own a technique built around the lightest possible batter, the freshest possible vegetables, and a dipping sauce that does the seasoning at the table rather than in the oil. The result is a dish that looks effortless, tastes clean, and communicates a kind of quiet precision that is very distinctly Japanese in its sensibility.
This recipe gives you the complete foundation: the science behind the cold-water batter, the correct mixing technique, the flour-dusting step that most home recipes skip, the oil temperature management that determines whether you get a lacy shatter or a greasy crust, the tentsuyu dipping sauce made from scratch, and a full presentation guide for serving tempura the way it is meant to be served. Whether you are making this for a Japanese dinner spread, a vegetarian starter, or simply because you want to understand one of the most elegant frying traditions in the world this recipe has everything you need.
What Makes This Tempura Vegetables Recipe Special
The gap between restaurant tempura and home tempura is almost always explained by the same handful of mistakes an over-mixed batter, water that was not cold enough, vegetables that were not dried or dusted with flour first, and oil at the wrong temperature. This recipe is built around eliminating every one of them.
- Ice-cold water is non-negotiable and here is why. Cold water slows the formation of gluten when flour and water are combined. Gluten is the protein network that makes bread chewy and pasta elastic exactly what you do not want in a tempura batter. A low-gluten batter fries to a light, crispy, almost flaky result. A high-gluten batter fries to a thick, chewy, greasy shell. This recipe uses ice-cold water AND ice cubes in the batter bowl to maintain the lowest possible temperature throughout the mixing and frying process. The few minutes the batter spends in the freezer between mixing and using it is not fussiness it is the step that keeps the batter cold as the kitchen heat works against you.
- Minimal mixing lumps are correct. Almost every other batter recipe instructs you to mix until smooth. Tempura batter is the exception. You stir it three or four times with chopsticks or a fork and stop even if lumps are visible. Those lumps are undissolved flour pockets that fry into the irregular, lacy, bubbly surface texture that makes tempura look and feel the way it does. A smooth, over-mixed tempura batter produces a coating that is uniform, dense, and nothing like the restaurant version.
- The flour-dusting step before dipping in batter. Dusting each vegetable piece in a thin layer of plain flour before dipping it in the tempura batter gives the batter a dry surface to adhere to rather than a wet vegetable surface it slides off of. This single step which many home recipes omit entirely is what makes the difference between a batter that coats the vegetable evenly and clings during frying, and one that slides off the wet surface and leaves bare patches on the finished piece.
- Oil temperature precision. Tempura is fried at 170°C to 180°C lower than many other deep-fried preparations. The lower temperature is correct for tempura because it allows the batter to cook through fully and develop its lacy structure before the outside browns. Too hot and the batter browns immediately while the inside is still raw paste. Too cool and the batter absorbs oil and becomes greasy and heavy. A kitchen thermometer is worth using here, or a drop of batter should float to the surface within 3 seconds and sizzle steadily without browning immediately.
- The tentsuyu dipping sauce made from scratch. Tempura is traditionally served with tentsuyu a dipping sauce made from soy sauce, mirin, and dashi along with grated daikon radish for stirring into the sauce. This recipe makes the tentsuyu from scratch in five minutes and the result is a clean, savoury-sweet sauce that does what the batter deliberately does not season the food at the table rather than in the oil. The freshly grated daikon stirred into the sauce just before serving adds a cooling, slightly peppery freshness that is one of the most important flavour elements of the whole dish.
Ingredients Overview
The flour for tempura batter should be plain all-purpose flour or ideally cake flour or tempura flour if you can find it. Tempura is traditionally made using cake flour because it contains less protein than all-purpose flour, which minimises gluten formation and makes it easier to achieve the characteristic crispiness. If you can only find all-purpose flour, it works well the ice-cold water and minimal mixing compensate for the slightly higher protein content. Never use bread flour or self-raising flour for tempura. A small amount of cornflour (cornstarch) mixed with the plain flour adds an extra layer of crispiness the cornstarch has zero gluten and fries to a very clean, dry crunch.
The water must be ice-cold not just cold from the tap, but genuinely cold from the refrigerator or with ice cubes added. Some recipes substitute part or all of the water with sparkling water or club soda. The carbonation in sparkling water creates tiny bubbles in the batter that expand during frying, producing an even lighter, more aerated coating. Club soda is less readily absorbed by the flour than still water, so the batter will be more aerated than batter made with water alone. Either works still ice-cold water is traditional, sparkling water produces a marginally lighter result.
The egg yolk (one yolk per cup of water) adds richness and colour to the batter. For a vegan version, the egg yolk is simply omitted and replaced with an additional tablespoon of cornflour the result is slightly paler and marginally less rich but still produces a perfectly crispy, light batter.
For vegetables, the key principle is that different vegetables need different handling and different frying times. Dense root vegetables like sweet potato and lotus root need to be sliced thinly so they cook through before the batter browns. Delicate vegetables like shiso leaves, thin asparagus, and snow peas fry in under a minute. Moisture-heavy vegetables like zucchini and eggplant need to be salted, rested, and dried before battering excess moisture turns the batter soggy and causes dangerous oil splatter. The vegetable handling notes in the directions section cover each type specifically.
For the tentsuyu dipping sauce, dashi is the base a light Japanese stock made from kombu (dried kelp) and bonito flakes. A quick cold-brew dashi from kombu alone is the simplest approach for home cooking and takes 20 minutes of passive soaking rather than active cooking. Mirin (sweet Japanese rice wine) and soy sauce complete the sauce. Freshly grated daikon radish is stirred in at the table it is not a garnish but an ingredient that changes the flavour and temperature of the sauce meaningfully. For a vegan tentsuyu, replace the bonito dashi with kombu-only dashi and use tamari in place of soy sauce.
How to Make It
The process has three parallel tracks that converge at the table. Track one is the tentsuyu: make it in advance and let it cool. Track two is the vegetable preparation: wash, cut, dry, and flour-dust all vegetables. Track three is the batter: mixed at the last possible moment before frying and kept cold throughout. Fry in batches at the correct temperature, drain on a wire rack, and serve immediately tempura waits for no one and loses its crunch within minutes of coming out of the oil.
The most important mindset shift for making good tempura at home is to treat the batter as a last-minute preparation, not a make-ahead one. Mix it no more than 5 minutes before you start frying, keep the bowl over ice while you work, and use it while it is still cold and lumpy. Every minute it sits at room temperature, more gluten forms and the batter gets heavier. The full step-by-step directions are below.
Also Read: Sushi Rolls Recipe
Tips for Best Results
- Make the batter last at the very last moment. Everything else the tentsuyu, the grated daikon, all the vegetable preparation should be done before the batter is mixed. The batter deteriorates quickly at room temperature as gluten continues to develop. Mix it two to three minutes before you plan to start frying and keep the bowl resting in a larger bowl filled with ice water to maintain the cold temperature throughout the session.
- Stop mixing when you still see lumps. Three to four gentle stirs with chopsticks or a fork is the correct amount of mixing for tempura batter. If you are looking at a smooth, fully combined batter, you have over-mixed it. Visible lumps of flour are not a mistake they are the intended texture. Trust this instruction even when every instinct tells you to keep stirring.
- Dry the vegetables completely before dusting with flour. Any surface moisture on the vegetable prevents the flour from adhering, which means the batter will not adhere either. Pat every piece dry with kitchen paper before the flour dusting step. For moisture-heavy vegetables like eggplant and zucchini, salt them lightly, rest for 10 minutes, then rinse and dry thoroughly before battering.
- Fry in small batches no more than 4 to 5 pieces at a time. Crowding the oil drops the temperature rapidly and turns the batter greasy rather than crispy. Each batch needs enough space that the oil can maintain its temperature around every piece simultaneously. Between batches, use a fine-mesh skimmer or a pair of chopsticks to remove any loose batter droplets from the oil these burn and make the oil dark and bitter if left in.
- Drain on a wire rack not paper towels. Kitchen paper creates a hot, steamy surface under the tempura that softens the batter from below within seconds. A wire rack over a tray allows air to circulate under every piece and keeps the tempura crispy for longer after frying.
- Serve within 3 minutes of frying. Tempura is one of the most time-sensitive fried foods. The thin batter absorbs moisture from the vegetables within minutes of coming out of the oil, and the characteristic crunch begins to soften noticeably after 3 to 4 minutes. At a dinner party, fry in small batches and bring directly to the table rather than holding in an oven an oven creates steam that destroys the tempura texture faster than simply leaving it on the rack.
Serving Suggestions
Tempura is traditionally served in one of two ways in Japan as a starter or side with tentsuyu dipping sauce and grated daikon, or as a topping over a bowl of hot soba or udon noodles (called tempura soba or tempura udon). For a dinner party setting, serve the tempura pieces arranged on a wooden board or a bamboo basket lined with white paper, with the tentsuyu sauce in a small ceramic bowl alongside a small mound of grated daikon and a sliver of fresh ginger. This is the classic izakaya presentation and it looks beautifully considered with almost no effort.
For a fuller Japanese meal at home, serve alongside a bowl of homemade miso soup, a small bowl of steamed Japanese short-grain rice, and a simple cucumber and sesame salad dressed with rice vinegar and a few drops of sesame oil. The clean, minimal flavours of tempura are complemented perfectly by the savoury warmth of miso soup and the gentle sweetness of plain Japanese rice.
Storage and Reheating
Tempura does not store well and this is by design. The thin batter is so delicate that it begins absorbing moisture from the vegetables within minutes of cooling. If you must reheat leftover tempura, place the pieces on a wire rack in an oven at 200°C for 6 to 8 minutes this drives out the absorbed moisture and partially restores the crunch. An air fryer at 185°C for 4 to 5 minutes works even better. Do not microwave tempura under any circumstances it turns the batter soft, wet, and completely without texture.
Make-ahead approach for parties: The best strategy for serving tempura to a crowd is to prepare the tentsuyu and all the vegetable cuts in advance, and make the batter fresh-to-order during the party in small batches. This is the approach used at Japanese tempura restaurants individual portions are battered and fried in the moment they are ordered. For a home party, frying in two to three batches at 15-minute intervals is more practical and gives every guest hot, fresh tempura rather than a full batch that loses its crunch before everyone has served themselves.
Variations and Substitutions
- Sparkling Water Batter: Replace the ice-cold still water in the batter with an equal amount of very cold sparkling water or club soda. The carbonation creates micro-bubbles in the batter that expand during frying and produce an even lighter, more aerated coating than still water. Pour the sparkling water directly from a refrigerated bottle it should still be fizzing when it hits the flour.
- Vegan Tempura: Omit the egg yolk entirely. Add an extra tablespoon of cornflour to compensate for the binding role the yolk would have played. The vegan batter produces a slightly paler, marginally thinner coating that is still beautifully crispy. Use kombu-only dashi for the tentsuyu and tamari in place of soy sauce for a fully vegan preparation.
- Gluten-Free Tempura: Replace the all-purpose flour in the batter with a 50/50 blend of rice flour and cornflour. Rice flour has almost no gluten and produces an extremely light, crispy batter that is arguably closer to the restaurant-grade tempura result than a wheat flour batter. This is also a naturally vegan option when combined with the egg-free approach above.
- Kakiage (Vegetable Fritter Style): Rather than battering individual pieces, mix a small handful of thinly sliced vegetables spring onion, carrot, burdock root, and corn directly into a thicker portion of batter and drop spoonfuls into the oil. The mixture fries into a round, fritter-style tempura patty called kakiage. It is a more rustic, home-style form of tempura that is particularly popular over rice bowls.
- Tendon (Tempura Rice Bowl): Serve the fried tempura pieces over a bowl of steamed Japanese short-grain rice with a drizzle of warm tentsuyu sauce over everything. This is one of Japan's most beloved comfort food dishes and the easiest way to turn a plate of vegetable tempura into a complete meal.
Preparation Method
Start with the tentsuyu: combine the dashi, mirin, and soy sauce in a small saucepan. Bring to a gentle simmer, stir briefly, and remove from heat. Cool to room temperature. Grate the daikon radish finely and squeeze out excess moisture gently it should be a small, cold, mound of grated radish ready to be stirred into the sauce at the table. Prepare the ginger similarly.
Prepare all vegetables: cut each type according to its specific handling requirements (detailed in the directions section), pat dry completely with kitchen paper, and arrange on a tray. Place the tray of vegetables in the refrigerator to keep cold cold vegetables maintain the batter temperature longer during the brief contact before the piece goes into the oil. Prepare a shallow plate of plain flour for the dusting step. Heat the oil to 175°C. Make the batter at the last possible moment cold water, egg yolk, flour and cornflour folded together with three or four strokes. Place the batter bowl in a larger bowl of ice water. Begin frying immediately.
Standard Operating Procedure (SOP)
For consistent, restaurant-quality vegetable tempura every single time, follow this sequence: make tentsuyu in advance → cool completely → grate daikon → prepare and cut all vegetables → dry all vegetables completely → refrigerate until ready to fry → heat oil to 175°C → make batter last (egg yolk + ice-cold water mixed first → sift flour and cornflour over liquid → fold 3–4 strokes maximum → stop with lumps visible → place batter bowl in bowl of ice water) → dust each vegetable piece lightly in plain flour → shake off excess → dip briefly in batter → lower gently into oil → fry 2–3 minutes per side depending on vegetable → remove when batter is just set and very lightly golden → drain on wire rack (not paper) → skim loose batter bits from oil between batches → serve immediately within 3 minutes → stir daikon into tentsuyu at the table → eat immediately. The four rules that govern everything are: keep the batter cold, mix it minimally, dust the vegetables first, and serve within minutes. These four rules together explain why restaurant tempura is what it is and why most home attempts fall short.
For a dinner party, prepare the tentsuyu up to 2 hours ahead and keep refrigerated. All vegetable preparation can be done up to 1 hour ahead. The batter must be made fresh for each frying session. A practical party approach is to fry three to four batches at intervals throughout the evening and bring each to the table as it comes out of the oil the anticipation of a new batch arriving hot creates a genuinely pleasurable rhythm at the table and ensures every guest experiences the crunch at its peak.
Garnish and Presentation
The traditional Japanese presentation for vegetable tempura is clean, minimal, and deliberately uncluttered and it is also beautiful. Some experienced cooks use distinct cutting techniques including thin slices, thick rounds, and the elegant suehiro fan cut, where a piece is cut into a fan shape that opens during frying to create a striking visual. For home cooking, the fan cut applied to sweet potato, lotus root, or eggplant takes less than 30 seconds per piece and immediately elevates the presentation from home-cooked to restaurant-level.
Arrange the fried tempura pieces on a wooden board, a bamboo basket lined with white or parchment paper, or a flat, light-coloured ceramic plate white or pale cream ceramic shows the golden batter most beautifully. Stand taller pieces upright against each other for height, lay flat pieces in a gentle fan. Place the tentsuyu dipping sauce in a small ceramic bowl alongside and put the grated daikon and a thin sliver of fresh ginger either in the sauce bowl or in two tiny separate bowls beside it. A few drops of yuzu juice or a thin curl of yuzu peel over the daikon adds a visual and aromatic finishing touch that is very much in the spirit of the dish. For a table centrepiece, a wooden board with eight to ten pieces of tempura in varied shapes and colours, two sauce bowls, and a few shiso leaves or fresh herb sprigs for colour creates a platter that looks quietly stunning.
Plating and Serving Tips
Bring tempura directly from the wire rack to the table never hold it in a covered container, a warm oven, or a plate covered with cling film. All three create the steam and trapped heat that destroy the batter texture within minutes. For individual plating at a dinner table, three to five pieces per person is the right starter portion enough to appreciate the range of vegetables and textures without overwhelming the plate. Arrange each piece with its battered side and texture visible from above, not hidden face-down on the plate.
For a sharing platter, think in terms of visual variety: alternate colours and shapes so the eye moves across the plate. A pale golden slice of sweet potato next to a dark-flecked lotus round, a bright green broccoli floret, a thin cross-section of eggplant. The range of colours and shapes in a well-chosen selection of tempura vegetables creates a natural visual composition without any additional styling effort. Keep the tentsuyu warm in a small ceramic pitcher so guests can pour their own serving this is both practical and adds a participatory element to the meal that guests find genuinely enjoyable.
If you make this tempura vegetables recipe, I genuinely want to hear how it went did the ice-cold water and minimal mixing produce the crunch you were hoping for, which vegetables were your favourite to fry, did you try the sparkling water batter or the rice flour gluten-free version? Leave a star rating below and drop a comment. Every note helps other home cooks understand the technique more confidently and I read every single one. Save this to Pinterest now so it is always there for your next Japanese dinner night, dinner party, or the next time you want to make something genuinely beautiful and technically precise at home!
Ingredients
- 1 medium sweet potato (about 200g)
- 6–8 broccoli florets, cut into bite-sized pieces with short flat stem
- 1 small eggplant (about 150g), cut into quarters lengthwise
- 1 medium zucchini, sliced 1 cm thick on the diagonal
- ½ lotus root (renkon), peeled and sliced 5mm thin in rounds
- 6–8 green beans or thin asparagus spears, topped and tailed
- 1 cup (120g) plain all-purpose flour OR cake flour OR tempura flour
- ½ red capsicum (bell pepper), deseeded and cut into wide strips
- 6–8 large button or shiitake mushrooms, stems trimmed
- 4–6 shiso leaves
- 1 cup (240ml) ice-cold water
- ¼ cup plain all-purpose flour
- 1 large egg yolk
- 2 tablespoons cornflour (cornstarch)
- 4–5 ice cubes
Nutritional Information
- Calories: 220 kcal
- Protein: 4g
- Carbohydrates: 30g
- Fat: 9g
- Fiber: 3g
- Sodium: 95mg
- Sugar: 4g
Directions
1. MAKE THE TENTSUYU DIPPING SAUCE (DO THIS FIRST)
For the quick cold kombu dashi: place one 10 cm piece of dried kombu in a small
bowl with 1½ cups of cold water. Leave to soak for 20 minutes — the water will
turn pale yellow-green and faintly sea-scented. Remove the kombu and you have
your dashi. Alternatively, dissolve ½ teaspoon of instant dashi powder in 1 cup
of just-boiled water and cool completely.
Combine 1 cup of the cooled dashi with the mirin and soy sauce in a small
saucepan. Bring to a gentle simmer over medium heat, stir once, remove from heat.
Allow to cool to room temperature. The sauce should taste clean, savoury,
faintly sweet, and mildly salty — if it tastes too salty, add a splash more
dashi. Grate the daikon radish finely and squeeze gently to remove excess water.
Grate the ginger finely. Set both aside separately.
2. PREPARE ALL VEGETABLES
Work through each vegetable type:
SWEET POTATO: peel and slice 5mm thin on the diagonal. Pat dry with kitchen paper.
BROCCOLI: cut into evenly-sized bite-sized florets with a short, flat stem (the flat
stem base helps the piece sit stable in the batter and in the oil).
EGGPLANT: cut into quarters lengthwise. Sprinkle lightly with salt on both sides.
Rest for 10 minutes. Rinse thoroughly. Pat completely dry with kitchen paper.
ZUCCHINI: slice 1 cm thick on the diagonal. Pat dry.
LOTUS ROOT: peel and slice 5mm thin in rounds. Immediately place in a bowl of
cold water with 1 teaspoon rice vinegar to prevent browning. When ready to fry,
drain and pat completely dry.
MUSHROOMS: clean with a damp cloth, trim stems. For shiitake, remove the stems
entirely and score the cap lightly with an X.
CAPSICUM: deseed and cut into wide strips.
GREEN BEANS/ASPARAGUS: top and tail. Leave whole.
SHISO LEAVES: leave whole. These fry in under 30 seconds.
Place all prepared vegetables on a tray and refrigerate while you prepare
the oil and batter. Cold vegetables maintain the batter temperature better.
3. HEAT THE OIL
Pour neutral oil into a deep, wide pan to a depth of 4 to 5 cm. Heat to 175°C
over medium-high heat. This will take approximately 8 to 10 minutes depending on
your stove and pan. Test with a small drop of batter — it should sink slightly,
then immediately float back to the surface and begin sizzling steadily within
3 seconds. If it floats immediately and sizzles very aggressively, the oil is too
hot (above 185°C). If it sinks and takes more than 5 seconds to surface, the oil
is too cool. Adjust the heat and test again. Prepare a wire rack over a clean
tray beside the stove for draining.
4. SET UP THE DUSTING AND BATTER STATION
Place the ¼ cup of plain flour in a wide, shallow plate for dusting.
Set up a larger bowl filled with ice water or ice cubes beside the stove.
Remove the prepared vegetables from the refrigerator.
5. MAKE THE TEMPURA BATTER (DO THIS LAST JUST BEFORE FRYING)
In a medium bowl, whisk the egg yolk briefly with the ice-cold water until just
combined — 10 seconds. Add the ice cubes to this liquid mixture and stir once.
Sift the plain flour and cornflour directly into the cold egg-water mixture.
Using chopsticks or a fork, fold the dry and wet ingredients together with
3 to 4 slow, deliberate strokes. Stop immediately — even if the batter looks
lumpy and uneven. Visible flour lumps are correct. Smooth batter is over-mixed
batter. The batter should look shaggy, slightly transparent in places, and cool
to the touch.
Place the batter bowl inside the larger bowl of ice water to keep it cold
throughout frying. The batter is now ready.
6. FLOUR-DUST, BATTER, AND FRY (IN BATCHES OF 4–5 PIECES)
Working with one piece at a time and frying in batches:
Take a vegetable piece and dust lightly in the plain flour on the shallow plate.
Shake off all excess flour — only the thinnest coating should remain on the surface.
Dip the flour-dusted piece into the cold tempura batter. Lift it out and allow
the excess batter to drip back into the bowl for 2 seconds.
Lower the piece gently into the hot oil — do not drop it.
Add 3 to 4 more pieces to the oil, one at a time, without crowding the pan.
COOK TIMES BY VEGETABLE:
- Sweet potato: 2.5 to 3 minutes per side
- Lotus root: 2.5 to 3 minutes per side
- Eggplant: 1.5 to 2 minutes per side
- Broccoli: 1.5 to 2 minutes per side
- Zucchini: 1.5 to 2 minutes per side
- Capsicum: 1 to 1.5 minutes per side
- Mushrooms: 1 to 1.5 minutes per side
- Green beans/asparagus: 1 to 1.5 minutes (no need to turn thin pieces)
- Shiso leaves: 30 seconds (one side only — do not turn)
The batter is ready when it looks very lightly golden and slightly puffed — not
brown. Tempura should be pale gold, not dark. The batter should look slightly
blistered and lacy at the edges. Remove with a mesh skimmer or chopsticks and
place on the wire rack. Do not place on paper towels.
Between batches, use a mesh skimmer or chopsticks to remove any loose batter
fragments floating in the oil — they burn quickly and make the oil bitter and dark.
7. SERVE AT THE TABLE
Bring the wire rack of tempura pieces directly to the table within 3 minutes of
frying. Do not cover. Do not hold in an oven. Arrange on a serving board, wooden
basket, or plate lined with white paper. Place the tentsuyu in a small bowl
alongside. Stir the grated daikon and grated ginger into the tentsuyu at the table.
Add a few drops of yuzu juice if using.
Eat immediately — dip each piece fish/vegetable-side down into the tentsuyu,
not the batter side. The sauce should lightly season the ingredient, not
overwhelm the delicate batter.
Rate this Recipe
User Reviews
No reviews yet. Be the first to share your thoughts!