Crispy Veg Spring Rolls That Shatter at the First Bite
Veg spring rolls with Indo-Chinese stir-fried filling, crispy wrapper & perfect seal. Deep-fried, air-fried, or baked ready in 45 mins. Get the full recipe now.
 Tripti Srivastava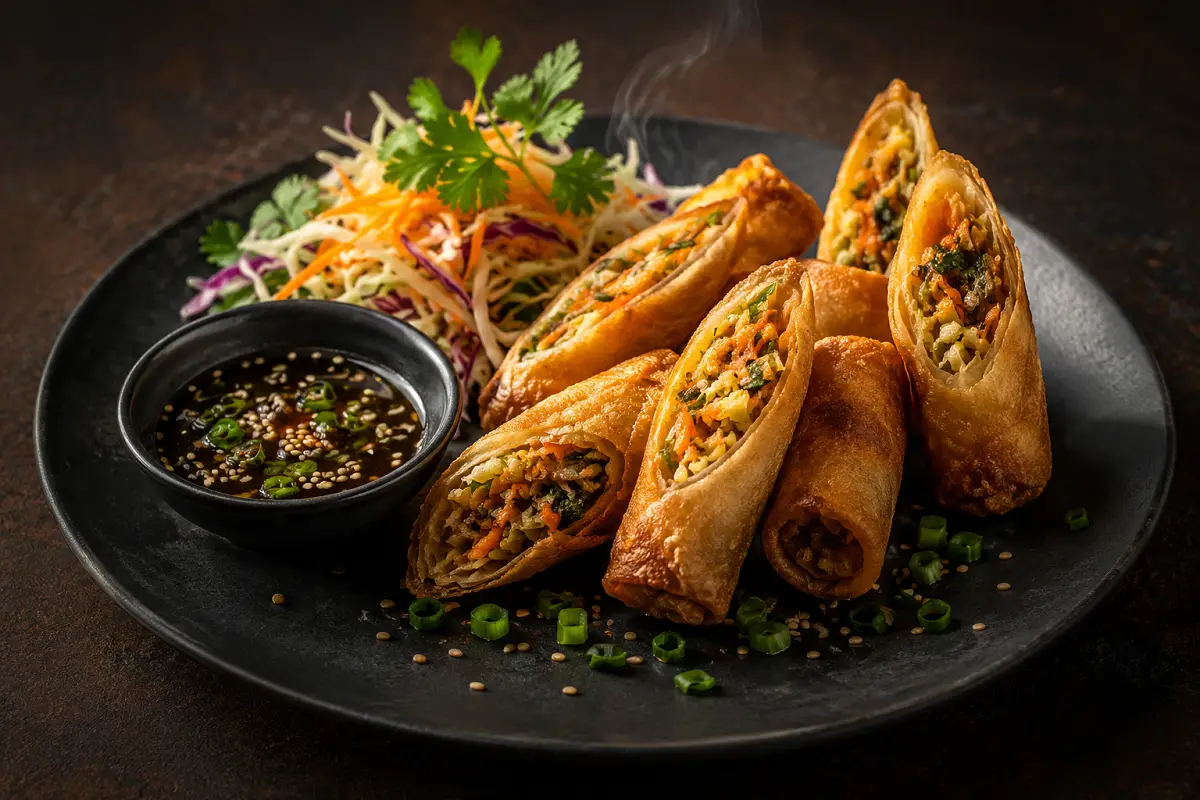
There is a specific sound that tells you a veg spring roll has been made correctly the clean, paper-thin crack when the golden shell shatters under your teeth before the warm, sauced vegetables spill out from inside. That sound, and the contrast between the blistered, crispy exterior and the hot, fragrant Indo-Chinese filling, is what makes this one of the most universally loved starters in the Indian-Chinese restaurant repertoire. Everyone at every table orders them. Everyone finishes the plate. And most people have wondered at least once why the ones they make at home never quite crack and shatter the same way. This recipe is built specifically to answer that question and to give you the crispy, golden, restaurant-quality result at home every single time you make it.
The Indo-Chinese spring roll as eaten across India is a specific and wonderful thing different from the Vietnamese fresh spring roll, different from the heavy Cantonese version, and very different from the thick-shelled egg rolls of American Chinese restaurants. The Indian version uses a thin, almost translucent wheat flour wrapper, a filling that is stir-fried quickly on high heat with soy sauce, chilli sauce, and a splash of vinegar, and a deep fry in hot oil that turns the wrapper into a layered, blistered shell that is almost flaky in texture. Getting it right is not complicated but it does require respecting a few specific rules. The most important one is this: dry filling is everything. Wet filling makes a soggy wrapper. A soggy wrapper does not crisp. A wrapper that does not crisp opens in the oil and fills it with your entire spring roll. This recipe is built around preventing every single one of those outcomes.
Whether you are making these for a Diwali party platter, a rainy afternoon snack, a kid's birthday spread, or just because the craving hit and nothing else will do this recipe gives you everything you need.
What Makes This Veg Spring Rolls Recipe Special
There are hundreds of spring roll recipes out there. Most of them will get you a decent result. This version is built around the specific techniques that get you a great one every time, not just sometimes.
- High-heat stir-fry for a dry, flavourful filling. The vegetables are cooked on the highest heat your stove can produce, tossed constantly for only 3 to 4 minutes. The goal is not to cook the vegetables soft it is to heat them intensely enough to evaporate their surface moisture while keeping their crunch. A filling made on medium heat for 8 minutes is wet, limp, and makes a soggy wrapper. A filling made on high heat for 3 minutes is dry, fragrant, and holds its structure inside the wrapper under the heat of the oil.
- Cooling the filling completely before rolling. This is the step that most people skip and the one that most directly causes burst wrappers. Warm filling releases steam. Steam turns the wrapper wet from the inside before it even goes into the oil. A fully cooled, room-temperature filling stays dry against the wrapper during the rolling and frying process. Spread it on a plate and give it 15 to 20 minutes it is not optional.
- A thick cornflour-water paste for the seal. The flap of the spring roll wrapper is sealed with a paste of cornflour and water thick enough to act as a genuine adhesive rather than a thin wash that loosens in hot oil. Two tablespoons of cornflour to three tablespoons of water, mixed until smooth and slightly viscous, provides a seal that holds through deep frying at 180°C without opening.
- The three-fold-and-tuck rolling technique. Rolling a spring roll correctly takes less than 30 seconds once you know the sequence filling placed in the lower third, bottom edge folded up firmly, sides folded in tightly, rolled upward with tension, sealed at the top. Each step creates a compact, tightly wound cylinder with no air pockets and no loose edges that can unravel in the oil. The technique is covered in full in the directions section.
- Oil temperature discipline. The correct deep-frying temperature for spring rolls is 180°C (356°F). Below this, the wrapper absorbs oil and turns greasy and chewy rather than crispy. Above this, the outside browns and chars before the wrapper layers separate and blister properly. A kitchen thermometer is the most reliable tool here but a simple bread-cube test (a cube of bread dropped into the oil should turn golden in 30 seconds at the correct temperature) works perfectly well.
Ingredients Overview
The spring roll wrapper is the most important buying decision in this recipe. Look for thin, square, frozen spring roll pastry sheets in your local Indian grocery store or Asian supermarket they come in 20cm × 20cm or 25cm × 25cm sizes, packaged in stacks of 20 to 25 sheets. The thinner the wrapper, the crispier the result. Avoid thick egg roll wrappers or samosa sheets they do not produce the same blistered, shattery result. Thaw frozen wrappers in the refrigerator overnight or at room temperature for 30 to 45 minutes before use. Keep them covered with a slightly damp kitchen towel while you work to prevent the edges from drying out and cracking when you try to fold them.
The filling vegetables are flexible but the core combination that produces the classic Indo-Chinese restaurant flavour is finely shredded cabbage, julienned carrot, thinly sliced capsicum (green and red), finely sliced French beans, and spring onion whites and greens. The cabbage is the backbone it provides bulk, sweetness when stir-fried on high heat, and the right amount of moisture to keep the filling juicy without making it wet. Shred it as finely as possible thick cabbage shreds create lumpy rolls that are hard to seal. Adding boiled hakka noodles to the filling is the touch that gives veg spring rolls that specific Indo-Chinese restaurant character the noodles add body, a slightly chewy texture contrast, and that additional soy-sauce flavour absorption that makes the filling so addictive. They are optional but thoroughly recommended.
The sauce base for the filling is built from soy sauce, red chilli sauce, a small amount of tomato ketchup, and a splash of white vinegar. These four together produce the characteristic Indo-Chinese sweet-sour-salty-hot flavour that defines the filling. Sesame oil is added off the heat at the very end it has a low smoke point and loses its distinctive toasted aroma if cooked at high heat, so adding it as a finishing element rather than a cooking medium preserves the flavour that makes the difference between a good filling and a great one. White pepper and a pinch of sugar round out the seasoning.
For substitutions: replace hakka noodles with rice noodles or glass noodles for a lighter texture. Add sliced mushrooms, baby corn, bean sprouts, or finely grated broccoli to the vegetable mix as alternatives or additions. Replace soy sauce with tamari for a gluten-free version (check the wrapper label too some spring roll wrappers contain wheat). For a protein-rich version, add crumbled firm tofu or scrambled paneer to the filling.
Also Read: Gobi Manchurian Recipe
How to Make It
The process has three distinct stages: stir-fry the filling on high heat and cool it completely, roll the spring rolls tightly using the cornflour paste seal, and deep fry (or air fry or bake) until golden and crispy. The filling takes about 8 to 10 minutes on the stove. The cooling takes 15 to 20 minutes. The rolling takes about 15 minutes for a full batch of 12 to 14 rolls. The frying takes about 10 minutes in batches. Total active time is around 45 minutes and the result is a plate of spring rolls that look and taste exactly like the ones from your favourite restaurant.
The most satisfying part of this recipe is that once you understand the three rolling steps fold, tuck, roll you can execute each spring roll in under 30 seconds. After the first two or three, your hands find the rhythm and the rest of the batch comes together quickly. The full step-by-step directions and the rolling technique are described in detail below.
Tips for Best Results
- Shred the vegetables as finely as possible. Thick shreds of cabbage or broad julienned carrot create an uneven filling that is hard to roll into a tight cylinder and tends to poke through the wrapper during frying. Finely shredded vegetables roll smoothly, create a denser, more evenly flavoured filling, and produce a spring roll with a cleaner shape and more satisfying texture.
- Cook the filling on the highest heat your stove produces. This is not the time for medium heat. The high heat evaporates the surface moisture from the vegetables in seconds rather than letting it pool in the pan and steam the vegetables soft. Use a wok if you have one its curved surface distributes heat rapidly and allows the tossing action that keeps everything moving and dry.
- Cool the filling completely before rolling. Spread the finished filling on a wide, flat plate or tray and leave it uncovered for 15 to 20 minutes. Do not cover it covering traps steam and the filling stays warm and moist. The filling should be completely at room temperature, not warm to the touch, before you begin rolling.
- Do not overfill the wrapper. Two heaped tablespoons of filling per wrapper is the right amount for a medium spring roll. More than this makes the roll hard to seal, creates a thick cylinder that takes longer to cook through, and risks the wrapper bursting at the seams during frying.
- Seal firmly and rest before frying. After rolling, press the sealed edge firmly for 5 seconds. Place the sealed-edge down on a tray. Letting them rest for 5 to 10 minutes before frying gives the cornflour paste seal time to set and bond properly. Frying immediately after rolling, before the seal has set, is a common reason wrappers open in the oil.
- Fry in small batches at the correct temperature. Too many spring rolls in the oil at once drops the temperature and results in greasy, pale rolls that absorb oil rather than crisping. Fry 3 to 4 at a time in well-heated oil and maintain the temperature between batches.
Serving Suggestions
The classic accompaniment for veg spring rolls is a small bowl of schezwan sauce the fiery, garlic-heavy red sauce that is the definitive dipping partner for Indo-Chinese snacks. A bowl of sweet chilli sauce alongside it gives guests the choice between bold and fragrant heat. For a more complete dipping spread, add a small bowl of soy-vinegar dipping sauce two tablespoons of soy sauce, one tablespoon of white vinegar, a pinch of sugar, and a few drops of sesame oil stirred together. It takes 30 seconds to make and pairs beautifully with the crispy wrapper and the soy-seasoned filling.
For a more substantial spread, serve alongside dry Gobi Manchurian and a bowl of fried rice for a complete Indo-Chinese party menu that will keep a crowd satisfied for hours. For a lighter meal, pair with hot-and-sour soup and serve the spring rolls as the starter. Either way, always serve spring rolls the moment they come out of the oil they lose their crunch within about 10 minutes and are best eaten immediately while the wrapper still shatters at the first bite.
Storage and Reheating
Cooked rolls: Cooked spring rolls can be stored in an airtight container in the refrigerator for up to 2 days. To restore the crunch, reheat in an air fryer at 180°C for 5 to 6 minutes, or in an oven at 200°C for 8 to 10 minutes on a wire rack. Avoid the microwave it makes the wrapper soft, rubbery, and completely without crunch.
Freezer (uncooked the best option): This is the most practical approach for making ahead in large quantities. Roll the spring rolls completely, place in a single layer on a parchment-lined tray, and freeze until solid about 1 hour. Transfer to a zip-lock bag and freeze for up to 4 weeks. Fry directly from frozen in oil heated to 175°C add 2 to 3 extra minutes to the frying time to ensure the filling is heated all the way through. Do not thaw before frying the wrapper becomes soggy when thawed and will not crisp properly.
Variations and Substitutions
- Schezwan Veg Spring Rolls: Add 1 to 2 tablespoons of schezwan sauce to the filling along with the other sauces. The garlic-chilli heat of the schezwan sauce transforms the filling into a boldly spiced, fiery version that is particularly popular as a party snack. Serve with extra schezwan sauce and a wedge of lime on the side.
- Paneer Spring Rolls: Crumble 100g of firm paneer into the stir-fried vegetable filling for the last 2 minutes of cooking, folding gently so the paneer stays in distinct crumbles rather than mashing into the vegetables. The paneer adds protein, a mild creamy note, and a slightly denser, more satisfying filling texture.
- Mushroom and Tofu Spring Rolls: Replace half the cabbage with finely sliced button mushrooms and add 100g of pressed, crumbled firm tofu. The mushrooms add an earthy depth and additional umami to the soy-seasoned filling. This version is particularly good with a drizzle of oyster sauce (use vegan oyster sauce to keep it completely plant-based) in the filling.
- Air Fryer Spring Rolls: Brush the rolled, uncooked spring rolls generously with neutral oil on all sides. Place in the air fryer basket in a single layer without touching. Air fry at 200°C (390°F) for 12 to 15 minutes, turning once at the halfway point. Spray with a little more oil before turning. The result is genuinely crispynot quite the same blistered, shattery texture as deep-fried, but very close and significantly lower in oil content.
- Baked Spring Rolls: Brush generously with oil on all sides. Bake on a wire rack at 220°C (430°F) for 18 to 20 minutes, turning once halfway. The wire rack is essential baking on a flat tray steams the bottom of the roll and prevents the underside from crisping. The baked version is the least oil-intensive but produces the mildest crunch of the three methods.
- Noodle-Free Version: Simply omit the hakka noodles from the filling. The roll will be slightly lighter and less dense but just as flavourful. Replace the noodle volume with additional finely shredded cabbage and julienned carrot to maintain the right filling quantity per wrapper.
Preparation Method
Start by preparing all the vegetables before any cooking begins this is a high-heat stir-fry recipe and everything moves fast once the wok is hot. Shred the cabbage as finely as possible, julienne the carrot, slice the capsicum, French beans, and spring onion whites into thin, even pieces. Boil the hakka noodles until just al dente (they will finish cooking in the wok), drain, rinse with cold water, toss with a teaspoon of oil to prevent sticking, and set aside. In a small bowl, mix the cornflour paste for sealing: 2 tablespoons of cornflour with 3 tablespoons of water, stirred until smooth. Set this beside your rolling station.
Heat a wok or wide pan on the highest heat for 2 full minutes until smoking. Add oil and the ginger-garlic immediately. Stir for 20 seconds, then add the onion and all the vegetables except the spring onion greens. Toss constantly on high heat for 3 to 4 minutes the vegetables should soften slightly but retain a distinct crunch. Add the soy sauce, chilli sauce, ketchup, vinegar, white pepper, and a pinch of sugar. Toss for 1 more minute. Add the noodles and spring onion greens. Toss for 30 seconds, then remove from heat. Stir in the sesame oil. Spread on a plate to cool completely 15 to 20 minutes uncovered.
Standard Operating Procedure (SOP)
For perfect, restaurant-quality veg spring rolls every single time, follow this sequence: prep all vegetables before heating the wok → high-heat stir-fry filling 3–4 minutes → add sauces → add noodles → add sesame oil off heat → spread on plate and cool completely (15–20 minutes, uncovered) → mix cornflour sealing paste → thaw wrappers and keep covered with damp towel → place filling in lower third of wrapper → fold bottom edge up firmly → fold sides in tightly → roll upward with tension → apply cornflour paste to top flap → press and seal firmly → place sealed-edge down on tray → rest 5–10 minutes before frying → deep fry at 180°C in small batches 3–4 at a time → 3–4 minutes until golden and blistered → drain on wire rack (not paper towels) → serve immediately with schezwan sauce. The five steps that most directly affect the final result are high heat for the filling, complete cooling before rolling, not overfilling, the cornflour seal, and correct oil temperature. These five together are what separate a crispy spring roll from a soggy one.
For party and catering batches of 30 or more spring rolls, prepare the filling up to 24 hours ahead and refrigerate. Roll the spring rolls the morning of the event and freeze flat on a tray. Fry directly from frozen in batches during the party they take 5 to 6 minutes from frozen compared to 3 to 4 minutes from fresh, and the texture is identical. Keep finished rolls on a wire rack in a 100°C oven rather than covered on a plate the wire rack allows air to circulate and keeps the underside from steaming soft while you complete the remaining batches. Never cover hot spring rolls the trapped steam destroys the crunch within minutes.
Garnish and Presentation
A well-plated spring roll presentation is clean, colourful, and confident. Arrange 3 to 4 spring rolls per serving on a flat plate, standing them upright at an angle against each other or laid diagonally across the plate. The cross- section of a spring roll cut diagonally in half the golden outer shell, the colourful vegetables visible inside is one of the most visually appetising cuts in the snack world. For individual plating, cut one spring roll diagonally and stand both halves upright so the filling is visible. This single presentation choice signals freshness, quality, and careful cooking more effectively than any garnish.
For garnish, keep it fresh and proportionate: a small mound of thinly sliced spring onion greens scattered over the top of the rolls, a few rings of fresh red chilli, a small bowl of schezwan sauce with a drizzle of sesame oil over its surface, and a wedge of lime on the side. The green and red garnish against the golden-brown wrapper is visually simple and immediately appealing. For a party platter, arrange the rolls in a neat row on a long wooden board, place two dipping bowls at either end, scatter spring onion greens along the full length of the board, and add a line of lime wedges down one side. It takes five minutes and looks like something from a proper restaurant.
Plating and Serving Tips
Serve veg spring rolls the moment they come off the heat and have had 30 seconds to drain. The window of perfect crunch is about 8 to 10 minutes after frying after that, moisture from the filling begins to migrate outward and the wrapper softens from the inside. For a dinner party, time your frying batches so the rolls hit the table while the conversation is still in full flow a spring roll that arrives at the table still crackling and steaming from the oil is an event in itself.
For a sharing platter, stand the rolls upright in a row with the diagonal cut facing outward so guests see the filling immediately. A small slate board or a dark plate makes the golden colour of the wrapper pop visually. Never stack hot spring rolls on top of each other the weight and the trapped steam between the layers softens the wrappers at the contact points within minutes. Always arrange in a single layer with space between each roll.
If you make this veg spring rolls recipe, I genuinely want to hear how they turned out did the filling stay dry, did the seal hold through frying, did you try the air fryer version or go for the full deep-fry? Leave a star rating below and drop a comment. Every note you leave helps other readers avoid the soggy wrapper problem and get that perfect shatter on the first bite. Save this to Pinterest now so it is always there for your next Diwali party, monsoon evening snack session, or any occasion where crispy, golden Indo-Chinese spring rolls are exactly the right answer!
Ingredients
- 2 cups (200g) cabbage, finely shredded
- 1 medium carrot (about 100g), peeled and julienned finely
- 4 garlic cloves, finely minced - 1 inch (2.5 cm) piece fresh ginger, finely grated
- ½ medium red capsicum, sliced into thin strips
- 1 medium green capsicum, sliced into thin strips
- 2 tablespoons neutral oil (for stir-frying sunflower or refined)
- 1 green chilli, finely minced (optional adjust to taste)
- ½ cup French beans, ends removed and sliced very finely on a diagonal
- 3 spring onions whites finely sliced, greens reserved for finishing
- 1 cup cooked hakka noodles
- 2 tablespoons dark soy sauce
- 1 tablespoon red chilli sauce (or schezwan sauce for the spicy version)
- 1 tablespoon tomato ketchup
- 1 tablespoon white vinegar
- ½ teaspoon white pepper powder
Nutritional Information
- Calories: 265 kcal
- Protein: 5g
- Carbohydrates: 32g
- Fat: 13g
- Fiber: 3g
- Sodium: 480mg
- Sugar: 4g
Directions
1. PREP ALL VEGETABLES BEFORE HEATING THE WOK
High-heat stir-frying moves very fast — have everything ready before the pan
goes on. Shred the cabbage as finely as possible. Julienne the carrot into
thin matchsticks. Slice the capsicum, French beans, and spring onion whites
into thin, even pieces. Keep the spring onion greens separate for adding
at the end. If using hakka noodles, boil to al dente in salted water,
drain completely, rinse under cold water, and toss with 1 teaspoon of oil.
Combine all the sauce mix ingredients in a small bowl and stir to combine.
Set everything within arm's reach of the stove — once the wok is hot, you
will not have time to measure or prepare.
2. MAKE THE SEALING PASTE
In a small bowl, stir 2 tablespoons of cornflour into 3 tablespoons of water
until completely smooth. The paste should be slightly thicker than water but
still pourable — if it feels very stiff, add a teaspoon more water. Set aside
at your rolling station.
3. THAW AND PREPARE THE WRAPPERS
If the spring roll sheets are frozen, thaw at room temperature for 30 to 45
minutes. Separate the stack carefully — they should peel apart cleanly once
fully thawed. Place the stack on a plate and cover with a lightly damp kitchen
towel. Wrappers dry out and crack at the edges within minutes when exposed
to air, so keep them covered until the moment each one is used.
4. STIR-FRY THE FILLING
Heat a wok or wide pan on the highest heat your stove can produce for 2 full
minutes until it is smoking hot. Add 2 tablespoons of neutral oil. It should
sizzle and shimmer immediately. Add the minced garlic, grated ginger, and
green chilli. Stir constantly for 20 seconds until fragrant — do not let
the garlic brown or burn. Add the spring onion whites and all the prepared
vegetables except the spring onion greens. Toss constantly on maximum heat
for 3 to 4 minutes. The vegetables should soften slightly at the edges but
retain a distinct crunch — they are not cooked through and soft at this stage.
You should hear a constant, vigorous sizzle throughout — if the sizzling
drops, increase the heat immediately.
5. ADD SAUCES, NOODLES, AND FINISH
Pour the combined sauce mix over the vegetables and toss immediately to coat
everything evenly. Cook for 1 more minute on high heat, still tossing.
Add the cooked hakka noodles and the spring onion greens. Toss together for
30 seconds until the noodles are coated in the sauce and evenly distributed
through the vegetables. Remove from heat. Stir in the sesame oil. Taste the
filling — it should be well-seasoned, slightly tangy, and smell intensely
of soy sauce and sesame. Adjust salt and pepper to taste.
6. COOL THE FILLING COMPLETELY
This step is non-negotiable. Transfer the filling to a wide, flat plate or
tray and spread it out in a thin layer. Leave it uncovered at room temperature
for 15 to 20 minutes. Do not cover it — the trapped steam will keep it warm
and moist. The filling must be completely at room temperature before rolling.
Touch it with your finger before starting — if it feels warm at all, give it
another 5 minutes. Warm filling equals wet wrapper equals burst rolls in the oil.
7. ROLL THE SPRING ROLLS
Work one wrapper at a time, keeping the rest covered with the damp towel.
Lay the wrapper on a flat, clean surface with one corner pointing toward you
(so it looks like a diamond, not a square). Place 2 heaped tablespoons of
the cooled filling horizontally across the lower third of the wrapper —
about 4 to 5 cm from the bottom corner. Spread the filling into a compact
rectangle, leaving about 2 cm of wrapper clear on both the left and right sides.
FOLD: Lift the bottom corner (the one pointing toward you) and fold it firmly
up and over the filling. Press down firmly to create a tightly wrapped base
with no air trapped underneath.
TUCK: Fold the left corner inward toward the centre, pressing firmly.
Fold the right corner inward toward the centre, pressing firmly.
You should now have a shape that looks like an open envelope with the filling
enclosed at the base.
ROLL: Roll the whole package upward away from you with steady, firm tension —
not loose, not so tight you tear the wrapper. Roll until you reach the top
corner with about 3 cm of wrapper remaining.
SEAL: Dip your fingertip or a pastry brush into the cornflour sealing paste
and apply a generous layer along the entire length of the final flap.
Roll the remaining flap firmly over the top and press along the entire sealed
edge for 5 full seconds. Place the spring roll sealed-edge down on a
parchment-lined tray. Repeat with the remaining wrappers and filling.
8. REST BEFORE FRYING
Leave the rolled spring rolls to rest on the tray for 5 to 10 minutes before
frying. The cornflour seal needs this time to bond properly. Frying immediately
before the seal has set is a common cause of rolls opening in the oil.
9. DEEP FRY
Pour neutral oil into a deep pan to a depth of 7 to 8 cm. Heat to 180°C
(356°F). Test with a bread cube — a small cube of bread dropped into the oil
should turn golden in exactly 30 seconds at the correct temperature.
Slide 3 to 4 spring rolls gently into the oil — never drop them.
Fry for 3 to 4 minutes, turning once at the halfway mark, until the wrappers
are a deep, even golden-brown and blistered across the surface.
Do not crowd the pan — too many rolls drops the oil temperature and produces
greasy, pale rolls. Remove with a slotted spoon or tongs and drain on a wire
rack (not kitchen paper — paper creates steam under the roll and softens the
base). Repeat with remaining rolls, checking and adjusting oil temperature
between batches.
10. GARNISH AND SERVE
Arrange the cooked spring rolls on a serving plate or board. Scatter thinly
sliced spring onion greens and a few red chilli rings over the top. Add a
wedge of lime and two dipping bowls — one with schezwan sauce, one with sweet
chilli sauce. For a cut presentation, diagonally cut one spring roll in half
and stand both pieces upright with the filling visible. Serve immediately
while the wrapper still shatters at the first bite.
Rate this Recipe
User Reviews
No reviews yet. Be the first to share your thoughts!